お知らせ:
FreeBSD (13.0) を VirtualBox にインストールする覚書
/
環境構築編
もありますよ
FreeBSD (12.1) を VirtualBox にインストールする覚書
/
環境構築編
もありますよ
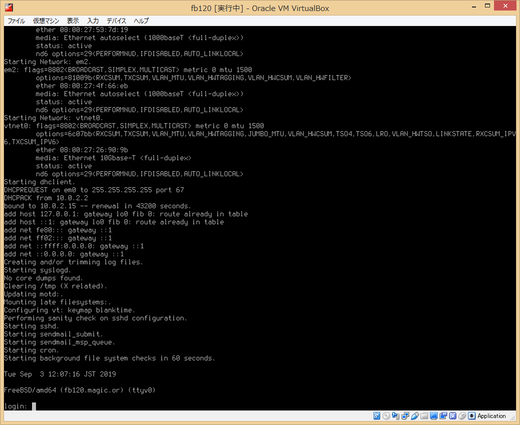
ターゲットの PC の「Oracle VM VirtualBox マネージャー」の画面で、「fb120」が選択された状態で『起動』押す!
無事に起動した。 ふー。
root でログイン。
ちなみに、ここで uname -a を実行した所、以下のようであった。
root@fb120:~ # uname -a
FreeBSD fb120.magic.or 12.0-RELEASE FreeBSD 12.0-RELEASE r341666 GENERIC  amd64
freebsd-update fetch を実行する。
ここで筆者の環境では都合により、環境変数 http_proxy の設定が必要であった。
(なおこれはインストール後も定期的に行った方が良いもの)
root@fb120:~ # freebsd-update fetch
Looking up update.FreeBSD.org mirrors... 3 mirrors found.
Fetching public key from update2.freebsd.org... done.
Fetching metadata signature for 12.0-RELEASE from update2.freebsd.org... done.
Fetching metadata index... done.
Fetching 2 metadata files... done.
Inspecting system... done.
Preparing to download files... done.
Fetching 1898 patches.....10....20....30....40....50....60....70....80....90....100....110....120....130....140....150....160...
.170....180....190....200....210....220....230....240....250....260....270....280....290....300....310....320....330....340....3
50....360....370....380....390....400....410....420....430....440....450....460....470....480....490....500....510....520....530
....540....550....560....570....580....590....600....610....620....630....640....650....660....670....680....690....700....710..
..720....730....740....750....760....770....780....790....800....810....820....830....840....850....860....870....880....890....
900....910....920....930....940....950....960....970....980....990....1000....1010....1020....1030....1040....1050....1060....10
70....1080....1090....1100....1110....1120....1130....1140....1150....1160....1170....1180....1190....1200....1210....1220....12
30....1240....1250....1260....1270....1280....1290....1300....1310....1320....1330....1340....1350....1360....1370....1380....13
90....1400....1410....1420....1430....1440....1450....1460....1470....1480....1490....1500....1510....1520....1530....1540....15
50....1560....1570....1580....1590....1600....1610....1620....1630....1640....1650....1660....1670....1680....1690....1700....17
10....1720....1730....1740....1750....1760....1770....1780....1790....1800....1810....1820....1830....1840....1850....1860....18
70....1880....1890.... done.
Applying patches... done.
Fetching 59 files... done.
〜
The following files will be removed as part of updating to 12.0-RELEASE-p10:
〜
The following files will be added as part of updating to 12.0-RELEASE-p10:
〜
The following files will be updated as part of updating to 12.0-RELEASE-p10:
〜
次に freebsd-update install を実行する。
root@fb120:~ # freebsd-update install
Installing updates... done.
今回 kernel に関係しそうな更新も見えており、ここで再起動してもよいし、作業を続けた後にまとめて再起動してもいいかもしれない。
自分は、作業時間の都合で、ここでシャットダウン・電源 OFF した。
(未だ VirtualBox guest
用ツールをインストールしていないので、ここでシャットダウンの代わりに、ホスト側をサスペンドなどすると、時計がずれたりしてしまう。)
root@fb120:~ # shutdown -p now再び起動し、(root でログインし) uname -a を実行した所、今度は以下のようであった。
root@fb120:~ # uname -a
FreeBSD fb120.magic.or 12.0-RELEASE-p10 FreeBSD 12.0-RELEASE-p10 GENERIC  amd64
root@fb120:~ # vi /etc/rc.conf以下を追記。 (上の方に似たような行があるのでそれをコピーすると入力の手間を省ける)
ifconfig_em1=""
ifconfig_em1_ipv6="inet6 accept_rtadv"
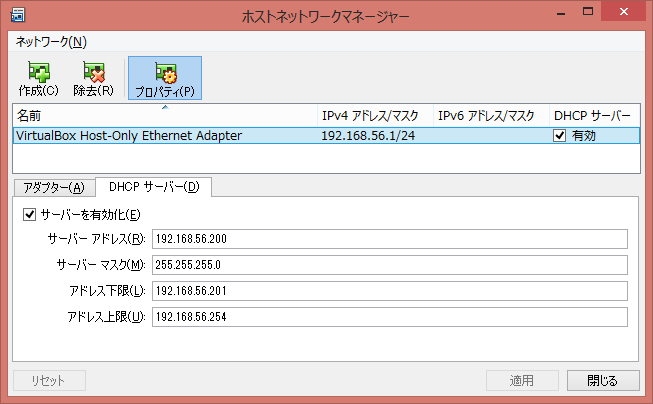
ifconfig_em2="inet 192.168.56.120 netmask 255.255.255.0"
ifconfig_em2_ipv6="inet6 accept_rtadv"
ここで、em2 に与えた 192.168.56.120 などという固定 IPv4 アドレスは、em2 には VirtualBox の DHCP サーバがいたが、そのアドレス範囲とは重複していない。
/tmp に何か存在していたので、以下のようにして全て削除しておいた。
root@fb120:~ # cd /tmp

root@fb120:/tmp # ls -lA
total 16
drwxrwxrwt  2 root  wheel  512 Sep  5 11:35 .ICE-unix
drwxrwxrwt  2 root  wheel  512 Sep  5 11:35 .X11-unix
drwxrwxrwt  2 root  wheel  512 Sep  5 11:35 .XIM-unix
drwxrwxrwt  2 root  wheel  512 Sep  5 11:35 .font-unix

root@fb120:/tmp # rmdir .*-unix

root@fb120:/tmp # ls -lA
total 0
/etc/rc.conf に追記するために、まずは以下のようにする。
root@fb120:/ # egrep ^tmp /etc/defaults/rc.conf >> /etc/rc.conf
(「>>」で追記する。 くれぐれも間違って「>」で上書きしないように注意する。)
次に
root@fb120:/ # vi /etc/rc.conf追記した部分が以下などのようになるように編集。
tmpmfs="YES"		# Set to YES to always create an mfs /tmp, NO to never
tmpsize="512m"		# Size of mfs /tmp if created
(上記ではメモリーサイズ 4GB に合わせてこれくらいに設定している。 自分は昔からメモリーサイズの 8分の1 に設定している。)
作業時間の都合で、ここでシャットダウン・電源 OFF した。
再び起動すると、以下のように IP アドレスが割り当たっていた (vtnet0 は未割り当て)
root@fb120:~ # ifconfig
em0: flags=8843<UP,BROADCAST,RUNNING,SIMPLEX,MULTICAST> metric 0 mtu 1500
	options=81009b<RXCSUM,TXCSUM,VLAN_MTU,VLAN_HWTAGGING,VLAN_HWCSUM,VLAN_HWFILTER>
	ether 08:00:27:d6:f6:d6
	inet6 fe80::a00:27ff:fed6:f6d6%em0 prefixlen 64 scopeid 0x1
	inet 10.0.2.15 netmask 0xffffff00 broadcast 10.0.2.255
	media: Ethernet autoselect (1000baseT <full-duplex>)
	status: active
	nd6 options=23<PERFORMNUD,ACCEPT_RTADV,AUTO_LINKLOCAL>
em1: flags=8843<UP,BROADCAST,RUNNING,SIMPLEX,MULTICAST> metric 0 mtu 1500
	options=81009b<RXCSUM,TXCSUM,VLAN_MTU,VLAN_HWTAGGING,VLAN_HWCSUM,VLAN_HWFILTER>
	ether 08:00:27:53:7d:19
	inet6 fe80::a00:27ff:fe53:7d19%em1 prefixlen 64 scopeid 0x2
	media: Ethernet autoselect (1000baseT <full-duplex>)
	status: active
	nd6 options=23<PERFORMNUD,ACCEPT_RTADV,AUTO_LINKLOCAL>
em2: flags=8843<UP,BROADCAST,RUNNING,SIMPLEX,MULTICAST> metric 0 mtu 1500
	options=81009b<RXCSUM,TXCSUM,VLAN_MTU,VLAN_HWTAGGING,VLAN_HWCSUM,VLAN_HWFILTER>
	ether 08:00:27:4f:66:eb
	inet 192.168.56.120 netmask 0xffffff00 broadcast 192.168.56.255
	inet6 fe80::a00:27ff:fe4f:66eb%em2 prefixlen 64 scopeid 0x3
	media: Ethernet autoselect (1000baseT <full-duplex>)
	status: active
	nd6 options=23<PERFORMNUD,ACCEPT_RTADV,AUTO_LINKLOCAL>
vtnet0: flags=8802<BROADCAST,SIMPLEX,MULTICAST> metric 0 mtu 1500
	options=6c07bb<RXCSUM,TXCSUM,VLAN_MTU,VLAN_HWTAGGING,JUMBO_MTU,VLAN_HWCSUM,TSO4,TSO6,LRO,VLAN_HWTSO,LINKSTATE,RXCSUM_IPV6,TXCSUM_IPV6>
	ether 08:00:27:26:90:9b
	media: Ethernet 10Gbase-T <full-duplex>
	status: active
	nd6 options=29<PERFORMNUD,IFDISABLED,AUTO_LINKLOCAL>
lo0: flags=8049<UP,LOOPBACK,RUNNING,MULTICAST> metric 0 mtu 16384
	options=680003<RXCSUM,TXCSUM,LINKSTATE,RXCSUM_IPV6,TXCSUM_IPV6>
	inet6 ::1 prefixlen 128
	inet6 fe80::1%lo0 prefixlen 64 scopeid 0x5
	inet 127.0.0.1 netmask 0xff000000
	groups: lo
	nd6 options=21<PERFORMNUD,AUTO_LINKLOCAL>
また /tmp が正しく Memory Disk になっていた。
root@fb120:~ # df -h
Filesystem     Size    Used   Avail Capacity  Mounted on
/dev/ada0p2    4.8G    3.0G    1.5G    67%    /
devfs          1.0K    1.0K      0B   100%    /dev
/dev/ada0p4    2.9G    541M    2.1G    20%    /var
tmpfs          512M    4.0K    512M     0%    /tmp

root@fb120:~ # ls -al /tmp
total 4
drwxrwxrwt   6 root  wheel   256 Sep  6 09:38 .
drwxr-xr-x  19 root  wheel  1024 Sep  6 09:38 ..
drwxrwxrwt   2 root  wheel     0 Sep  6 09:38 .ICE-unix
drwxrwxrwt   2 root  wheel     0 Sep  6 09:38 .X11-unix
drwxrwxrwt   2 root  wheel     0 Sep  6 09:38 .XIM-unix
drwxrwxrwt   2 root  wheel     0 Sep  6 09:38 .font-unix
自分は ports で行くが、普通の人は代わりにバイナリパッケージを pkg コマンドでインストールした方が圧倒的に楽だと思います。 ただしその詳細はここでは触れません。 あしからず。
それでも簡単にいうと、pkg search 〜 でパッケージ名を探し、(sudo) pkg install 〜 でパッケージをインストールする感じ。
なお最初に「pkg」コマンドを実行すると、最初に pkg コマンド自体のインストールを尋ねられるので、y を押してインストールする。
まず portsnap fetch を実行する。
root@fb120:~ # portsnap fetch
Looking up portsnap.FreeBSD.org mirrors... 6 mirrors found.
Fetching public key from ec2-ap-northeast-1.portsnap.freebsd.org... done.
Fetching snapshot tag from ec2-ap-northeast-1.portsnap.freebsd.org... done.
Fetching snapshot metadata... done.
Fetching snapshot generated at Fri Sep  6 09:12:45 JST 2019:
〜
Extracting snapshot... done.
Verifying snapshot integrity... done.
Fetching snapshot tag from ec2-ap-northeast-1.portsnap.freebsd.org... done.
Latest snapshot on server matches what we already have.
No updates needed.
次に、初回なので portsnap extract を実行する。
root@fb120:~ # ls /usr
bin	home	include	lib	lib32	libdata	libexec	local	obj	sbin	share	src	tests

root@fb120:~ # portsnap extract
〜

root@fb120:~ # cd /usr

root@fb120:/usr # ls -ld ports
drwxr-xr-x  69 root  wheel  1536 Sep  6 10:07 ports
順番が逆になってしまった。 先にこっちをやるべきだった。
まずは、/usr/ports と、/usr/local を、ZFS 上に置くことにする。
root@fb120:/usr # df -h
Filesystem     Size    Used   Avail Capacity  Mounted on
/dev/ada0p2    4.8G    3.9G    552M    88%    /
devfs          1.0K    1.0K      0B   100%    /dev
/dev/ada0p4    2.9G    706M    2.0G    26%    /var
tmpfs          512M    4.0K    512M     0%    /tmp

root@fb120:/usr # gpart show
=>      40  62914480  ada0  GPT  (30G)
        40    409600     1  efi  (200M)
    409640  10485760     2  freebsd-ufs  (5.0G)
  10895400   8388608     3  freebsd-swap  (4.0G)
  19284008   6291456     4  freebsd-ufs  (3.0G)
  25575464  37339056     5  freebsd-zfs  (18G)
上記に見えるように、ZFS 用に用意したパーティションが ada0p5 であることを確認した。
zpool create を実行する。 プール名は「zfs」としておいた
root@fb120:/usr # zpool create zfs ada0p5ここで、以下のようなものが (コンソールに) 表示された。 (後から dmesg コマンドで確認することも出来る)
ZFS NOTICE: Prefetch is disabled by default if less than 4GB of RAM is present;
            to enable, add "vfs.zfs.prefetch_disable=0" to /boot/loader.conf.
ZFS filesystem version: 5
ZFS storage pool version: features support (5000)
後半の 2行はよいのだが、前半は、後で調整することにする。
次に zfs create で、/usr/ports 用と
/usr/local 用のファイルシステムを作成する。
また zfs set で compression=lz4 (圧縮) を指定しておく。
root@fb120:/usr # zfs create zfs/ports

root@fb120:/usr # zfs set compression=lz4 zfs/ports

root@fb120:/usr # zfs create zfs/local

root@fb120:/usr # zfs set compression=lz4 zfs/local

root@fb120:/usr # df -h
Filesystem     Size    Used   Avail Capacity  Mounted on
/dev/ada0p2    4.8G    3.9G    552M    88%    /
devfs          1.0K    1.0K      0B   100%    /dev
/dev/ada0p4    2.9G    706M    2.0G    26%    /var
tmpfs          512M    4.0K    512M     0%    /tmp
zfs             17G     23K     17G     0%    /zfs
zfs/ports       17G     23K     17G     0%    /zfs/ports
zfs/local       17G     23K     17G     0%    /zfs/local
起動時に ZFS が自動的にマウントされるように、/etc/rc.conf に設定しておく。
root@fb120:/usr # egrep zfs_enable /etc/defaults/rc.conf >> /etc/rc.conf

root@fb120:/usr # vi /etc/rc.conf
/etc/rc.conf の追加行が以下のようになるように編集する。
zfs_enable="YES" # Set to YES to automatically mount ZFS file systems
/usr/local が zfs を向くようにする。
zfs set 時に -o mountpoint=〜 でマウントポイントを指定する方法もあるのだが、もし zfs import したくなったときにややこしくなるので、何らかの理由でそうする必要がない限り、自分はあまり好みではないのだが、以降を参照。
root@fb120:/usr # rmdir local

root@fb120:/usr # ln -s /zfs/local
/usr/ports も zfs を向けるようにするのだが、(作業の順番を間違えたので) 先に内容をコピーしないといけない。
root@fb120:/usr # cd ports

root@fb120:/usr/ports # ls -A
.arcconfig	Keywords	arabic		databases	graphics	multimedia	russian		x11-drivers
.gitattributes	LEGAL		archivers	deskutils	hebrew		net		science		x11-fm
.gitauthors	MOVED		astro		devel		hungarian	net-im		security	x11-fonts
.gitignore	Makefile	audio		dns		irc		net-mgmt	shells		x11-servers
.gitmessage	Mk		base		editors		japanese	net-p2p		sysutils	x11-themes
.portsnap.INDEX	README		benchmarks	emulators	java		news		textproc	x11-toolkits
CHANGES		Templates	biology		finance		korean		palm		ukrainian	x11-wm
CONTRIBUTING.md	Tools		cad		french		lang		polish		vietnamese
COPYRIGHT	UIDs		chinese		ftp		mail		ports-mgmt	www
GIDs		UPDATING	comms		games		math		portuguese	x11
INDEX-12	accessibility	converters	german		misc		print		x11-clocks

root@fb120:/usr/ports # pax -rw . /zfs/ports/

root@fb120:/usr/ports # ls -A /zfs/ports/
.arcconfig	Keywords	arabic		databases	graphics	multimedia	russian		x11-drivers
.gitattributes	LEGAL		archivers	deskutils	hebrew		net		science		x11-fm
.gitauthors	MOVED		astro		devel		hungarian	net-im		security	x11-fonts
.gitignore	Makefile	audio		dns		irc		net-mgmt	shells		x11-servers
.gitmessage	Mk		base		editors		japanese	net-p2p		sysutils	x11-themes
.portsnap.INDEX	README		benchmarks	emulators	java		news		textproc	x11-toolkits
CHANGES		Templates	biology		finance		korean		palm		ukrainian	x11-wm
CONTRIBUTING.md	Tools		cad		french		lang		polish		vietnamese
COPYRIGHT	UIDs		chinese		ftp		mail		ports-mgmt	www
GIDs		UPDATING	comms		games		math		portuguese	x11
INDEX-12	accessibility	converters	german		misc		print		x11-clocks

root@fb120:/usr/ports # cd /usr

root@fb120:/usr # rm -fr ports

root@fb120:/usr # ln -s /zfs/ports

root@fb120:/usr # ls -ld /zfs/ports
drwxr-xr-x  69 root  wheel  86 Sep  6 10:07 /zfs/ports

root@fb120:/usr # chown nsmrtks /zfs/ports

root@fb120:/usr # ls -ld /zfs/ports
drwxr-xr-x  69 nsmrtks  wheel  86 Sep  6 10:07 /zfs/ports
先に zfs set したとおり、ファイルシステムは圧縮されており、
root@fb120:/usr # zfs get compression
NAME       PROPERTY     VALUE     SOURCE
zfs        compression  off       default
zfs/local  compression  lz4       local
zfs/ports  compression  lz4       local
以下のように圧縮率が得られた。
root@fb120:/usr # zfs get compressratio
NAME       PROPERTY       VALUE  SOURCE
zfs        compressratio  2.51x  -
zfs/local  compressratio  1.00x  -
zfs/ports  compressratio  2.51x  -
ここで作業時間の都合により一旦シャットダウン・電源 OFF した。
再び起動すると、ZFS が自動的にマウントされるが、やはり先ほどのように ZFS NOTICE: Prefetch is disabled by default if less than 4GB of RAM is present; 〜 のメッセージが出る。
筆者は少なくとも最低限必要推奨なメモリを確保の上 prefetch
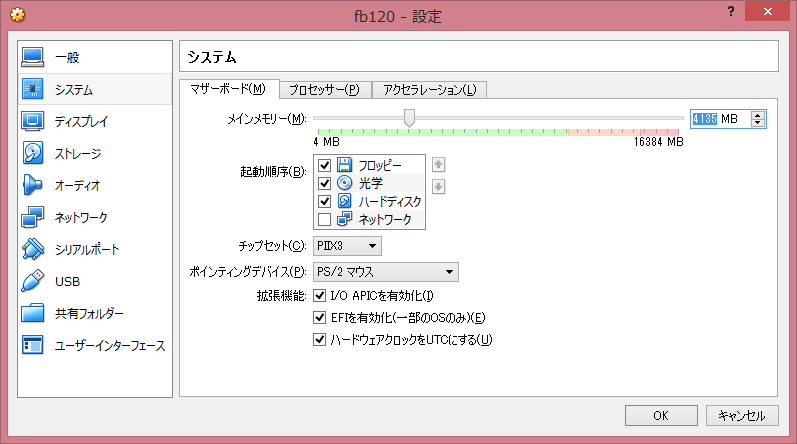
を有効にしたいので、VirtualBox で割り当てるメモリーサイズを増やすことにする。
シャットダウン・電源 OFF し、VirtualBox
の設定でメモリーサイズを増やすのだが、かといってホスト側の負担も考えてあまりこれ以上増やしたくないというのもあるので、1MB
単位で変えられるようなので、面倒だがメモリーサイズを少し変えては起動そしてシャットダウン・電源 OFF
を繰り返し、先ほどのメッセージが出なくなるギリギリに調整する。
今回の場合、そのサイズは 4135MB であった。
(FreeBSD のバージョンが上がるたびに微増する傾向がある。
11.2 の頃は 4131MB でいけていた。)
先ほどの手順で ports をインストールしたので、とりあえず普通にビルド・インストールする。
(繰り返しになるが普通の人は代わりにバイナリパッケージを pkg install sudo でインストールすればいいと思います。 以下同様。 なお後述の teetime も参考)
root@fb120:~ # cd /usr/ports/security/sudo

root@fb120:/usr/ports/security/sudo # ls
Makefile	distinfo	files		pkg-descr	pkg-plist

root@fb120:/usr/ports/security/sudo # nice make install |& tee install.log
たまにダイアログが出てきて、オプションを選べるので、もしデフォルトから変えたければ設定する。 (ただし経験上、あまりデフォルトから変えると、ビルドに失敗することもあった。)
結果、無事ビルド・インストール出来た。
次に sudoers ファイル (実体は /usr/local/etc/sudoers にある) を visudo で編集する。
root@fb120:/usr/ports/security/sudo # cd

root@fb120:~ # visudo
このとき、オリジナルと同一の /usr/local/etc/sudoers.dist というファイルも元から横に置かれているので、わざわざ自分でコピーを取っておかなくても変更点を比較できる。
筆者の環境では以下のように変更を行った。
diff で示すと以下のようである。
root@fb120:~ # diff -u /usr/local/etc/sudoers.dist /usr/local/etc/sudoers
--- /usr/local/etc/sudoers.dist	2019-09-09 12:21:57.484772000 +0900
+++ /usr/local/etc/sudoers	2019-09-09 17:59:48.294881000 +0900
@@ -49,7 +49,9 @@
 ## Run X applications through sudo; HOME is used to find the
 ## .Xauthority file.  Note that other programs use HOME to find
 ## configuration files and this may lead to privilege escalation!
-# Defaults env_keep += "HOME"
+Defaults env_keep += "HOME"
+# 2019-09-09 nsmrtks
+
 ##
 ## X11 resource path settings
 # Defaults env_keep += "XAPPLRESDIR XFILESEARCHPATH XUSERFILESEARCHPATH"
@@ -77,6 +79,9 @@
 # Defaults!/usr/local/bin/sudoreplay !log_output
 # Defaults!REBOOT !log_output

+# 2019-09-09 nsmrtks
+Defaults env_keep += "http_proxy https_proxy"
+
 ##
 ## Runas alias specification
 ##
@@ -87,7 +92,8 @@
 root ALL=(ALL) ALL

 ## Uncomment to allow members of group wheel to execute any command
-# %wheel ALL=(ALL) ALL
+%wheel ALL=(ALL) ALL
+# 2019-09-09 nsmrtks

 ## Same thing without a password
 # %wheel ALL=(ALL) NOPASSWD: ALL
これで、wheel グループに所属している一般ユーザ nsmrtks は、sudo が実行できるようになった。
nsmrtks@fb120:~ % sudo pwd

We trust you have received the usual lecture from the local System
Administrator. It usually boils down to these three things:

    #1) Respect the privacy of others.
    #2) Think before you type.
    #3) With great power comes great responsibility.

Password:パスワード↵
/usr/home/nsmrtks
これは全く筆者の都合によるものだが、ここで使用する物理キーボードが、日本語配列から、US 配列に変更になった。
そのままだと VirtualBox の FreeBSD
コンソールの操作に不都合が生じたので、/etc/rc.conf にあった keymap="jp.kbd"
の行をコメントアウトし、再起動した。
#keymap="jp.kbd"これは筆者の環境だけかもしれない。
筆者は、/usr/ports/distfiles
(ports でビルドを行う時に取得してきたファイルが置かれる場所) を、VirtualBox
の仮想ディスクごと分離している。
(サイズは 16GB)
そして、旧環境から新環境へ移行する際には、(内容を残したまま)
マウントを付け替えることにしている。
今回まさに旧環境から新環境へ移行する。
まず旧環境にて、distfiles の仮想ディスクを umount し、/etc/fstab 及び /etc/exports (後述) のエントリもコメントアウトした。
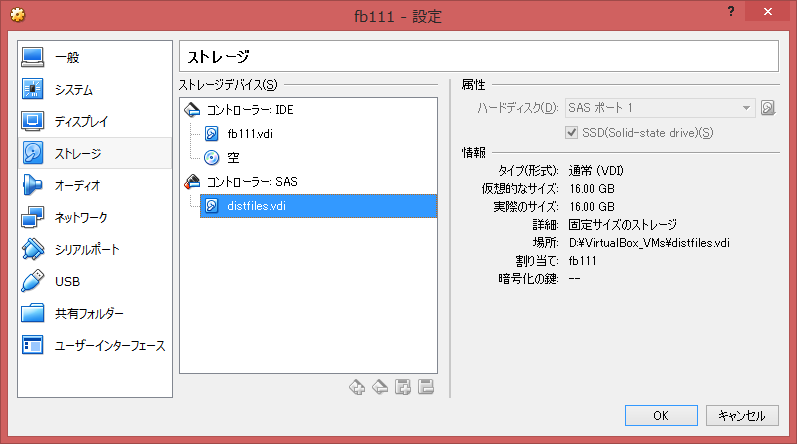
VirtualBox にて、旧環境の distfiles の仮想ディスクは、以下に見えている、「コントローラー: SAS」配下にある distfiles.vdi である。
いったん旧環境をシャットダウン・電源 OFF する。
新環境 (fb120) もシャットダウン・電源 OFF する。
次に、先ほどの distfiles.vdi を右クリックして、「割り当てを除去」を選択する。
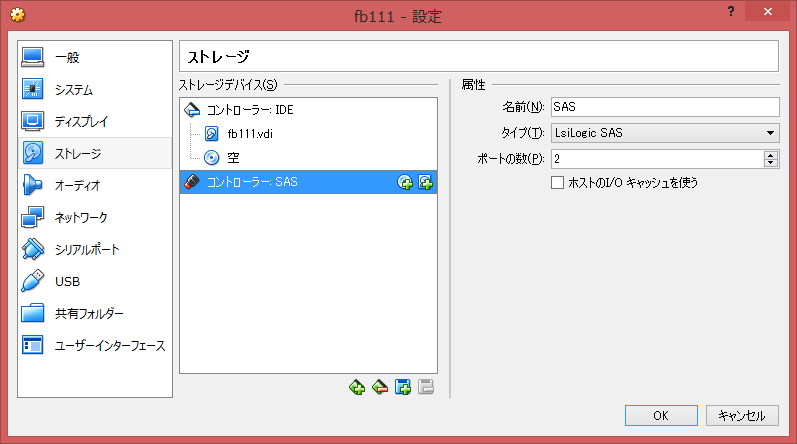
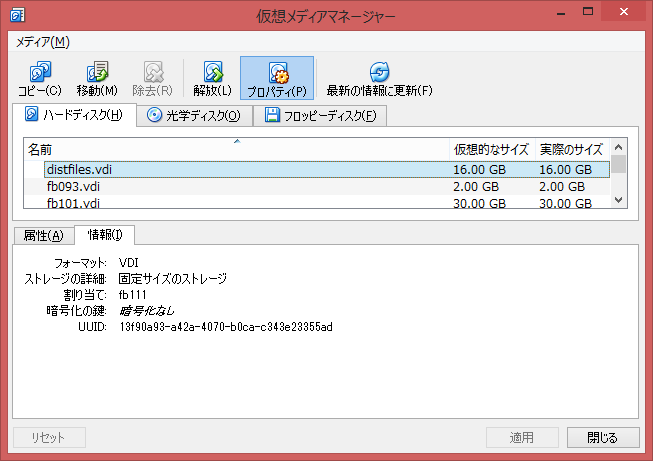
割り当ては除去されたが、仮想ディスク自体は、以下のように仮想メディアマネージャーを見ても分かる通り、残っている。
ところが、「プロパティ」を表示させ、「情報」の「割り当て」の所を見ると、旧環境 (fb111)
に割り当たったままになっている。
後述するが、後で手順をやり直す羽目になった..
今度は、新環境 (fb120) のストレージの設定にて、以下のようになっているが..
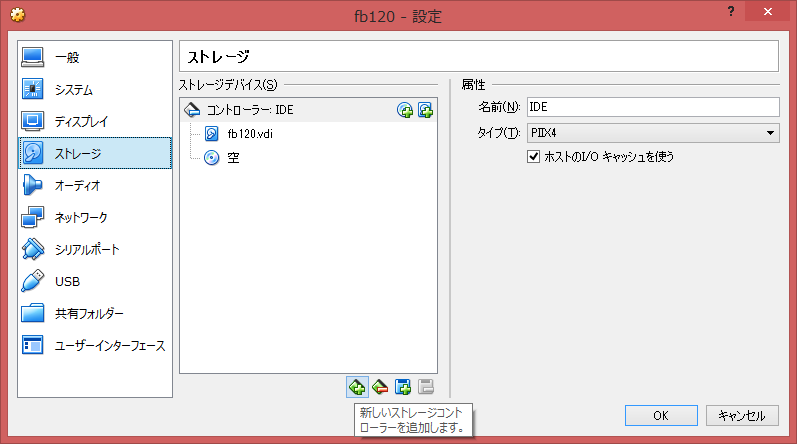
下の方の「◆」に「+」のアイコンを押し、「SAS コントローラーの追加」を選択する。 (SAS でなくてもよいが深い理由はない)
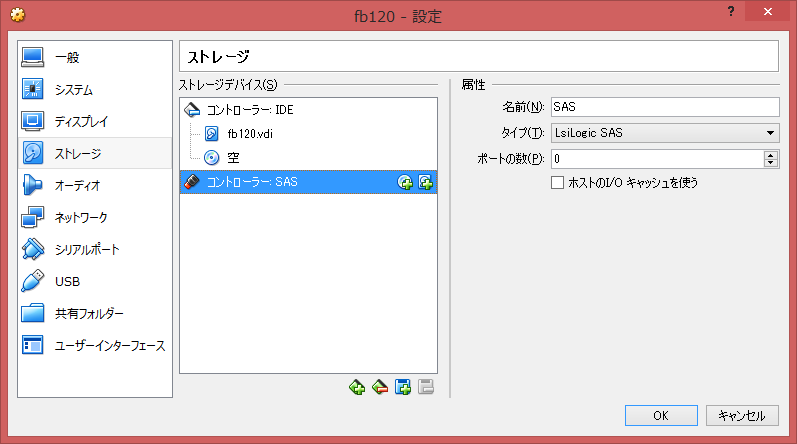
「コントローラー: SAS」が追加された。
さらに、「コントローラー: SAS」を選択すると右側に出る「■」に「+」(「ハードディスクの追加」) か、あるいは下の方の「■」に「+」を押して「ハードディスクを追加」を選択し..
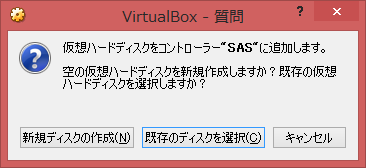
「既存のディスクを選択」を押したら、distfiles.vdi ファイルを選択する。
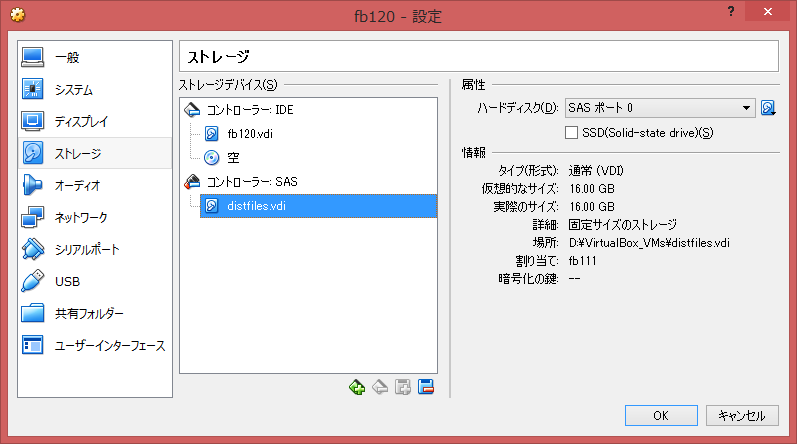
忘れずに「OK」押す。
..これでいけたと思ったが、再び「仮想メディアマネージャー」を見ると、distfiles.vdi が、旧環境 (fb111) と、新環境 (fb120) の、両方に割り当たっているという、気持ち悪い状態になってしまった。
そこで、仮想メディアマネージャーにて、(distfiles.vdi を選択した状態で) 「解放」を押してみると..
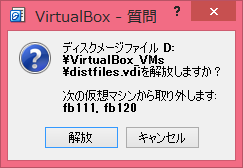
..ダイアログが出るので「解放」を押すと..
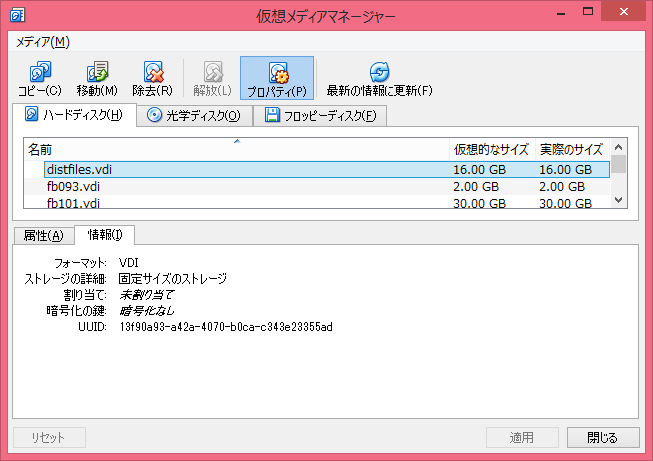
何の警告もなく、distfiles.vdi が「未割り当て」になった。!?
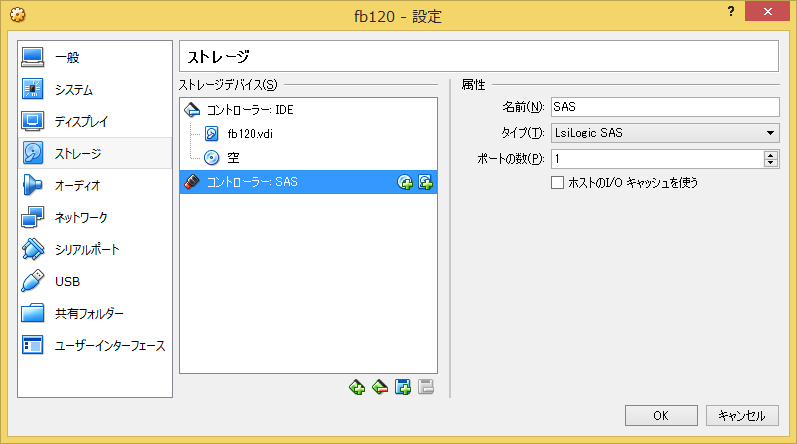
先ほど新環境 (fb120) の SAS に追加した distfiles.vdi が再びなくなってしまった。
再度、仮想ハードディスクを追加する手順をやり直した..
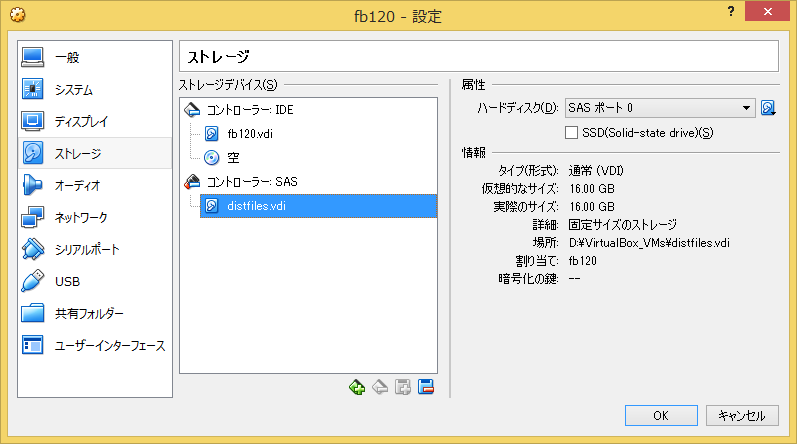
遠回りしたが、あらためて「仮想メディアマネージャー」で見ても、これで正常になった。
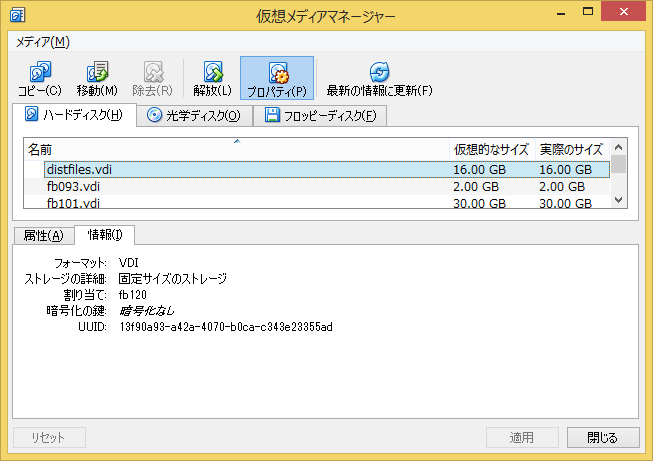
もしかして、旧環境で実行した「割り当てを除去」の手順も必要なくて、いきなり仮想メディアマネージャから「解放」すればよかったのかもしれない。
さて、新環境 (fb120) を再び起動する。
追加した仮想ハードディスクは以下のように見えている。
(起動時に表示される他 dmesg コマンドでも後から確認できる)
〜
da0 at mpt0 bus 0 scbus2 target 0 lun 0
da0: <VBOX HARDDISK 1.0> Fixed Direct Access SPC-3 SCSI device
da0: 300.000MB/s transfers
da0: Command Queueing enabled
da0: 16384MB (33554432 512 byte sectors)
〜
今回は、(ルートディレクトリ直下の) /distfiles
というディレクトリにマウントすることとし、/usr/ports/distfiles
からシンボリックリンクを張ることとする。
(なぜ /usr/ports/distfiles に直接マウントしないかというと、後述の
NFS を設定したときにディレクトリ名が長くなってしまうからというしょうもない?
理由である。)
ディレクトリの作成やシンボリックリンクの作成と、/etc/fstab の編集を行う。
nsmrtks@fb120:~ % sudo mkdir /distfiles
〜

nsmrtks@fb120:~ % sudo chown nsmrtks /distfiles

nsmrtks@fb120:~ % gpart show da0
=>      40  33554352  da0  GPT  (16G)
        40  33554352    1  freebsd-ufs  (16G)

nsmrtks@fb120:~ % sudoedit /etc/fstab
以下の行を /etc/fstab に追記した。
# 2019-09-13 nsmrtks
/dev/da0p1	/distfiles	ufs	rw	2	2
さらに作業を続ける..
これも作業の順番を間違えてしまったが、sudo をビルドしたときに
/usr/ports/distfiles
にいくつかファイルが取得されてしまったのでその移動も行っている。
nsmrtks@fb120:~ % cd /usr/ports/

nsmrtks@fb120:/usr/ports % mv -i distfiles distfiles.bak

nsmrtks@fb120:/usr/ports % ln -s /distfiles

nsmrtks@fb120:/usr/ports % sudo mount /distfiles

nsmrtks@fb120:/usr/ports % sudo chown nsmrtks distfiles.bak

nsmrtks@fb120:/usr/ports % sudo chown nsmrtks distfiles.bak/*

nsmrtks@fb120:/usr/ports % mv -i distfiles.bak/* distfiles/
overwrite distfiles/dialog4ports-0.1.6.tar.gz? (y/n [n]) y↵
overwrite distfiles/freebsd-pkg-1.11.1_GH0.tar.gz? (y/n [n]) y↵
overwrite distfiles/gettext-0.20.1.tar.xz? (y/n [n]) y↵
overwrite distfiles/sudo-1.8.27.tar.gz? (y/n [n]) y↵

nsmrtks@fb120:/usr/ports % rmdir distfiles.bak

nsmrtks@fb120:/usr/ports % df -h
Filesystem     Size    Used   Avail Capacity  Mounted on
/dev/ada0p2    4.8G    3.0G    1.5G    67%    /
devfs          1.0K    1.0K      0B   100%    /dev
/dev/ada0p4    2.9G    707M    2.0G    26%    /var
zfs             17G     23K     17G     0%    /zfs
zfs/local       17G     19M     17G     0%    /zfs/local
zfs/ports       17G    363M     17G     2%    /zfs/ports
tmpfs          512M    4.0K    512M     0%    /tmp
/dev/da0p1      15G     12G    1.9G    87%    /distfiles

nsmrtks@fb120:/usr/ports % ls -ld /usr/ports/distfiles
lrwxr-xr-x  1 nsmrtks  wheel  10 Sep 13 11:59 /usr/ports/distfiles -> /distfiles
これも、必要なのは筆者の環境だけかもしれない。
筆者は、新環境 (すなわち今インストール中のこの環境「fb120」) を立ち上げてからも、引き継ぎのためやバックアップのために、旧環境もしばらく残して運用することにしており、その際、ホームディレクトリや /usr/ports/distfiles (前述) を旧環境から新環境に移動して切り替え、旧環境からは NFS でそのまま参照するようにしている。
NFS というと、どのディレクトリをエクスポートするかという設定が必要だが、/etc/exports ファイルと、ZFS の sharenfs の二段構えで行くことにする。
また、そのために、/etc/hosts への追記を行う。
そこでまずは /etc/hosts を編集する。
ここで、同じホスト上の VirtualBox
の仮想マシンどうしは、「ホストオンリーアダプター」を通して通信できる。
それは、
仮想マシンの作成
時に「アダプター3」として割り当てており、FreeBSD
からは em2 として見えている。
nsmrtks@fb120:~ % ifconfig em2
em2: flags=8843<UP,BROADCAST,RUNNING,SIMPLEX,MULTICAST> metric 0 mtu 1500
	options=81009b<RXCSUM,TXCSUM,VLAN_MTU,VLAN_HWTAGGING,VLAN_HWCSUM,VLAN_HWFILTER>
	ether 08:00:27:4f:66:eb
	inet 192.168.56.120 netmask 0xffffff00 broadcast 192.168.56.255
	inet6 fe80::a00:27ff:fe4f:66eb%em2 prefixlen 64 scopeid 0x3
	media: Ethernet autoselect (1000baseT <full-duplex>)
	status: active
	nd6 options=23<PERFORMNUD,ACCEPT_RTADV,AUTO_LINKLOCAL>
/etc/hosts には、この
IP アドレスを書いておけば、仮想マシンどうしがホスト名で通信できる。
前置きが長くなったが、筆者の環境では /etc/hosts に以下を追記した。
#
# 2019-09-17 nsmrtks
fe80::a00:27ff:fe4f:66eb%em2		fb120.magic.or	fb120	fb120v6	fb120c
# 2017-09-27 nsmrtks
fe80::a00:27ff:fea3:3469%em2		fb111.magic.or	fb111	fb111v6	fb111c
# 2016-05-22 nsmrtks
fe80::a00:27ff:fed2:1b07%em2		fb103.magic.or	fb103	fb103v6	fb103c
# 2016-05-08 nsmrtks
fe80::a00:27ff:fe1f:3f4e%em2		fb101.magic.or	fb101	fb101v6	fb101c
# 2016-05-22 nsmrtks
fe80::a00:27ff:fe07:b6d8%em2		fb093.magic.or	fb093	fb093v6	fb093c
192.168.56.93							fb093v4
ここで、IPv6 アドレスを使用している。
FreeBSD の NFS は IPv6 で通信可能である。
(fb093v4 というホスト名のみ IPv4 アドレスになっている)
また、各 IPv6 アドレスに %em2 が付いているが、これは
IPv6 のリンクローカルアドレスを使用している。
一応これで通信可能で、また /etc/hosts もこの書式を受け付ける。
自ホスト fb120 等も記述しておいた。
旧環境が立ち上がっていれば ping6 できる。
nsmrtks@fb120:~ % ping6 fb111c
PING6(56=40+8+8 bytes) fe80::a00:27ff:fe4f:66eb%em2 --> fe80::a00:27ff:fea3:3469%em2
16 bytes from fe80::a00:27ff:fea3:3469%em2, icmp_seq=0 hlim=64 time=0.452 ms
16 bytes from fe80::a00:27ff:fea3:3469%em2, icmp_seq=1 hlim=64 time=0.990 ms
^C
--- fb111.magic.or ping6 statistics ---
2 packets transmitted, 2 packets received, 0.0% packet loss
round-trip min/avg/max/std-dev = 0.452/0.721/0.9912/01(日).269 ms
NFS の話に戻って、まず /etc/exports に以下のように記述することにする。
# 2019-09-18 nsmrtks

V4: /zfs

/distfiles	fb111c fb103c fb101c fb093c

# EoF
先に /distfiles の方の行について述べると、これは /distfiles ディレクトリをホスト fb111c fb103c fb101c fb093c に export している。
V4: /zfs という行について、これは NFSv4 を使用している。
/zfs というディレクトリを NFSv4 tree root にするという指定になっている。
そして /zfs については、ZFS の
sharenfs の指定と組み合わせて設定することにする。
ZFS の sharenfs の設定が未だだが、先に
NFS サーバを立ち上げる設定をしてみる。
それには、以下のように実行して..
(繰り返しになるが、「>>」で追記するのであり、
くれぐれも間違って「>」で上書きしないように注意する。)
nsmrtks@fb120:~ % sudo -i
〜

root@fb120:~ # egrep ^nfs /etc/defaults/rc.conf >> /etc/rc.conf

root@fb120:~ # exit
logout

nsmrtks@fb120:~ % sudoedit /etc/rc.conf
/etc/rc.conf に以下のように追記されるように編集した。
# 2019-09-18 nsmrtks
nfs_server_enable="YES"			# This host is an NFS server (or NO).
nfsv4_server_enable="YES"		# Enable support for NFSv4
nfsuserd_enable="YES"			# NFSv4 user/group name mapping daemon
nfsuserd_flags="-domain magic.or"	# Flags for nfsuserd
ここで筆者の環境では nfsuserd_flags に -domain オプションで「magic.or」という名前を設定した。 これはサーバ側(すなわちこのホスト)とクライアント側で合わせる必要がある。
この段階で、NFS サーバを立ち上げてみる。 (最初の cd / は不要かもしれない)
nsmrtks@fb120:~ % cd /

nsmrtks@fb120:/ % sudo /etc/rc.d/nfsd start
〜
Starting nfsd.

nsmrtks@fb120:/ % showmount -e
Exports list on localhost:

nsmrtks@fb120:/ % sudo killall -HUP mountd

nsmrtks@fb120:/ % showmount -e
Exports list on localhost:
/distfiles                         fb111.magic.or fb103.magic.or fb101.magic.or fb093.magic.or
/etc/rc.d/nfsd start した直後だと、showmount -e で何も現れなかったが、mountd
に HUP シグナルを送ることにより、エクスポートされ showmount -e で
/distfiles の行が表示されるようになった。
(あるいは再起動してもよかっただろう)
この段階で、ホスト fb111c や fb103c 等から、ホスト fb120c の
/distfiles が NFS マウントできるようになるだろう..
たとえば fb111 (fb111c) については、fb120c を /etc/hosts
に追加し、/etc/fstab を以下のように書き換えて
(先頭の方にある /dev/da0p1 〜 の行をコメントアウトし最後の 2行を追記した)
..
〜
#/dev/da0p1	/zfs/distfiles	ufs	rw,late	2	2
# 2019-09-10
# 2019-09-19
fb120c:/distfiles	/zfs/distfiles	nfs	rw,nfsv4
.. fb111 から fb120 の /distfiles をマウントしようとしても..
% sudo mount /zfs/distfiles
mount_nfs: nmount: /zfs/distfiles: No such file or directory
1で終了しました
..マウントできない。
ここで、fb111 の /etc/fstab から nfsv4 を外すと..
fb120c:/distfiles /zfs/distfiles nfs rw
..マウントできるようになる。 しかしそうすると NFSv4 でなくなってしまうだろう。 (それでもいいのだが..)
% sudo mount /zfs/distfiles

% df -h
Filesystem            Size    Used   Avail Capacity  Mounted on
〜
fb120c:/distfiles      15G     12G    1.9G    87%    /zfs/distfiles

% mount
〜
fb120c:/distfiles on /zfs/distfiles (nfs)
fb120 にて /zfs/distfiles -> /distfiles というシンボリックリンクを作成したりもしてみたが、意図通りにならなかった。
fb120 にて distfiles を /zfs の下にマウントする手もあるのだが、それは過去に、起動時に /zfs/distfiles が自動的にエクスポートできず、再起動のたびに sudo killall -HUP mountd を実行する (!) という手間がかかったりした。
どうも /zfs を NFSv4 tree root にするという作戦が良くないように思える。
なぜ /zfs を NFSv4 tree root にしているかというと、実はホームディレクトリも
/zfs の下に置いてエクスポートしようと思っているからだった。
試行錯誤の上に、以下のようにした。 (作業の順番の記憶が少しあやふやである)
/distfiles を /home 以下に移動した。
/etc/fstab も、/home/distfiles
をマウントするように変更し、そしてマウントし直した。
〜
# 2019-09-13,20 nsmrtks
/dev/da0p1	/home/distfiles	ufs	rw	2	2
また /home は、/usr/home へのシンボリックリンクになっていたので、実ディレクトリに変更した。
/etc/exports について、NFSv4 tree root を /zfs でなく /home に変更し、/distfiles についても /home/distfiles にする。 sudo killall -HUP mountd も実行する。
# 2019-09-18,20 nsmrtks

V4: /home

/home/distfiles	fb111c fb103c fb101c fb093c

# EoF
以下は、root でログインし直して実行している。
root@fb120:~ # cd /

root@fb120:/ # ls -ld home
lrwxr-xr-x  1 root  wheel  8 Aug 30 18:04 home -> usr/home

root@fb120:/ # rm -i home
remove home? y↵

root@fb120:/ # mv -i usr/home .

root@fb120:/ # ls home
distfiles	local		nsmrtks		ports

root@fb120:/ # df -h
Filesystem     Size    Used   Avail Capacity  Mounted on
〜
/dev/da0p1      15G     12G    1.9G    87%    /usr/home/distfiles

root@fb120:/ # umount /usr/home/distfiles

root@fb120:/ # mount /home/distfiles

root@fb120:/ # df -h
Filesystem     Size    Used   Avail Capacity  Mounted on
〜
/dev/da0p1      15G     12G    1.9G    87%    /home/distfiles

root@fb120:/ # showmount -e
Exports list on localhost:
/home/distfiles                    fb111.magic.or fb103.magic.or fb101.magic.or fb093.magic.or
念のため再起動した。
そうしたら、fb111 から fb120c:/distfiles がマウントでき、ファイルも見えるようになった。
〜

% sudo mount /zfs/distfiles

% df -h
Filesystem            Size    Used   Avail Capacity  Mounted on
〜
fb120c:/distfiles      15G     12G    3.2G    80%    /zfs/distfiles

% mount
〜
fb120c:/distfiles on /zfs/distfiles (nfs)

% ls -l /zfs/distfiles/ | head
total 7967928
-rw-r--r--   1 nsmrtks  wheel          1273  2月 27  2015 0001-Remove-pure-attribute-from-functions-with-side-effec.patch
-rw-r--r--   1 nsmrtks  wheel        218971  7月 17  2018 01org-libva-2.2.0_GH0.tar.gz
-rw-r--r--   1 nsmrtks  wheel           939  4月 24 10:02 0bd101cecc5458a8463b8d672bf1745c3cbb7c02.patch
-rw-r--r--   1 nsmrtks  wheel          1144  3月 28 12:11 0c83efa.patch
-rw-r--r--   1 root     wheel          1001  2月 14  2018 18675a51fca2.patch
-rw-r--r--   1 nsmrtks  wheel           627  7月 12  2018 20a318d06aca.patch
-rw-r--r--   1 root     wheel          1744  3月  6  2019 21c8be385b3f.patch
-rw-r--r--   1 nsmrtks  wheel          1114  7月 12  2018 2aae617a84f4.patch
-rw-r--r--   1 nsmrtks  wheel          2927  5月 13 10:14 31ab7e09a3b5

% head /zfs/distfiles/0001-Remove-pure-attribute-from-functions-with-side-effec.atch
From 765c6134f3d47edac98818015ab6a1cbd1aa8d06 Mon Sep 17 00:00:00 2001
From: Mark Harris <mark.hsj@gmail.com>
Date: Thu, 26 Feb 2015 18:13:58 -0800
Subject: [PATCH] Remove pure attribute from functions with side effects

Fixes missing version number in sox --version using clang -O2.
---
 src/sox.h | 5 ++---
 1 file changed, 2 insertions(+), 3 deletions(-)
これも、筆者の環境に特有の話が続くが..
先ほども触れたが、新環境 (すなわち今インストール中のこの環境「fb120」)
を立ち上げたら、旧環境で運用していたホームディレクトリを新環境に移動して切り替えることにしている。
非圧縮状態で
10 GB 以上に相当するファイル群なので、コピーにそれなりの時間を要する。
コピーの間じゅう、環境が使えないのは不便なので、あらかたの内容を裏でコピーしておき、最後に残りをコピーすることにする。
色々やることがある。
まずコピーの前に、ZFS に空のホームディレクトリを作成する。
ここで、NFS の所で触れたように、/home を NFS エクスポートするので、ホームディレクトリを /home に下にマウントするようにする。
ところがそうすると、(新環境の) 現状のホームディレクトリも /home/nsmrtks なので、sudo でなく root でログインし直して作業する。
現状の /home/nsmrtks は一応リネームして保存しておくことにする。
また、(zfs/ports や zfs/local と同様に) lz4 圧縮を指定することにする。
root@fb120:~ # cd /home

root@fb120:/home # ls
distfiles	local		nsmrtks		ports

root@fb120:/home # mv -i nsmrtks nsmrtks.bak

root@fb120:/home # zfs create -o mountpoint=/home/nsmrtks zfs/nsmrtks

root@fb120:/home # df -h
Filesystem     Size    Used   Avail Capacity  Mounted on
/dev/ada0p2    4.8G    3.0G    1.5G    67%    /
devfs          1.0K    1.0K      0B   100%    /dev
/dev/ada0p4    2.9G    708M    2.0G    26%    /var
/dev/da0p1      15G     13G    1.5G    90%    /home/distfiles
zfs             17G     23K     17G     0%    /zfs
zfs/local       17G     19M     17G     0%    /zfs/local
zfs/ports       17G    363M     17G     2%    /zfs/ports
tmpfs          512M    4.0K    512M     0%    /tmp
zfs/nsmrtks     17G     23K     17G     0%    /home/nsmrtks

root@fb120:/home # zfs set compression=lz4 zfs/nsmrtks

root@fb120:/home # zfs get compression
NAME         PROPERTY     VALUE     SOURCE
zfs          compression  off       default
zfs/local    compression  lz4       local
zfs/nsmrtks  compression  lz4       local
zfs/ports    compression  lz4       local

root@fb120:/home # ls /home
distfiles	local		nsmrtks		nsmrtks.bak	ports

root@fb120:/home # ls -a /home/nsmrtks
.	..
次に、今のうちに /home/nsmrtks を NFS エクスポートしておく。
そのやり方だが、/etc/exports はこれ以上触らず、即ち /etc/exports
の「V4: /home」と書いた行 (のみ) を利用し、残りを
ZFS の機能で行うことにする。
以下のように、zfs set sharenfs= にホストを指定する。 なおこの操作で、mountd に HUP シグナルを送る相当まで自動的に実行してくれる。
root@fb120:~ # zfs get sharenfs
NAME         PROPERTY  VALUE     SOURCE
zfs          sharenfs  off       default
zfs/local    sharenfs  off       default
zfs/nsmrtks  sharenfs  off       default
zfs/ports    sharenfs  off       default

root@fb120:~ # zfs set sharenfs='fb111c fb103c fb101c fb093c' zfs/nsmrtks

root@fb120:~ # zfs get sharenfs
NAME         PROPERTY  VALUE                        SOURCE
zfs          sharenfs  off                          default
zfs/local    sharenfs  off                          default
zfs/nsmrtks  sharenfs  fb111c fb103c fb101c fb093c  local
zfs/ports    sharenfs  off                          default

root@fb120:~ # showmount -e
Exports list on localhost:
/home/distfiles                    fb111.magic.or fb103.magic.or fb101.magic.or fb093.magic.or
/home/nsmrtks                      fb111.magic.or fb103.magic.or fb101.magic.or fb093.magic.or
忘れずにオーナーも設定しておく。
root@fb120:~ # ls -ld /home/nsmrtks
drwxr-xr-x  2 root  wheel  2 Sep 25 10:27 /home/nsmrtks

root@fb120:~ # chown nsmrtks:nsmrtks /home/nsmrtks

root@fb120:~ # ls -ld /home/nsmrtks
drwxr-xr-x  2 nsmrtks  nsmrtks  2 Sep 25 10:27 /home/nsmrtks

root@fb120:~ # ls -l /home
total 69
drwxr-xr-x  51 nsmrtks  wheel    55296 Sep 24 18:58 distfiles
drwxr-xr-x   2 root     wheel      512 Sep 20 11:19 local
drwxr-xr-x   2 nsmrtks  nsmrtks      2 Sep 25 10:27 nsmrtks
drwxr-xr-x   3 nsmrtks  nsmrtks    512 Sep 25 10:18 nsmrtks.bak
drwxr-xr-x   2 root     wheel      512 Sep 20 11:19 ports
ホスト fb111 (fb111c あるいは fb111.magic.or) からマウントでき、ファイルを書き込めて共有できることを確かめた。
NFSv4 tree root の関係で、fb120c:/nsmrtks という指定では、あるいはさらにいうと fb120c:/distfiles と指定した場合も、-o nfsv4 を付けないとマウントできなかった。 このことからも、ちゃんと NFSv4 を使用してマウントできていることがあらためて確かめられた。
(fb111 側の操作)
% sudo mount -o nfsv4 fb120c:/nsmrtks /mnt
〜

% echo from fb111 > /mnt/shared.txt
(fb120 側の操作)
root@fb120:~ # ls -l /home/nsmrtks
total 1
-rw-r--r--  1 nsmrtks  nsmrtks  11 Sep 25 10:56 shared.txt

root@fb120:~ # cat /home/nsmrtks/shared.txt
from fb111

root@fb120:~ # rm -i /home/nsmrtks/shared.txt
remove /home/nsmrtks/shared.txt? y
あとは、fb111 にあるホームディレクトリを fb120 にコピーする。 (NFS を使ってコピーすることにする)
% cd

% date ; rsync -a --del . /mnt/ ; date
2019年 9月25日 水曜日 11時13分14秒 JST
2019年 9月25日 水曜日 12時35分19秒 JST
最後に、残りを全てコピーを終える。
ここで、念の為と思ってシングルユーザーモード (shutdown now)
でコピーしようとしたが..
NFS のため、root ユーザーではコピーできないので、sudo -u 〜 を使用している。
# cd /home/nsmrtks

# sudo -u nsmrtks rsync -nav --del . /mnt/
〜

# sudo -u nsmrtks rsync -av --del . /mnt/
〜
No name and/or group mapping for uid,gid:(65534,1039)
〜
.. NFSv4 の nfsuserd までいなくなってしまったようなので、そこから exit してマルチユーザーモードに戻して行った。
# exit
〜

# sudo -u nsmrtks rsync -av --del . /mnt/
〜

# sudo -u nsmrtks rsync -av --del . /mnt/
〜
コピーするものが無事になくなったようなので、旧環境はホームディレクトリを新環境のものを NFS マウントするように切り換えた。
また、新環境を一般ユーザー (nsmrtks) でログインし直すと、ホームディレクトリが旧環境からコピーしてきたものに切り替わっているので、これまでの ~/.tcshrc 等もろもろがそのまま使えるようになった。
これも、ports でなく pkg を用いるなら不用と思われる。
/etc/make.conf ファイルを新規作成して、以下の内容にする。
# 2017-09-27 nsmrtks
# see /usr/ports/Mk/bsd.command.mk
SU_CMD?=/usr/local/bin/sudo -E sh -c

# 2019-07-31,08-23 nsmrtks
DEFAULT_VERSIONS+= python=3.7

# EoF
最初の SU_CMD〜 だが、これは ports でビルドするときに、たまに出て来る su を代わりに sudo を用いるように設定している。
その下の 〜 python=3.7 は、これも筆者の環境に特有の設定である。
現時点で FreeBSD の Python のデフォルトは 3.6 のようだが、仕事の都合で
3.7 を使わないとうまくいかない。
そのため ports で、Python 関連については、3.7
をビルド/インストールするようにする設定である。
このように、Python 3.7 環境を手に入れるには、pkg
でバイナリをインストールするのではなく
ports でソースからコンパイルしないといけなさそうである。
ここで、筆者の環境でいつも用いている「teetime」スクリプトを紹介する。
これは、「コマンド |& tee ログ.txt」 (csh 系)
あるいは「コマンド 2>&1 | tee ログ.txt」 (sh 系)
に毛の生えたようなコマンドで、コマンドを何回かやり直しても、ログのファイル名を、既に存在するファイル名とぶつからないように、日付時刻のファイル名を自動的に付けてくれるものである。
(コマンドにあまり複雑なものを指定するとうまくいかない制限事項がある)
「teetime [-t タグ] コマンド..」のように用いる。
これも ports でなく pkg を用いるなら不用である。
先ほど紹介した teetime スクリプトを用いている。
% cd /usr/ports/*/portupgrade

% pwd
/zfs/ports/ports-mgmt/portupgrade

% nice teetime -t install make install
touch: install20190927.log: Permission denied
Cannot touch, exiting.
1で終了しました

% ls -ld
drwxr-xr-x  2 root  wheel  6  9月  6 10:06 ./
.. おや?
/usr/ports 以下のオーナーを変更するのを忘れていただろうか。
% cd /usr/ports

% ls -l
〜

% sudo chown -R nsmrtks .
その後も、実は make.conf をホームディレクトリに置いたまま /etc/ にコピーするのを忘れていてやり直したりした後、
〜

% cd /usr/ports/*/portupgrade

% nice teetime -t install make install
conflicting install20190927.log
logging (from the next line till the end) to install2019092710.log
teetime! 2019年 9月27日 金曜日 10時51分44秒 JST
teetime! working directory is /zfs/ports/ports-mgmt/portupgrade
teetime> make install
〜

mkdir: /zfs/ports/distfiles: No such file or directory
*** Error code 1

Stop.
make[1]: stopped in /zfs/ports/ports-mgmt/portupgrade
*** Error code 1

Stop.
make: stopped in /zfs/ports/ports-mgmt/portupgrade
teetime! 2019年 9月27日 金曜日 10時51分50秒 JST
.. おやっ?
/usr/ports/distfiles を /home/distfiles に向け直すのを忘れていた..
% ls -ld /usr/ports
lrwxr-xr-x  1 root  wheel  10  9月 20 12:01 /usr/ports -> /zfs/ports

%  ls -ld /usr/ports/distfiles
lrwxr-xr-x  1 nsmrtks  wheel  10  9月 13 11:59 /usr/ports/distfiles -> /distfiles
以下のように直し..
% cd /usr/ports

% ls -ld distfiles
lrwxr-xr-x  1 nsmrtks  wheel  10  9月 13 11:59 distfiles -> /distfiles

% rm -i distfiles
remove distfiles? y

% ln -s /home/distfiles
もう一度ビルド。
% cd -

% pwd
/zfs/ports/ports-mgmt/portupgrade

% nice teetime -t install make install
conflicting install20190927.log
conflicting install2019092710.log
logging (from the next line till the end) to install201909271052.log
teetime! 2019年 9月27日 金曜日 10時52分57秒 JST
teetime! working directory is /zfs/ports/ports-mgmt/portupgrade
teetime> make install
〜
===>  Installing for portupgrade-2.4.16,2
===>  Checking if portupgrade is already installed
===>  Switching to root credentials for 'install' target
===>   Registering installation for portupgrade-2.4.16,2
Installing portupgrade-2.4.16,2...
===>  Returning to user credentials
teetime! 2019年 9月27日 金曜日 11時14分08秒 JST
今度はうまくいったようだ。
少し流れからそれるが、(ホームディレクトリが NFS となった) 旧環境の Emacs で、mozc による漢字変換が失敗するようになった。
NFS のせいかどうか分からないが、新環境と旧環境の双方で、/etc/rc.conf に以下を追記し、
# 2019-09-27 nsmrtks
rpc_lockd_enable="YES"		# Run NFS rpc.lockd needed for client/server.
双方で以下のように lockd を起動し (rpc_lockd_enable に対応するのが /etc/rc.d/lockd だというのが分かりにくいが /etc/rc.d にて rpc_lockd_enable を egrep して判断した)、
% sudo /etc/rc.d/lockd start
〜
そうすると旧環境の Emacs でこれまで通り mozc で漢字変換できるようになった。 これが原因だったのだろうか?
ここからは、先ほどインストールした portupgrade に付属の portinstall コマンドを用いて ports のソフトをインストールしていく。 (繰り返しになるが pkg を用いるなら考慮不要)
また、/var/tmp/log/Install というディレクトリを作成し、そこにログを残していくことにする。 これについては、pkg でインストールする場合も役に立つと思う。
% cd /var/tmp

% mkdir log

% cd log

% mkdir Install

% cd Install

% nice teetime -t xorg portinstall -s xorg
logging (from the next line till the end) to xorg20190930.log
teetime! 2019年 9月30日 月曜日 09時33分02秒 JST
teetime! working directory is /var/tmp/log/Install
teetime> portinstall -s xorg
〜
===>   mesa-dri-18.3.2_4 depends on file: /usr/local/bin/python2.7 - found
===>   Returning to build of mesa-dri-18.3.2_4
===>   mesa-dri-18.3.2_4 depends on package: llvm80>=3.9.0_4 - not found
===>  llvm80-8.0.1_2 needs Python 3.6 at least, but 2.7 was specified.
*** Error code 1

Stop.
make[4]: stopped in /usr/ports/devel/llvm80
*** Error code 1

Stop.
make[3]: stopped in /zfs/ports/graphics/mesa-dri
*** Error code 1

Stop.
make[2]: stopped in /usr/ports/graphics/mesa-dri
*** Error code 1

Stop.
make[1]: stopped in /zfs/ports/x11/xorg
*** Error code 1

Stop.
make: stopped in /zfs/ports/x11/xorg
** Command failed [exit code 1]: /usr/bin/script -qa /tmp/portinstall20190930-1940-w13tw1 env make FETCH_BEFORE_ARGS=-q
** Fix the problem and try again.
--->  [Executing a command as root: sudo /usr/local/sbin/pkgdb -aFOQ]
パスワード: 〜
** Listing the failed packages (-:ignored / *:skipped / !:failed)
	! x11/xorg	(install error)
teetime! 2019年 9月30日 月曜日 09時45分40秒 JST
何だ!? llvm80 の所でエラーになってしまった。 llvm80 を単独でビルドしたらいけるだろうか? (以前 llvm90 で同様のことがあった)
% nice teetime -t llvm80_ portinstall -s llvm80
logging (from the next line till the end) to llvm80_20190930.log
teetime! 2019年 9月30日 月曜日 09時50分26秒 JST
teetime! working directory is /var/tmp/log/Install
teetime> portinstall -s llvm80
〜
--->  [Executing a command as root: sudo /usr/local/sbin/pkgdb -aFOQ]
teetime! 2019年 9月30日 月曜日 14時57分11秒 JST
いけたようだ。(何故これでいけるのかは分からないが..)
xorg のビルドに戻る。 (先ほどまでの xorg 関連のビルド物を clean せず活かすよう、portinstall のオプションに -w を付加する。)
% nice teetime -t xorg portinstall -sw xorg
conflicting xorg20190930.log
logging (from the next line till the end) to xorg2019093015.log
teetime! 2019年 9月30日 月曜日 15時07分58秒 JST
teetime! working directory is /var/tmp/log/Install
teetime> portinstall -sw xorg
〜
===>   libdrm-2.4.99,1 depends on executable: meson - not found
===>  meson-0.51.2 needs Python 3.5 at least, but 2.7 was specified.
*** Error code 1

Stop.
make[6]: stopped in /usr/ports/devel/meson
*** Error code 1

Stop.
make[5]: stopped in /zfs/ports/graphics/libdrm
*** Error code 1

Stop.
make[4]: stopped in /usr/ports/graphics/libdrm
*** Error code 1

Stop.
make[3]: stopped in /zfs/ports/graphics/mesa-dri
*** Error code 1

Stop.
make[2]: stopped in /usr/ports/graphics/mesa-dri
*** Error code 1

Stop.
make[1]: stopped in /zfs/ports/x11/xorg
*** Error code 1

Stop.
make: stopped in /zfs/ports/x11/xorg
** Command failed [exit code 1]: /usr/bin/script -qa /tmp/portinstall20190930-41554-1pot0ec env make FETCH_BEFORE_ARGS=-q
** Fix the problem and try again.
--->  [Executing a command as root: sudo /usr/local/sbin/pkgdb -aFOQ]
パスワード: 〜
** Listing the failed packages (-:ignored / *:skipped / !:failed)
	! x11/xorg	(unknown build error)
teetime! 2019年 9月30日 月曜日 15時19分24秒 JST
今度は meson の所で同様にエラーになってしまった。 先ほどと同様に対処してみる..
% nice teetime -t meson portinstall -s meson
logging (from the next line till the end) to meson20190930.log
teetime! 2019年 9月30日 月曜日 15時19分46秒 JST
teetime! working directory is /var/tmp/log/Install
teetime> portinstall -s meson
〜
===>  Cleaning for meson-0.51.2
--->  [Executing a command as root: sudo /usr/local/sbin/pkgdb -aFOQ]
teetime! 2019年 9月30日 月曜日 15時20分09秒 JST
同様にいけた.. 再び xorg のビルドに戻って..
% nice teetime -t xorg portinstall -sw xorg
conflicting xorg20190930.log
conflicting xorg2019093015.log
logging (from the next line till the end) to xorg201909301525.log
teetime! 2019年 9月30日 月曜日 15時25分33秒 JST
teetime! working directory is /var/tmp/log/Install
teetime> portinstall -sw xorg
〜
--->  [Executing a command as root: sudo /usr/local/sbin/pkgdb -aFOQ]
teetime! 2019年 9月30日 月曜日 16時16分13秒 JST
今度こそ無事にビルド・インストールできた。
実は筆者は、旧環境までは、GUI を VNC で運用しており、VirtualBox 上の
FreeBSD で、普通の X サーバーであまり運用したことがなかった。
(ないわけではない)
早速起動してみるとどうなるか。
(~/.xinitrc ファイルは置いていない)
% cd

% rehash

% where startx
/usr/local/bin/startx

% startx
xauth:  file /home/nsmrtks/.serverauth.49282 does not exist


X.Org X Server 1.18.4
Release Date: 2016-07-19
X Protocol Version 11, Revision 0
Build Operating System: FreeBSD 12.0-RELEASE-p10 amd64
Current Operating System: FreeBSD fb120.magic.or 12.0-RELEASE-p10 FreeBSD 12.0-RELEASE-p10 GENERIC amd64
Build Date: 30 September 2019  04:11:27PM

Current version of pixman: 0.38.4
	Before reporting problems, check http://wiki.x.org
	to make sure that you have the latest version.
Markers: (--) probed, (**) from config file, (==) default setting,
	(++) from command line, (!!) notice, (II) informational,
	(WW) warning, (EE) error, (NI) not implemented, (??) unknown.
(==) Log file: "/var/log/Xorg.0.log", Time: Mon Sep 30 16:22:41 2019
(==) Using default built-in configuration (39 lines)
scfb trace: probe start
scfb trace: probe done
(EE)
Fatal server error:
(EE) Cannot run in framebuffer mode. Please specify busIDs        for all framebuffer devices
(EE)
(EE)
Please consult the The X.Org Foundation support
	 at http://wiki.x.org
 for help.
(EE) Please also check the log file at "/var/log/Xorg.0.log" for additional information.
(EE)
(EE) Server terminated with error (1). Closing log file.
xinit: giving up
xinit: unable to connect to X server: Connection refused
xinit: server error
1で終了しました
だめやった..
メッセージに従い、/var/log/Xorg.0.log を見てみると.. 以下のようにエラー (EE) になっている行が見つかった。
[ 47612.804]
X.Org X Server 1.18.4
Release Date: 2016-07-19
[ 47612.804] X Protocol Version 11, Revision 0
[ 47612.804] Build Operating System: FreeBSD 12.0-RELEASE-p10 amd64
[ 47612.804] Current Operating System: FreeBSD fb120.magic.or 12.0-RELEASE-p10 FreeBSD 12.0-RELEASE-p10 GENERIC amd64
[ 47612.804] Build Date: 30 September 2019  04:11:27PM
〜
[ 47612.813] (II) LoadModule: "vboxvideo"
[ 47612.814] (WW) Warning, couldn't open module vboxvideo
[ 47612.814] (II) UnloadModule: "vboxvideo"
[ 47612.814] (II) Unloading vboxvideo
[ 47612.814] (EE) Failed to load module "vboxvideo" (module does not exist, 0)
〜
vboxvideo というのがインストールが必要なのだろうか。
そうだとしてどうやってインストールできるのだろうか。
探してみると、それは virtualbox-ose-additions に含まれているように見える。
(旧環境で実行)
% locate vboxvideo
/usr/local/lib/xorg/modules/drivers/vboxvideo_drv.so
/usr/ports/emulators/virtualbox-ose/files/patch-src_VBox_Additions_x11_vboxvideo_Makefile.kmk
/usr/ports/emulators/virtualbox-ose-additions/files/vboxvideo.conf
(新環境で実行)
% find /usr/ports/ -name \*vboxvideo\* -print
/usr/ports/emulators/virtualbox-ose-additions/files/vboxvideo.conf
/usr/ports/emulators/virtualbox-ose/files/patch-src_VBox_Additions_x11_vboxvideo_Makefile.kmk
ここまで来て、virtualbox-ose-additions を未だインストールしていなかった。 それを先にインストールした方がよかった。
virtualbox-ose-additions をインストールしていないと、ホストをサスペンド/レジュームするたびに、VirtualBox ゲストの時計が遅れていったりしてしまうが、実はここまで毎回そのたびに ntpdate で手動で時計を合わせていたのである。
MS-Windows や GNU/Linux では、Guest Additions CD を挿入して.. などというのがあった気がするが、FreeBSD では ports や pkg からインストールできる。
% cd /var/tmp/log/Install

% nice teetime -t virtualbox-ose-additions_ portinstall -s virtualbox-ose-additions
logging (from the next line till the end) to virtualbox-ose-additions_20190930.log
teetime! 2019年 9月30日 月曜日 16時53分12秒 JST
teetime! working directory is /var/tmp/log/Install
teetime> portinstall -s virtualbox-ose-additions
〜
途中 VirtualBox ホストのサスペンド/レジュームを挟む..
〜
virtualbox-ose-additions のオプション
『OPENGL』
「3D pass-through support (requires X11)」
というのは何だろう..
デフォルト OFF になっているけど、今回 X11 (xorg)
もインストールしていることだし、試しに ON にしてみるか..
〜
--->  [Executing a command as root: sudo /usr/local/sbin/pkgdb -aFOQ]
teetime! 2019年 10月 1日 火曜日 10時59分21秒 JST
無事にビルド・インストールが終わった。
さて、ビルド・インストール中のメッセージが、teetime コマンドにより
/var/tmp/log/Install/ 以下のログファイルに残っているので、それを見てみる。
(今回は virtualbox-ose-additions_20190930.log というファイル名であった)
これと、/usr/local/etc/rc.d/ 以下にインストールされた
vboxguest と vboxservice と さらに dbus をを参考にして、/etc/rc.conf
に以下のような行を追加した。
# 2019-10-01 nsmrtks
#
# (see /usr/local/etc/rc.d/dbus)
dbus_enable="YES"		# to enable the D-BUS messaging system
#
# (see /usr/local/etc/rc.d/{vboxguest,vboxservice}
vboxguest_enable="YES"		# Set it to YES to enable vboxguest on startup
vboxservice_enable="YES"	# Set it to "YES" to enable VBoxService.
いったんシャットダウン・電源 OFF した。
次に、関係あるか分からないが、VirtualBox の設定の「ディスプレイ」で、「3Dアクセラレーションを有効化」というのを、チェックを付けてみた。 (忘れずに「OK」押す)
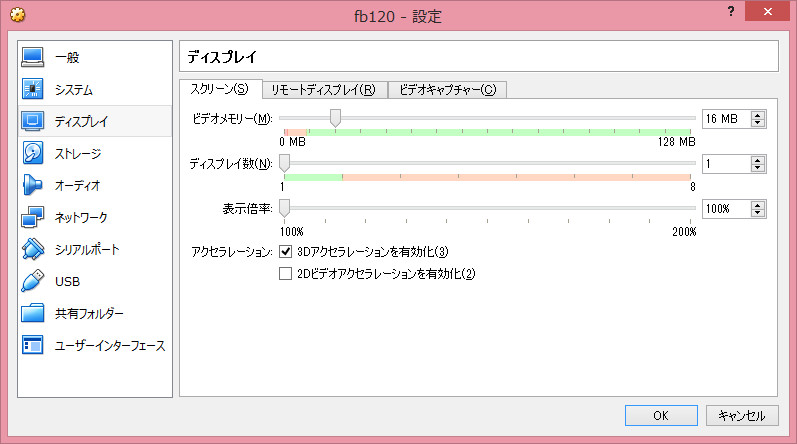
そうして起動すると、「vboxguest: loaded successfully」や、VBoxService が起動したようなメッセージが出ていたが..
kldstat で見ると vboxguest.ko がロードされていた。
% kldstat
Id Refs Address                Size Name
 1   18 0xffffffff80200000  243d228 kernel
 2    1 0xffffffff82b11000   247e20 zfs.ko
 3    1 0xffffffff82d59000     7628 opensolaris.ko
 4    1 0xffffffff82d61000    2eec3 vboxguest.ko
 5    1 0xffffffff82d90000     2678 intpm.ko
 6    1 0xffffffff82d93000      b10 smbus.ko
 7    1 0xffffffff82d94000     81f0 tmpfs.ko
しかし..
% ps ax | egrep -i box
1196  0  S+   0:00.00 egrep -i box
VBoxService などが起動しているはずだが、いない。 orz
実は旧環境 (FreeBSD 11.2) でも、最近同じ現象が起きていたのだ。 (当初は大丈夫だったのだが portupgrade するうちにそうなった)
ホストをサスペンド/レジュームするたびに、ntpdate を手動で実行しないとならないのだろうか.. orz
気を取り直して、この状態で startx を実行すると、起動できるだろうか。
ここで、VirtualBox はフルスクリーンモードで表示させており、そのサイズは 1366x768 である。 (また VirtualBox のツールバーのようなものが当初下に表示されていたが上に移動させている)
今度は、無事に X11 が起動した。 ただ、xdpyinfo でも見た所、どうも 800x600 で起動してしまったようだ。
xrandr を引数なしで実行した所、どうやら 1366x768 にも出来るようだ。 (昔は VirtualBox のフルスクリーンモードと同じサイズ (当時は 1366x768 でなかったかもしれない) にできなくて VNC にしたような記憶があるが曖昧)
そこで早速 xarndr -s 1366x768 を実行してみた所..
画面をいっぱいに広げることが出来た。 ただ、(twm で) ウィンドウを画面の右の方に持っていこうとしても、画面右数センチメートルを残して、それ以上右に行かないという現象が見られた。 画面下の方に持っていくときも同様の現象になるようだ。 xrandr と twm の相性が悪いのだろうか??
ところでもう一つ、VMware や VirtualBox や VNC で X11
を使う時に、筆者にとっては大きな問題となるのが、筆者は MS-Windows
環境で Alt + Tab キーの組み合わせを酷使するのだが、これが
MS-Windows でなく VNC 等の側に捕捉されてしまい、MS-Windows
で使えないということがよくある。
VirtualBox では、Alt + Tab キーが、通常は MS-Windows
側に捕捉され、「ホストキー」 (デフォルトは右 Ctrl キー) を押すと
VirtualBox 側に捕捉されるようだ。
(もう一度「ホストキー」を押すと元に戻る)
ただ、「通常」の状態で Alt + Tab キーを押した時に、VirtualBox
側に、変な文字が入力されてしまう。
これは以前からそうだった。
惜しいのだが、今回も VNC で運用することになるだろうか。 どうしようか。
その後も、色々調べたり試したり考えたりしたのだが、以下には少し情報があった。
変な文字が入る問題は別として、xorg.conf でマウスに vboxmouse を指定するのがいいらしい。 その際、xorg.conf を生成するのに Xorg -configure を用いた方がいいだろう。
だが、VBoxService がフルに起動しないという致命的な問題もあり(後述)、やはり (今回も) VNC で行こうかと思った。
ところで、何とか VBoxService (/usr/local/sbin/VBoxService) が起動できないものか。 sudo /usr/local/etc/rc.d/vboxservice start をあらためて実行しても、VBoxService が起動したようなメッセージが出ているのに ps で見ると起動していないわけだが、verbose スイッチのようなものはないかと思って、VBoxService --help を実行したら出てくるメッセージを見て..
% VBoxService --help
Usage:
 VBoxService  [-f|--foreground] [-v|--verbose] [-l|--logfile <file>]
              [-p|--pidfile <file>] [-i|--interval <seconds>]
              [--disable-<service>] [--enable-<service>]
              [--only-<service>] [-h|-?|--help]
              [--control-interval <ms>]
              [--timesync-interval <ms>] [--timesync-min-adjust <ms>]
              [--timesync-latency-factor <x>] [--timesync-max-latency <ms>]
              [--timesync-set-threshold <ms>] [--timesync-set-start]
              [--timesync-set-on-restore|--timesync-no-set-on-restore]
              [--timesync-verbosity <level>]
              [--vminfo-interval <ms>] [--vminfo-user-idle-threshold <ms>]

Options:
    -i | --interval         The default interval.
    -f | --foreground       Don
    't daemonize the program. For debugging.
    -l | --logfile <file>   Enables logging to a file.
    -p | --pidfile <file>   Write the process ID to a file.
    -v | --verbose          Increment the verbosity level. For debugging.
    -V | --version          Show version information.
    -h | -? | --help        Show this message and exit with status 1.

Service-specific options:
〜
VBoxService に -v と -f を指定してみた所で、以下のようなものが出た。
% VBoxService -v -f
VBoxService 5.2.32 r132056 (verbosity: 1) freebsd.amd64 (Oct  1 2019 10:55:33) release log
00:00:00.000092 main     Log opened 2019-10-03T01:11:56.209466000Z
00:00:00.000155 main     OS Product: FreeBSD
00:00:00.000166 main     OS Release: 12.0-RELEASE-p10
00:00:00.000176 main     OS Version: FreeBSD 12.0-RELEASE-p10 GENERIC
00:00:00.000183 main     Executable: /zfs/local/sbin/VBoxService
00:00:00.000186 main     Process ID: 3718
00:00:00.000189 main     Package type: BSD_64BITS_GENERIC (OSE)
00:00:00.002611 main     5.2.32 r132056 started. Verbose level = 1
00:00:00.003097 main     Warning! Feature reporing failed: VERR_INVALID_PARAMETER
00:00:00.003130 main     Error: Service 'control' failed to initialize: VERR_INVALID_PARAMETER
00:00:00.003196 main     Session 0 is about to close ...
00:00:00.003210 main     Stopping all guest processes ...
00:00:00.003219 main     0 guest processes were signalled to stop
00:00:00.003226 main     Closing all guest files ...
00:00:00.003450 main     Ended.
1で終了しました
これに対し、VBoxService --help のメッセージをいまいちど見てみると..
% VBoxService --help
〜
Service-specific options:
    --enable-control        Enables the control service. (default)
    --disable-control       Disables the control service.
    --only-control          Only enables the control service.
    --control-interval      Specifies the interval at which to check for
                            new control commands. The default is 1000 ms.
    --enable-timesync       Enables the timesync service. (default)
〜
どうやら VBoxService には
「the control service」
というものがあって、且つ、それは enable (デフォルト) したり
disable したり出来るもののようだ。
あと、それは「the timesync service」とはまた別になっているようだ。
それでは --disable-control を付けるとどうなるか?
% sudo VBoxService --disable-control
〜
VBoxService 5.2.32 r132056 (verbosity: 0) freebsd.amd64 (Oct  1 2019 10:55:33) release log
00:00:00.000093 main     Log opened 2019-10-03T01:13:35.187356000Z
00:00:00.000161 main     OS Product: FreeBSD
00:00:00.000172 main     OS Release: 12.0-RELEASE-p10
00:00:00.000182 main     OS Version: FreeBSD 12.0-RELEASE-p10 GENERIC
00:00:00.000188 main     Executable: /zfs/local/sbin/VBoxService
00:00:00.000191 main     Process ID: 3723
00:00:00.000194 main     Package type: BSD_64BITS_GENERIC (OSE)
00:00:00.002856 main     5.2.32 r132056 started. Verbose level = 0

% ps ax | egrep -i box
3724  -  Ss      0:00.01 VBoxService --disable-control
3727  0  S+      0:00.00 egrep -i box
今度は VBoxService が起動した!
本当は the control service
が有効になった方が良いのだろうが、どうしても解決方法が分かっていない。
そこで --disable-control で急場をしのぐことにしてみる。
/usr/local/etc/rc.d/vboxservice から --disable-control
を指定しないといけないのだが、試行錯誤した所、とりあえず
start_cmd という変数を使うと、コマンドラインパラメータも指定できるようだ。
command="/usr/local/sbin/VBoxService"
と書いてある行の直下に、以下を挿入した。
# 2019-10-03 nsmrtks
start_cmd="${command} --disable-control"
これで sudo /usr/local/sbin/VBoxService start で VBoxService を起動した状態で、夜にホストをサスペンドし、翌朝にレジュームした所、時計がずれていないことを確認した。
これもおそらく筆者の環境に特有の話が続く..
FreeBSD や NetBSD では、IPv6 のリンクローカルアドレス (IPv6
ルーターがなくても自動的に割り当てられるが同一ネットワーク内でしか通信できない)
で NFS が通信できたが、これが Ubuntu GNU/Linux
相手だとどうしてもうまくいかなかった。
しかし当職場には未だ IPv6 環境が来ていない。
このような場合、リンクローカルアドレスよりもよりしっかりした IPv6
アドレスとして、ユニークローカルアドレス (ULA) を用いるのがいいようだ。
筆者は、かつて http://www.kame.net/~suz/gen-ula.html を使用させてもらって生成した ULA を従来より用いている。 ただし、このページは現在では無くなってしまったようだ。 (参考までに同様の目的を果たせるものが ローカルな環境でIPv6を使う に見つかった)
筆者の環境の ULA は、fd39:8b7f:067e::/48 というものである。
これを em2 (VirtualBox のネットワークの設定で
「ホストオンリーアダプター」
になっており他の VirtualBox の仮想マシンと通信できる)
に割り当てるのだが、その際 16 ビットの「サブネットID」として
1 を用いることにする。
(0 でなくて 1 なのは、0 は em1 で従来より用いていたりしたため。)
ここまでで IPv6 の 128 ビットのアドレスのうち上位 64 ビットまでで、残り
64 ビットは、(em2 の) MAC (イーサネット) アドレスから算出した EUI-64
でよいはずだ。
あらためて以下を参照することにする。
em2 の MAC アドレスは、ifconfig で知ることが出来る。
% ifconfig
〜
em2: flags=8843<UP,BROADCAST,RUNNING,SIMPLEX,MULTICAST> metric 0 mtu 1500
	options=81009b<RXCSUM,TXCSUM,VLAN_MTU,VLAN_HWTAGGING,VLAN_HWCSUM,VLAN_HWFILTER>
	ether 08:00:27:4f:66:eb
	inet 192.168.56.120 netmask 0xffffff00 broadcast 192.168.56.255
	inet6 fe80::a00:27ff:fe4f:66eb%em2 prefixlen 64 scopeid 0x3
	media: Ethernet autoselect (1000baseT <full-duplex>)
	status: active
	nd6 options=23<PERFORMNUD,ACCEPT_RTADV,AUTO_LINKLOCAL>
〜
08:00:27:4f:66:eb の EUI-64 は 0a 00 27 ff fe 4f 66 eb である。
が、実は em2 の
IPv6 リンクローカルアドレスを見れば同じ値なので分かったりする。
これらから、fd39:8b7f:067e:1:a00:27ff:fe4f:66eb という IPv6 アドレスが得られた。
これを、まずは /etc/rc.conf に設定する。 ifconfig_em2 の所を以下のように変更した。
#ifconfig_em2_ipv6="inet6 accept_rtadv"
# 2019-10-03 nsmrtks
ifconfig_em2_ipv6="inet6 fd39:8b7f:067e:1:a00:27ff:fe4f:66eb prefixlen 64"
また、/etc/hosts と、相手ホストの /etc/hosts にも、エントリを追加する。 自ホスト (fb120) の /etc/hosts の fb120 に関するエントリは以下のようになった。
# 2019-09-17,10-03 nsmrtks
fe80::a00:27ff:fe4f:66eb%em2		fb120.magic.or	fb120	fb120v6	fb120c
fd39:8b7f:067e:1:a00:27ff:fe4f:66eb	fb120.magic.or	fb120	fb120v6	fb120c
相手ホストの IPv6 ULA アドレスも /etc/hosts に追記した。
再起動すると、新しく IPv6 ULA アドレスが割り当てられた。
% ifconfig
〜
em2: flags=8843<UP,BROADCAST,RUNNING,SIMPLEX,MULTICAST> metric 0 mtu 1500
	options=81009b<RXCSUM,TXCSUM,VLAN_MTU,VLAN_HWTAGGING,VLAN_HWCSUM,VLAN_HWFILTER>
	ether 08:00:27:4f:66:eb
	inet 192.168.56.120 netmask 0xffffff00 broadcast 192.168.56.255
	inet6 fe80::a00:27ff:fe4f:66eb%em2 prefixlen 64 scopeid 0x3
	inet6 fd39:8b7f:67e:1:a00:27ff:fe4f:66eb prefixlen 64
	media: Ethernet autoselect (1000baseT <full-duplex>)
	status: active
	nd6 options=21<PERFORMNUD,AUTO_LINKLOCAL>
〜
そして、Ubuntu GNU/Linux 仮想マシン (ホスト名 ul164) から ホームディレクトリ (zfs/nsmrtks) を NFS マウントできるように、zfs の sharenfs を設定し直した。
% zfs get sharenfs
NAME         PROPERTY  VALUE                        SOURCE
zfs          sharenfs  off                          default
zfs/local    sharenfs  off                          default
zfs/nsmrtks  sharenfs  fb111c fb103c fb101c fb093c  local
zfs/ports    sharenfs  off                          default

% sudo zfs set sharenfs='fb111c fb103c fb101c fb093c ul164' zfs/nsmrtks

% zfs get sharenfs
NAME         PROPERTY  VALUE                              SOURCE
zfs          sharenfs  off                                default
zfs/local    sharenfs  off                                default
zfs/nsmrtks  sharenfs  fb111c fb103c fb101c fb093c ul164  local
zfs/ports    sharenfs  off                                default
そうして、Ubuntu GNU/Linux マシン (ul164) から IPv6 で NFS (NFSv4) マウントでき、ファイルも読み書きできることを確認した。
tigervnc-server を用いることとする。 (以前は tightvnc というのも使っていたのだが X11 的に古くて支障が出た)
% ls -ld /usr/ports/*/*vnc*
〜
drwxr-xr-x  3 nsmrtks  wheel        8  9月  6 10:05 /usr/ports/net/tigervnc-server
drwxr-xr-x  2 nsmrtks  wheel        5  9月  6 10:05 /usr/ports/net/tigervnc-viewer
drwxr-xr-x  3 nsmrtks  wheel        7  9月  6 10:05 /usr/ports/net/tightvnc
〜

% cd /var/tmp/log/Install

% nice teetime -t tigervnc-server_ portinstall -s tigervnc-server
logging (from the next line till the end) to tigervnc-server_20191004.log
teetime! 2019年 10月 4日 金曜日 12時10分26秒 JST
teetime! working directory is /var/tmp/log/Install
teetime> portinstall -s tigervnc-server
[Reading data from pkg(8) ... - 283 packages found - done]
〜
--->  [Executing a command as root: sudo /usr/local/sbin/pkgdb -aFOQ]
teetime! 2019年 10月 4日 金曜日 12時49分41秒 JST
無事にビルド・インストールできた。
起動してみる。
VNC をフルスクリーンで使用するために -geometry 〜 を指定している。
(DPI も指定しているつもりだが.. 後述)
なお初回起動だとパスワードの設定を求められるだろう。
(筆者は設定済のホームディレクトリを旧環境からコピーしてきている)
% vncserver -geometry 1366x768 -dpi 75

New 'fb120.magic.or:1 (nsmrtks)' desktop is fb120.magic.or:1

Starting applications specified in /home/nsmrtks/.vnc/xstartup
Log file is /home/nsmrtks/.vnc/fb120.magic.or:1.log
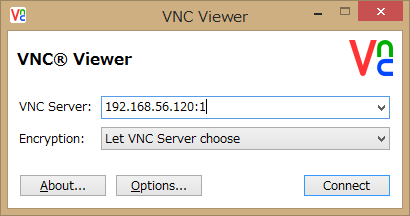
この VNC サーバーには、とりあえず em2 の IPv4 アドレス (192.168.56.120)
と、ディスプレイ番号「1」を指定すると (vncserver
からのメッセージにも表示されている)、Windows 側から接続することが出来る。
ちなみに VNC ビュアー (クライアント) は RealVNC を用いている。
自分は ~/.vnc/xstartup を自分で記述していたので、それに沿った内容で表示された。 さもなくば、デフォルトの設定で表示されるだろう。
筆者が好んで使わせてもらっているフォントである。 これを Emacs や rxvt-unicode やブラウザで使う。
% cd /var/tmp/log/Install/

% nice teetime -t ja-font-ume_ portinstall -s ja-font-ume
logging (from the next line till the end) to ja-font-ume_20191007.log
teetime! 2019年 10月 7日 月曜日 13時09分52秒 JST
teetime! working directory is /var/tmp/log/Install
teetime> portinstall -s ja-font-ume
[Reading data from pkg(8) ... - 295 packages found - done]
--->  [Executing a command as root: sudo /usr/bin/touch /var/db/pkgdb.fixme]
〜
--->  [Executing a command as root: sudo /usr/local/sbin/pkgdb -aFOQ]
teetime! 2019年 10月 7日 月曜日 13時10分08秒 JST
% cd /var/tmp/log/Install/

% nice teetime -t emacs portinstall -s emacs
logging (from the next line till the end) to emacs20191007.log
teetime! 2019年 10月 7日 月曜日 13時14分30秒 JST
teetime! working directory is /var/tmp/log/Install
teetime> portinstall -s emacs
[Reading data from pkg(8) ... - 296 packages found - done]
--->  [Executing a command as root: sudo /usr/bin/touch /var/db/pkgdb.fixme]
〜
--->  [Executing a command as root: sudo /usr/local/sbin/pkgdb -aFOQ]
teetime! 2019年 10月 7日 月曜日 17時52分09秒 JST
PC の負荷の都合により途中でダイアログ入力待ちの状態で長時間止めていたため時間が余分にかかっている。
無事にビルド・インストールできた。
起動してみた所。
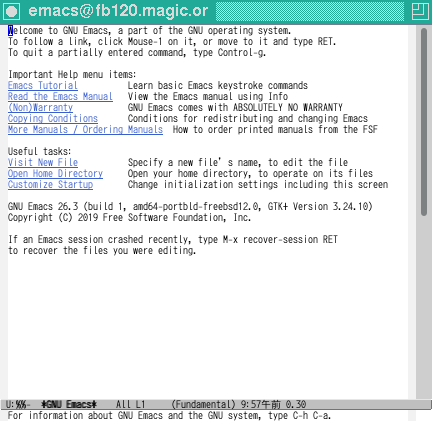
なお、Emacs で梅フォントを用いる設定は、以前 Emacs のメニューバーから設定しホームディレクトリ下のファイルに保存していた。
xterm の代わりに用いる。
% cd /var/tmp/log/Install/

% ls -ld /usr/ports/*/rxvt-*
-rw-r--r--  1 nsmrtks  wheel  931198  1月 24  2016 /usr/ports/distfiles/rxvt-unicode-9.22.tar.bz2
drwxr-xr-x  3 nsmrtks  wheel       7  9月  6 10:07 /usr/ports/x11/rxvt-unicode

% nice teetime -t rxvt-unicode_ portinstall -s rxvt-unicode
logging (from the next line till the end) to rxvt-unicode_20191008.log
teetime! 2019年 10月 8日 火曜日 10時05分35秒 JST
teetime! working directory is /var/tmp/log/Install
teetime> portinstall -s rxvt-unicode
[Reading data from pkg(8) ... - 381 packages found - done]
--->  [Executing a command as root: sudo /usr/bin/touch /var/db/pkgdb.fixme]
パスワード:
--->  Installing 'rxvt-unicode-9.22_1' from a port (x11/rxvt-unicode)
--->  Building '/usr/ports/x11/rxvt-unicode'
===>  Cleaning for gdk-pixbuf2-2.38.1
===>   /zfs/ports/graphics/gdk-pixbuf2/work not writable, skipping
===>  Cleaning for gobject-introspection-1.56.1,1
===>   /zfs/ports/devel/gobject-introspection/work not writable, skipping
===>  Cleaning for cairo-1.16.0,2
===>   /zfs/ports/graphics/cairo/work not writable, skipping
===>  Cleaning for glib-2.56.3_6,1
===>   /zfs/ports/devel/glib20/work not writable, skipping
===>  Cleaning for shared-mime-info-1.10_1
===>   /zfs/ports/misc/shared-mime-info/work not writable, skipping
===>  Cleaning for intltool-0.51.0_1
===>   /zfs/ports/textproc/intltool/work not writable, skipping
===>  Cleaning for p5-XML-Parser-2.44
===>   /zfs/ports/textproc/p5-XML-Parser/work not writable, skipping
===>  Cleaning for tiff-4.0.10_1
===>   /zfs/ports/graphics/tiff/work not writable, skipping
===>  Cleaning for jbigkit-2.1_1
===>   /zfs/ports/graphics/jbigkit/work not writable, skipping
===>  Cleaning for rxvt-unicode-9.22_1
===>  Switching to root credentials to create /var/db/ports/x11_rxvt-unicode
Password:
何か変なことになっている.. Ctrl-C で止めて、おかしくなっているディレクトリを試しに一個見てみると..
% ls -l /usr/ports/graphics/gdk-pixbuf2
total 7
-rw-r--r--  1 nsmrtks  wheel   178  7月 17 21:53 distinfo
-rw-r--r--  1 nsmrtks  wheel  1196  7月 17 21:53 Makefile
-rw-r--r--  1 nsmrtks  wheel   249  9月  1  2017 pkg-descr
-rw-r--r--  1 nsmrtks  wheel  7278  7月 17 21:53 pkg-plist
drwxr-xr-x  5 root     wheel    19 10月  7 13:31 work
work ディレクトリを sudo で消すことにする。
% sudo portsclean -C
Cleaning out /usr/ports/*/*/work...
Delete /usr/ports/x11/libxkbcommon/work
〜
Delete /usr/ports/print/psutils/work
done.
そしてやり直す。
% nice teetime -t rxvt-unicode_ portinstall -s rxvt-unicode
conflicting rxvt-unicode_20191008.log
logging (from the next line till the end) to rxvt-unicode_2019100810.log
teetime! 2019年 10月 8日 火曜日 10時13分32秒 JST
teetime! working directory is /var/tmp/log/Install
teetime> portinstall -s rxvt-unicode
[Reading data from pkg(8) ... - 381 packages found - done]
--->  [Executing a command as root: sudo /usr/bin/touch /var/db/pkgdb.fixme]
〜
--->  [Executing a command as root: sudo /usr/local/sbin/pkgdb -aFOQ]
teetime! 2019年 10月 8日 火曜日 10時17分49秒 JST
今度はうまくビルド・インストールできた。
ここで、筆者の ~/.Xdefaults ファイルには、以下のような記述があり、梅フォントを使うようになっている。
〜
! urxvt (rxvt-unicode)
URxvt.transparent:	true
URxvt.shading:		193
URxvt.font:		xft:UMEgothic:pixelsize=9
〜
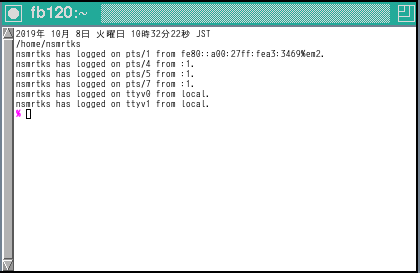
起動してみた所。 なおコマンド名は urxvt である。 (もし ~/.Xdefaults の内容が反映されていない場合、xrdb ~/.Xdefaults を実行してみる。)
% cd /var/tmp/log/Install

% nice teetime -t rsync portinstall -s rsync
logging (from the next line till the end) to rsync20191008.log
teetime! 2019年 10月 8日 火曜日 10時40分15秒 JST
teetime! working directory is /var/tmp/log/Install
teetime> portinstall -s rsync
[Reading data from pkg(8) ... - 384 packages found - done]
〜
--->  [Executing a command as root: sudo /usr/local/sbin/pkgdb -aFOQ]
teetime! 2019年 10月 8日 火曜日 10時40分47秒 JST
無事にビルド・インストールできた。
余談だが、先ほどの rsync の公式サイトは https://rsync.samba.org/ で、Samba と同じ所にある。
筆者は、仮想マシン上の FreeBSD ←→ ホストの Windows 間でファイルをやり取りするために、従来より Samba を用いている。
% cd /var/tmp/log/Install/
% ls -ld /usr/ports/*/samba*
-rw-r--r-- 1 nsmrtks wheel 18316560 8月 27 20:18 /usr/ports/distfiles/samba-4.10.8.tar.gz
drwxr-xr-x 3 nsmrtks wheel 6 9月 6 10:04 /usr/ports/dns/samba-nsupdate[39;49m[m/
drwxr-xr-x 3 nsmrtks wheel 7 9月 6 10:05 /usr/ports/net/samba410
drwxr-xr-x 3 nsmrtks wheel 7 9月 6 10:05 /usr/ports/net/samba48
% nice teetime -t samba410_ portinstall -s samba410
logging (from the next line till the end) to samba410_20191008.log
teetime! 2019年 10月 8日 火曜日 10時53分31秒 JST
teetime! working directory is /var/tmp/log/Install
teetime> portinstall -s samba410
[Reading data from pkg(8) ... - 385 packages found - done]
---> [Executing a command as root: sudo /usr/bin/touch /var/db/pkgdb.fixme]
〜
---> [Executing a command as root: sudo /usr/local/sbin/pkgdb -aFOQ]
teetime! 2019年 10月 8日 火曜日 11時45分42秒 JST
無事にビルド・インストールできた。
次に、以下のような /usr/local/etc/smb4.conf ファイルを作成した。 ここではワークグループ名を「MAGIC」、NetBIOS 名を「fb」と設定している。
# 2019-10-08 nsmrtks

[global]
	workgroup = MAGIC
	netbios name = fb
	map archive = no

[homes]
	comment = Home Directories (%h)
	browseable = no
	writable = yes

# end-of-file
また、以下を /etc/rc.conf に追記する。 (/usr/local/etc/rc.d/samba_server を参照)
# 2019-10-09 nsmrtks
# (see /usr/local/etc/rc.d/samba_server)
samba_server_enable="YES"
ここまで、筆者は旧環境でも、同じ
NetBIOS 名「fb」で Samba を起動していたので、先にそれを停止させる。
(そして次回からは起動しないようにする)
そして新環境で Samba を起動する。
% cd /

% sudo /usr/local/etc/rc.d/samba_server start
〜
Performing sanity check on Samba configuration: OK
Starting nmbd.
Starting smbd.

% ps axw | egrep mb
59348  -  Ss      0:00.05 /usr/local/sbin/nmbd --daemon --configfile=/usr/local/etc/smb4.conf
59353  -  Is      0:00.55 /usr/local/sbin/smbd --daemon --configfile=/usr/local/etc/smb4.conf
59356  -  S       0:00.00 /usr/local/sbin/smbd --daemon --configfile=/usr/local/etc/smb4.conf
59357  -  S       0:00.00 /usr/local/sbin/smbd --daemon --configfile=/usr/local/etc/smb4.conf
59358  -  I       0:00.01 /usr/local/sbin/smbd --daemon --configfile=/usr/local/etc/smb4.conf
59363  3  S+      0:00.00 egrep mb
そして、ユーザ (自分) を Samba に追加する。 (コマンド名が類推しにくいが pdbedit である)
% sudo pdbedit -a -u nsmrtks
〜
new password:パスワードを考えて入力y↵
retype new password:もう一度入力y↵
Unix username:        nsmrtks
NT username:
Account Flags:        [U          ]
User SID:             S-1-5-21-750377330-2325953255-673116876-1000
Primary Group SID:    S-1-5-21-750377330-2325953255-673116876-513
Full Name:            NISHIMURA Takeshi
Home Directory:       \\fb\nsmrtks
HomeDir Drive:
Logon Script:
Profile Path:         \\fb\nsmrtks\profile
Domain:               FB
Account desc:
Workstations:
Munged dial:
Logon time:           0
Logoff time:          9223372036854775807 seconds since the Epoch
Kickoff time:         9223372036854775807 seconds since the Epoch
Password last set:    水, 09 10月 2019 10:25:11 JST
Password can change:  水, 09 10月 2019 10:25:11 JST
Password must change: never
Last bad password   : 0
Bad password count  : 0
Logon hours         : FFFFFFFFFFFFFFFFFFFFFFFFFFFFFFFFFFFFFFFFFF
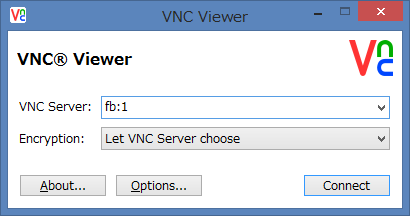
これで、Windows 側から \\fb でアクセスできるようになったし、

また VNC ビュアーにおいては、IPv4 アドレスでなくホスト名 fb を指定して接続するということも出来る。
筆者は以前までウィンドウマネージャとして mwm (Motif Window Manager) を長らく使っていたり、また WindowMaker も少し使っていたのだが、どうも古くて動作に支障が出ていると思うようになった。 (なおこれまでのスクリーンショットを見ても分かる通り今起動しているのは twm である。twm も昔は使っていた。)
やはり GNOME か KDE なのか.. と、旧環境を構築する時に思っていた時、第三の統合デスクトップ?として、「GNOME で使われている GTK+ ツールキットをベースにしたデスクトップ環境」 でありながらより軽い Xfce というものもあるということを以下などで知った。
旧環境ではどれにするか決めあぐねて、3つともインストール(!)したりしていた。
ここでは Xfce にしてみる。
(他の作業環境では KDE を使ったり GNOME を試したりもしている)
% cd /var/tmp/log/Install/

% nice teetime -t xfce portinstall -s xfce
logging (from the next line till the end) to xfce20191009.log
teetime! 2019年 10月 9日 水曜日 11時15分26秒 JST
teetime! working directory is /var/tmp/log/Install
teetime> portinstall -s xfce
[Reading data from pkg(8) ... - 400 packages found - done]
--->  [Executing a command as root: sudo /usr/bin/touch /var/db/pkgdb.fixme]
〜
===>   gstreamer1-plugins-1.14.4_2 depends on package: iso-codes>=0 - not found
===>  iso-codes-4.2 needs Python 3.4 at least, but 2.7 was specified.
*** Error code 1

Stop.
make[15]: stopped in /usr/ports/misc/iso-codes
*** Error code 1

Stop.
make[14]: stopped in /usr/ports/multimedia/gstreamer1-plugins
*** Error code 1

Stop.
make[13]: stopped in /usr/ports/multimedia/gstreamer1-plugins-bad
*** Error code 1

Stop.
make[12]: stopped in /zfs/ports/www/webkit2-gtk3
*** Error code 1

Stop.
make[11]: stopped in /usr/ports/www/webkit2-gtk3
*** Error code 1

Stop.
make[10]: stopped in /zfs/ports/net/gnome-online-accounts
*** Error code 1

Stop.
make[9]: stopped in /usr/ports/net/gnome-online-accounts
*** Error code 1

Stop.
make[8]: stopped in /usr/ports/devel/libgdata
*** Error code 1

Stop.
make[7]: stopped in /zfs/ports/devel/gvfs
*** Error code 1

Stop.
make[6]: stopped in /usr/ports/devel/gvfs
*** Error code 1

Stop.
make[5]: stopped in /zfs/ports/x11-fm/thunar
*** Error code 1

Stop.
make[4]: stopped in /usr/ports/x11-fm/thunar
*** Error code 1

Stop.
make[3]: stopped in /zfs/ports/x11-wm/xfce4-desktop
*** Error code 1

Stop.
make[2]: stopped in /usr/ports/x11-wm/xfce4-desktop
*** Error code 1

Stop.
make[1]: stopped in /zfs/ports/x11-wm/xfce4
*** Error code 1

Stop.
make: stopped in /zfs/ports/x11-wm/xfce4
** Command failed [exit code 1]: /usr/bin/script -qa /tmp/portinstall20191009-59547-pj1cdx env make FETCH_BEFORE_ARGS=-q
** Fix the problem and try again.
--->  [Executing a command as root: sudo /usr/local/sbin/pkgdb -aFOQ]
パスワード:
** Listing the failed packages (-:ignored / *:skipped / !:failed)
	! x11-wm/xfce4	(unknown build error)
teetime! 2019年 10月 9日 水曜日 11時41分21秒 JST
変な所で止まってしまった。 iso-codes とやらを単独でビルドを試みる。
% nice teetime -t iso-codes_ portinstall -s iso-codes
logging (from the next line till the end) to iso-codes_20191009.log
teetime! 2019年 10月 9日 水曜日 11時44分26秒 JST
teetime! working directory is /var/tmp/log/Install
teetime> portinstall -s iso-codes
[Reading data from pkg(8) ... - 430 packages found - done]
--->  [Executing a command as root: sudo /usr/bin/touch /var/db/pkgdb.fixme]
〜
--->  [Executing a command as root: sudo /usr/local/sbin/pkgdb -aFOQ]
teetime! 2019年 10月 9日 水曜日 11時45分05秒 JST
うまくいった。 xfce のビルドに戻る。 (繰り返しになるが今度は portinstall に -w オプションを付けた方がよい)
作業記録の都合で、ここだけ間違えて /var/tmp/log/Install ではなくホームディレクトリで実行してしまった。
% nice teetime -t iso-codes_ portinstall -sw iso-codes
logging (from the next line till the end) to xfce20191009.log
teetime! 2019年 10月 9日 水曜日 11時49分17秒 JST
teetime! working directory is /home/nsmrtks
teetime> portinstall -sw xfce
[Reading data from pkg(8) ... - 431 packages found - done]
--->  [Executing a command as root: sudo /usr/bin/touch /var/db/pkgdb.fixme]
〜
===>   gstreamer1-plugins-gl-1.14.4_2 depends on shared library: libgraphene-1.0.so - not found
===>  graphene-1.8.2_1 needs Python 3.4 at least, but 2.7 was specified.
*** Error code 1

Stop.
make[15]: stopped in /usr/ports/graphics/graphene
*** Error code 1

Stop.
make[14]: stopped in /zfs/ports/graphics/gstreamer1-plugins-gl
*** Error code 1

Stop.
make[13]: stopped in /usr/ports/graphics/gstreamer1-plugins-gl
*** Error code 1

Stop.
make[12]: stopped in /zfs/ports/www/webkit2-gtk3
*** Error code 1

Stop.
make[11]: stopped in /usr/ports/www/webkit2-gtk3
*** Error code 1

Stop.
make[10]: stopped in /zfs/ports/net/gnome-online-accounts
*** Error code 1

Stop.
make[9]: stopped in /usr/ports/net/gnome-online-accounts
*** Error code 1

Stop.
make[8]: stopped in /usr/ports/devel/libgdata
*** Error code 1

Stop.
make[7]: stopped in /zfs/ports/devel/gvfs
*** Error code 1

Stop.
make[6]: stopped in /usr/ports/devel/gvfs
*** Error code 1

Stop.
make[5]: stopped in /zfs/ports/x11-fm/thunar
*** Error code 1

Stop.
make[4]: stopped in /usr/ports/x11-fm/thunar
*** Error code 1

Stop.
make[3]: stopped in /zfs/ports/x11-wm/xfce4-desktop
*** Error code 1

Stop.
make[2]: stopped in /usr/ports/x11-wm/xfce4-desktop
*** Error code 1

Stop.
make[1]: stopped in /zfs/ports/x11-wm/xfce4
*** Error code 1

Stop.
make: stopped in /zfs/ports/x11-wm/xfce4
** Command failed [exit code 1]: /usr/bin/script -qa /tmp/portinstall20191009-1007-1chouwp env make FETCH_BEFORE_ARGS=-q
** Fix the problem and try again.
--->  [Executing a command as root: sudo /usr/local/sbin/pkgdb -aFOQ]
〜
** Listing the failed packages (-:ignored / *:skipped / !:failed)
	! x11-wm/xfce4	(unknown build error)
teetime! 2019年 10月 9日 水曜日 11時58分23秒 JST
また変な所で止まってしまった。 graphene を単独でビルドを試みる。
% nice teetime -t graphene portinstall -s graphene
logging (from the next line till the end) to graphene20191009.log
teetime! 2019年 10月 9日 水曜日 12時05分13秒 JST
teetime! working directory is /var/tmp/log/Install
teetime> portinstall -s graphene
[Reading data from pkg(8) ... - 435 packages found - done]
--->  [Executing a command as root: sudo /usr/bin/touch /var/db/pkgdb.fixme]
〜
--->  [Executing a command as root: sudo /usr/local/sbin/pkgdb -aFOQ]
teetime! 2019年 10月 9日 水曜日 12時08分42秒 JST
うまくいった。 xfce のビルドに戻る。
% nice teetime -t xfce portinstall -sw xfce
conflicting xfce20191009.log
logging (from the next line till the end) to xfce2019100912.log
teetime! 2019年 10月 9日 水曜日 12時10分27秒 JST
teetime! working directory is /var/tmp/log/Install
teetime> portinstall -sw xfce
[Reading data from pkg(8) ... - 439 packages found - done]
--->  [Executing a command as root: sudo /usr/bin/touch /var/db/pkgdb.fixme]
〜
===>  Installing for webkit2-gtk3-2.24.3_1
===>  Checking if webkit2-gtk3 is already installed
===>  Switching to root credentials for 'install' target
Password:
sudo: timed out reading password
*** Error code 1

Stop.
make[12]: stopped in /zfs/ports/www/webkit2-gtk3
*** Error code 1

Stop.
make[11]: stopped in /usr/ports/www/webkit2-gtk3
*** Error code 1

Stop.
make[10]: stopped in /zfs/ports/net/gnome-online-accounts
*** Error code 1

Stop.
make[9]: stopped in /usr/ports/net/gnome-online-accounts
*** Error code 1

Stop.
make[8]: stopped in /usr/ports/devel/libgdata
*** Error code 1

Stop.
make[7]: stopped in /zfs/ports/devel/gvfs
*** Error code 1

Stop.
make[6]: stopped in /usr/ports/devel/gvfs
*** Error code 1

Stop.
make[5]: stopped in /zfs/ports/x11-fm/thunar
*** Error code 1

Stop.
make[4]: stopped in /usr/ports/x11-fm/thunar
*** Error code 1

Stop.
make[3]: stopped in /zfs/ports/x11-wm/xfce4-desktop
*** Error code 1

Stop.
make[2]: stopped in /usr/ports/x11-wm/xfce4-desktop
*** Error code 1

Stop.
make[1]: stopped in /zfs/ports/x11-wm/xfce4
*** Error code 1

Stop.
make: stopped in /zfs/ports/x11-wm/xfce4
** Command failed [exit code 1]: /usr/bin/script -qa /tmp/portinstall20191009-8547-1tceyep env make FETCH_BEFORE_ARGS=-q
** Fix the problem and try again.
--->  [Executing a command as root: sudo /usr/local/sbin/pkgdb -aFOQ]
パスワード:
** Listing the failed packages (-:ignored / *:skipped / !:failed)
	! x11-wm/xfce4	(unknown build error)
teetime! 2019年 10月 9日 水曜日 15時29分29秒 JST
おっと。
% nice teetime -t xfce portinstall -sw xfce
conflicting xfce20191009.log
logging (from the next line till the end) to xfce2019100915.log
teetime! 2019年 10月 9日 水曜日 15時32分16秒 JST
teetime! working directory is /var/tmp/log/Install
teetime> portinstall -sw xfce
[Reading data from pkg(8) ... - 446 packages found - done]
--->  [Executing a command as root: sudo /usr/bin/touch /var/db/pkgdb.fixme]
〜
--->  [Executing a command as root: sudo /usr/local/sbin/pkgdb -aFOQ]
teetime! 2019年 10月 9日 水曜日 16時07分56秒 JST
無事にビルド・インストールできた。
Xfce は startxfce4 コマンドで起動できる。 筆者の ~/.vnc/xstartup は、startxfce4 コマンドが存在すればそれを起動するようになっている。
#!/bin/tcsh
〜
where twm	> /dev/null && set WINDOWMAN=twm
where mwm	> /dev/null && set WINDOWMAN=mwm
where startxfce4 >/dev/null && set WINDOWMAN='startxfce4'
〜
$WINDOWMAN &
Xvnc (vncserver) を起動し直す。 そして VNC ビューアも接続し直す。
% vncserver -kill :1
Killing Xvnc process ID 49946

% vncserver -geometry 1366x768 -dpi 75

New 'fb120.magic.or:1 (nsmrtks)' desktop is fb120.magic.or:1

Starting applications specified in /home/nsmrtks/.vnc/xstartup
Log file is /home/nsmrtks/.vnc/fb120.magic.or:1.log
無事に Xfce で起動した。 (壁紙は以前の設定が旧環境のホームディレクトリからコピーされてきている。 また設定により上下のバーを自動的に隠すようになっており見えていない。)
ところで、ここで Emacs を起動すると..
分かりにくいかもしれないが、さっき twm の時に起動した
Emacs よりも大きいサイズで表示されている。
これはどういうことだろうか。
実は X11 の DPI の設定をどうやら Xfce が上書きしていて、Emacs
がそれに沿って表示されているようなのだ。
vncserver コマンドに -dpi 75 オプションを付けず、且つ twm のとき。
% xdpyinfo
〜
screen #0:
  dimensions:    1366x768 pixels (361x203 millimeters)
  resolution:    96x96 dots per inch
〜
vncserver コマンドに -dpi 75 オプションを付けて、且つ twm のとき。
% xdpyinfo
〜
  resolution:    75x75 dots per inch
〜
vncserver コマンドに -dpi 75 オプションを付けて、且つ Xfce のとき。
% xdpyinfo
〜
  resolution:    96x96 dots per inch
〜
これで何が困るかというと、細かい話だが、Emacs を、ちょうどいいフォントサイズに設定した時に、いわゆる半角文字といわゆる全角文字を、1:2 の割合で表示してくれなくなるのである。 (Emacs のバグだろうか?)
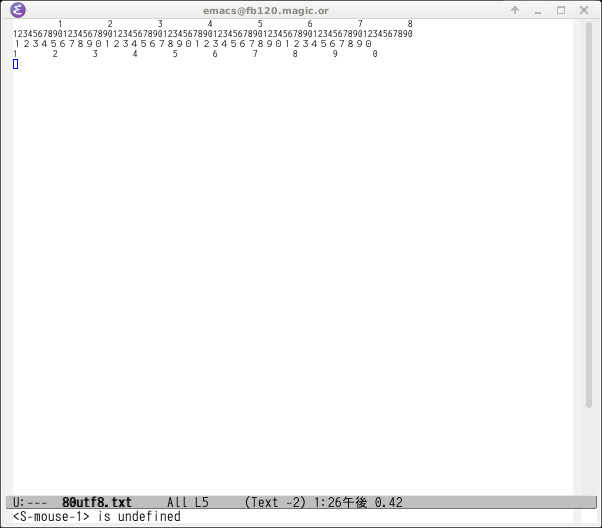
Xfce に DPI の設定があればよいのだが見つけられていない。
そこで筆者は、VNC サーバを立ち上げるたびに、xrandr --dpi 75
というコマンドを入力して
(値は必ずしも 75 にしないといけないわけではなくて幅がある)、DPI
を設定し直している。
何か他に良い手はないのだろうか..
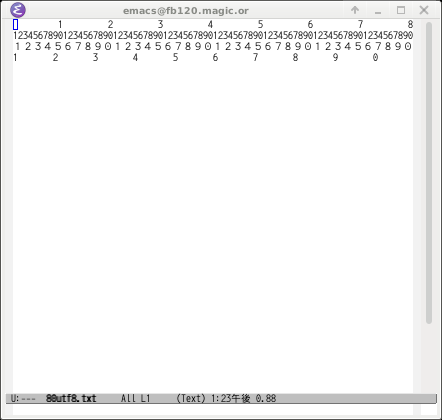
余談だが、TigerVNC サーバではなく TightVNC サーバでは DPI のデフォルト値が 75 だったらしく、Xfce を使用していなかった頃、TigerVNC にすると Emacs がうまく表示されなくなってしまい、TightVNC から移行できないでいたことがあった。 原因と対策方法が DPI であることをやっと突き止めて TightVNC から TigerVNC に移行できた。
% cd /var/tmp/log/Install/

% ls -ld /usr/ports/*/*nkf*
-rw-r--r--  1 nsmrtks  wheel  232479 12月 12  2015 /usr/ports/distfiles/nkf-2.1.4.tar.gz
drwxr-xr-x  3 nsmrtks  wheel       6  9月  6 10:05 /usr/ports/japanese/nkf
drwxr-xr-x  2 nsmrtks  wheel       6  9月  6 10:05 /usr/ports/japanese/p5-nkf
drwxr-xr-x  2 nsmrtks  wheel       6  9月  6 10:05 /usr/ports/mail/junkfilter

% nice teetime -t ja-nkf_ portinstall -s ja-nkf
logging (from the next line till the end) to ja-nkf_20191015.log
teetime! 2019年 10月15日 火曜日 11時14分54秒 JST
teetime! working directory is /var/tmp/log/Install
teetime> portinstall -s ja-nkf
[Reading data from pkg(8) ... - 484 packages found - done]
--->  [Executing a command as root: sudo /usr/bin/touch /var/db/pkgdb.fixme]
〜
--->  [Executing a command as root: sudo /usr/local/sbin/pkgdb -aFOQ]
teetime! 2019年 10月15日 火曜日 11時15分05秒 JST
mozc-el の正確なパッケージ名が分からなかったので、pkg search コマンドで調べている
% cd /var/tmp/log/Install/

% ls -ld /usr/ports/*/*mozc*
-rw-r--r--  1 nsmrtks  wheel  36711684  3月  6  2019 /usr/ports/distfiles/hrs-allbsd-mozc-v2.23.2815.102.00_GH0.tar.gz
drwxr-xr-x  2 nsmrtks  wheel         5  9月  6 10:05 /usr/ports/japanese/boiled-mozc
drwxr-xr-x  3 nsmrtks  wheel         4  9月  6 10:05 /usr/ports/japanese/fcitx-mozc
drwxr-xr-x  3 nsmrtks  wheel         4  9月  6 10:05 /usr/ports/japanese/ibus-mozc
drwxr-xr-x  2 nsmrtks  wheel         4  9月  6 10:05 /usr/ports/japanese/mozc-el
drwxr-xr-x  3 nsmrtks  wheel         6  9月  6 10:05 /usr/ports/japanese/mozc-server
drwxr-xr-x  2 nsmrtks  wheel         3  9月  6 10:05 /usr/ports/japanese/mozc-tool
drwxr-xr-x  3 nsmrtks  wheel         4  9月  6 10:05 /usr/ports/japanese/uim-mozc

% nice teetime -t mozc-el_ portinstall -s mozc-el
logging (from the next line till the end) to mozc-el_20191015.log
teetime! 2019年 10月15日 火曜日 11時20分43秒 JST
teetime! working directory is /var/tmp/log/Install
teetime> portinstall -s mozc-el
** No such package or port: mozc-el
teetime! 2019年 10月15日 火曜日 11時20分43秒 JST

% pkg search mozc-el
pkg: Repository FreeBSD missing. 'pkg update' required
pkg: Repository FreeBSD cannot be opened. 'pkg update' required
70で終了しました

% pkg update
pkg: Insufficient privileges to update the repository catalogue.
77で終了しました

% sudo pkg update
〜
Updating FreeBSD repository catalogue...
〜
FreeBSD repository update completed. 32770 packages processed.
All repositories are up to date.

% pkg search mozc-el
ja-mozc-el-emacs26-2.23.2815.102.00_5 Emacs input method for Mozc
ja-mozc-el-emacs26_canna-2.23.2815.102.00_5 Emacs input method for Mozc
ja-mozc-el-emacs26_nox-2.23.2815.102.00_5 Emacs input method for Mozc
ja-mozc-el-emacs27-2.23.2815.102.00_5 Emacs input method for Mozc
ja-mozc-el-emacs27_nox-2.23.2815.102.00_5 Emacs input method for Mozc

% emacs --version
GNU Emacs 26.3
Copyright (C) 2019 Free Software Foundation, Inc.
GNU Emacs comes with ABSOLUTELY NO WARRANTY.
You may redistribute copies of GNU Emacs
under the terms of the GNU General Public License.
For more information about these matters, see the file named COPYING.

% nice teetime -t ja-mozc-el-emacs26_ portinstall -s ja-mozc-el-emacs26
logging (from the next line till the end) to ja-mozc-el-emacs26_20191015.log
teetime! 2019年 10月15日 火曜日 11時22分06秒 JST
teetime! working directory is /var/tmp/log/Install
teetime> portinstall -s ja-mozc-el-emacs26
[Reading data from pkg(8) ... - 485 packages found - done]
--->  [Executing a command as root: sudo /usr/bin/touch /var/db/pkgdb.fixme]
〜
===>   Registering installation for ja-mozc-el-emacs26-2.23.2815.102.00_5
Installing ja-mozc-el-emacs26-2.23.2815.102.00_5...
To activate mozc, you will need to add the following lines to
your ~/.emacs:

(set-language-environment "Japanese")
(setq default-input-method "japanese-mozc")
(global-set-key (kbd "C-o") 'toggle-input-method)

〜
--->  [Executing a command as root: sudo /usr/local/sbin/pkgdb -aFOQ]
teetime! 2019年 10月15日 火曜日 11時44分41秒 JST
mozc-server (ja-mozc-server) もインストールされる。
% pkg info | egrep -i mozc
ja-mozc-el-emacs26-2.23.2815.102.00_5 Emacs input method for Mozc
ja-mozc-server-2.23.2815.102.00_5 Mozc Japanese Input Method, Server
起動については後述する。
Emacs への設定方法について、ビルドのログにもメッセージが出ている。 (再掲)
To activate mozc, you will need to add the following lines to
your ~/.emacs:

(set-language-environment "Japanese")
(setq default-input-method "japanese-mozc")
(global-set-key (kbd "C-o") 'toggle-input-method)
この 3行を ~/.emacs
に書くわけだが、(setq default-input-method "japanese-mozc")
については、設定すると、もし mozc がインストールされていない状態で
C-\ を押すとエラーになる。
その場合は C-u C-\ とすると、他の入力方法 ("japanese" 等) を選べる。
または、この行を書かなくても、C-u C-\ で "japanese-mozc" を選ぶと
mozc で入力が可能である。
ただし毎回やらないといけない。
最後の (global-set-key (kbd "C-o") 'toggle-input-method)
は、好みの問題だろう。
筆者は設定していない。
(C-\ を用いる)
(2019-10-30 追記) (set-language-environment "Japanese") の行があると、Emacs の挙動がおかしくなった。 その場合、この行は外したほうが良いかもしれない。 外しても、mozc-el は正常に動作していた。
他には ja-fcitx-mozc や ja-ibus-mozc という選択肢もある。
% pkg search mozc | egrep -v emacs
ja-fcitx-mozc-2.23.2815.102.00_5 Mozc engine for Fcitx
ja-ibus-mozc-2.23.2815.102.00_5 Mozc engine for IBus
ja-mozc-server-2.23.2815.102.00_5 Mozc Japanese Input Method, Server
ja-mozc-tool-2.23.2815.102.00_5 Mozc tool for IBus, SCIM, and others
ja-uim-mozc-2.23.2815.102.00_5 Mozc engine for uim

% cd /var/tmp/log/Install/

% nice teetime -t ja-uim-mozc_ portinstall -s ja-uim-mozc
logging (from the next line till the end) to ja-uim-mozc_20191016.log
teetime! 2019年 10月16日 水曜日 09時23分20秒 JST
teetime! working directory is /var/tmp/log/Install
teetime> portinstall -s ja-uim-mozc
[Reading data from pkg(8) ... - 491 packages found - done]
--->  [Executing a command as root: sudo /usr/bin/touch /var/db/pkgdb.fixme]
〜
===>  Checking if qtchooser is already installed
===>  Switching to root credentials for 'install' target
Password:
sudo: timed out reading password
*** Error code 1

Stop.
make[6]: stopped in /usr/ports/misc/qtchooser
*** Error code 1

Stop.
make[5]: stopped in /usr/ports/devel/qt5-qmake
*** Error code 1

Stop.
make[4]: stopped in /usr/ports/devel/qt5-buildtools
*** Error code 1

Stop.
make[3]: stopped in /zfs/ports/japanese/mozc-tool
*** Error code 1

Stop.
make[2]: stopped in /usr/ports/japanese/mozc-tool
*** Error code 1

Stop.
make[1]: stopped in /zfs/ports/japanese/uim-mozc
*** Error code 1

Stop.
make: stopped in /zfs/ports/japanese/uim-mozc
** Command failed [exit code 1]: /usr/bin/script -qa /tmp/portinstall20191016-51885-1y8i1zb env make FETCH_BEFORE_ARGS=-q
** Fix the problem and try again.
--->  [Executing a command as root: sudo /usr/local/sbin/pkgdb -aFOQ]
パスワード:
** Listing the failed packages (-:ignored / *:skipped / !:failed)
	! japanese/uim-mozc	(unknown build error)
teetime! 2019年 10月16日 水曜日 09時37分19秒 JST
おっと。
% nice teetime -t ja-uim-mozc_ portinstall -sw ja-uim-mozc
conflicting ja-uim-mozc_20191016.log
logging (from the next line till the end) to ja-uim-mozc_2019101609.log
teetime! 2019年 10月16日 水曜日 09時38分05秒 JST
teetime! working directory is /var/tmp/log/Install
teetime> portinstall -sw ja-uim-mozc
[Reading data from pkg(8) ... - 492 packages found - done]
--->  [Executing a command as root: sudo /usr/bin/touch /var/db/pkgdb.fixme]
〜
===>  Checking if qt5-gui is already installed
===>  Switching to root credentials for 'install' target
Password:
sudo: timed out reading password
*** Error code 1

Stop.
make[4]: stopped in /usr/ports/x11-toolkits/qt5-gui
*** Error code 1

Stop.
make[3]: stopped in /zfs/ports/japanese/mozc-tool
*** Error code 1

Stop.
make[2]: stopped in /usr/ports/japanese/mozc-tool
*** Error code 1

Stop.
make[1]: stopped in /zfs/ports/japanese/uim-mozc
*** Error code 1

Stop.
make: stopped in /zfs/ports/japanese/uim-mozc
** Command failed [exit code 1]: /usr/bin/script -qa /tmp/portinstall20191016-89914-buqj81 env make FETCH_BEFORE_ARGS=-q
** Fix the problem and try again.
--->  [Executing a command as root: sudo /usr/local/sbin/pkgdb -aFOQ]
パスワード:
** Listing the failed packages (-:ignored / *:skipped / !:failed)
	! japanese/uim-mozc	(unknown build error)
teetime! 2019年 10月16日 水曜日 10時16分40秒 JST
ありゃ。
% nice teetime -t ja-uim-mozc_ portinstall -sw ja-uim-mozc
conflicting ja-uim-mozc_20191016.log
logging (from the next line till the end) to ja-uim-mozc_2019101610.log
teetime! 2019年 10月16日 水曜日 10時17分46秒 JST
teetime! working directory is /var/tmp/log/Install
teetime> portinstall -sw ja-uim-mozc
[Reading data from pkg(8) ... - 502 packages found - done]
--->  [Executing a command as root: sudo /usr/bin/touch /var/db/pkgdb.fixme]
〜
Installing ja-uim-mozc-2.23.2815.102.00_5...
To activate uim-mozc, please add the following into ~/.xinitrc,
~/.xsession, or ~/.kde4/env (for KDE4):

export GTK_IM_MODULE=uim
export QT_IM_MODULE=uim
export XMODIFIERS=@im=uim
export XIM=uim
/usr/local/bin/mozc start
uim-xim &

〜
--->  [Executing a command as root: sudo /usr/local/sbin/pkgdb -aFOQ]
teetime! 2019年 10月16日 水曜日 10時31分12秒 JST
無事にビルド・インストールできた。
uim 及び mozc
サーバを有効化するには、ビルドのログにも出ているようなものを、~/.vnc/xstartup
に書く。
筆者は ~/.vnc/xstartup を tcsh 用に書いているので、以下のようにしている。
#!/bin/tcsh
〜
setenv GTK_IM_MODULE uim
setenv QT_IM_MODULE uim
setenv XMODIFIERS @im=uim
setenv XIM uim
/usr/local/bin/mozc start
uim-xim &
〜
「mozc_tool config_dialog」で、mozc の設定が出来たりする。 筆者は以前、スペースの入力を「半角」に設定したような記憶がある。
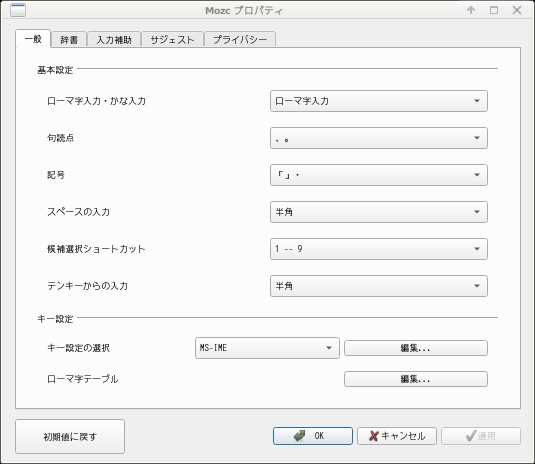
magit というのは、Emacs から git を使うための Emacs Lisp である。
筆者が仕事で使わせてもらっている。
% pkg search magit
magit-emacs26-2.90.1_1         Interface to Git for Emacs
magit-emacs26_canna-2.90.1_1   Interface to Git for Emacs
magit-emacs26_nox-2.90.1_1     Interface to Git for Emacs
magit-emacs27-2.90.1_1         Interface to Git for Emacs
magit-emacs27_nox-2.90.1_1     Interface to Git for Emacs
magit-popup-emacs26-2.13.0_1   Define prefix-infix-suffix command combos
magit-popup-emacs26_canna-2.13.0_1 Define prefix-infix-suffix command combos
magit-popup-emacs26_nox-2.13.0_1 Define prefix-infix-suffix command combos
magit-popup-emacs27-2.13.0_1   Define prefix-infix-suffix command combos
magit-popup-emacs27_nox-2.13.0_1 Define prefix-infix-suffix command combos

% cd /var/tmp/log/Install/

% nice teetime -t magit-emacs26_ portinstall -s magit-emacs26
logging (from the next line till the end) to magit-emacs26_20191016.log
teetime! 2019年 10月16日 水曜日 11時14分44秒 JST
teetime! working directory is /var/tmp/log/Install
teetime> portinstall -s magit-emacs26
[Reading data from pkg(8) ... - 507 packages found - done]
〜
===>   Registering installation for magit-emacs26-2.90.1_1
Installing magit-emacs26-2.90.1_1...
To use Magit, you should add following line to your .emacs file:

(require 'magit)

〜
--->  [Executing a command as root: sudo /usr/local/sbin/pkgdb -aFOQ]
teetime! 2019年 10月16日 水曜日 11時22分06秒 JST
筆者が仕事で使わせてもらっている。
% pkg search proxy-connect
proxy-connect-100              Command to make network connections via SOCKS and HTTPS proxies

% cd /var/tmp/log/Install/

% nice teetime -t proxy-connect_ portinstall -s proxy-connect
logging (from the next line till the end) to proxy-connect_20191016.log
teetime! 2019年 10月16日 水曜日 11時27分59秒 JST
teetime! working directory is /var/tmp/log/Install
teetime> portinstall -s proxy-connect
[Reading data from pkg(8) ... - 533 packages found - done]
〜
--->  [Executing a command as root: sudo /usr/local/sbin/pkgdb -aFOQ]
teetime! 2019年 10月16日 水曜日 11時28分06秒 JST
あの IntelliJ IDEA 系の統合開発環境が FreeBSD で動く!
筆者が仕事で使わせてもらっている。
% pkg search pycharm
pycharm-ce-2019.2.3            JetBrains PyCharm Community Edition IDE

% cd /var/tmp/log/Install/

% nice teetime -t pycharm-ce_ portinstall -s pycharm-ce
logging (from the next line till the end) to pycharm-ce_20191016.log
teetime! 2019年 10月16日 水曜日 11時34分46秒 JST
teetime! working directory is /var/tmp/log/Install
teetime> portinstall -s pycharm-ce
[Reading data from pkg(8) ... - 534 packages found - done]
〜
===>   Registering installation for bootstrap-openjdk8-r450802 as automatic
Installing bootstrap-openjdk8-r450802...
WARNING: This port only exists for bootstrapping java/openjdk8.
You are advised to remove this port as soon as a stable JDK is built.

This OpenJDK implementation requires fdescfs(5) mounted on /dev/fd and
procfs(5) mounted on /proc.

If you have not done it yet, please do the following:

	mount -t fdescfs fdesc /dev/fd
	mount -t procfs proc /proc

To make it permanent, you need the following lines in /etc/fstab:

	fdesc	/dev/fd		fdescfs		rw	0	0
	proc	/proc		procfs		rw	0	0

〜
===>   Registering installation for openjdk8-8.222.10.1_2 as automatic
Installing openjdk8-8.222.10.1_2...
This OpenJDK implementation requires fdescfs(5) mounted on /dev/fd

If you have not done it yet, please do the following:

	mount -t fdescfs fdesc /dev/fd

To make it permanent, you need the following lines in /etc/fstab:

	fdesc	/dev/fd		fdescfs		rw	0	0

〜
--->  [Executing a command as root: sudo /usr/local/sbin/pkgdb -aFOQ]
teetime! 2019年 10月16日 水曜日 11時57分27秒 JST
インストール時のメッセージに従って、/etc/fstab に以下を追記した。
# 2019-10-16 nsmrtks
# (/var/tmp/log/Install/pycharm-ce_20191016.log)
fdesc	/dev/fd		fdescfs		rw	0	0
proc	/proc		procfs		rw	0	0
そうして sudo mount -av を実行した。
% sudo mount -av
〜
/dev/ada0p2 on / (ufs, local, journaled soft-updates, writes: sync 34 async 13683, reads: sync 5807 async 33, fsid 1dda685d4800c24a)
fdescfs on /dev/fd (fdescfs, fsid 02ff005959000000)
procfs on /proc (procfs, local, fsid 03ff000202000000)

% mount
/dev/ada0p2 on / (ufs, local, journaled soft-updates)
devfs on /dev (devfs, local, multilabel)
/dev/ada0p4 on /var (ufs, local, journaled soft-updates)
/dev/da0p1 on /home/distfiles (ufs, NFS exported, local, journaled soft-updates)
zfs/nsmrtks on /home/nsmrtks (zfs, NFS exported, local, nfsv4acls)
zfs on /zfs (zfs, local, nfsv4acls)
zfs/local on /zfs/local (zfs, local, nfsv4acls)
zfs/ports on /zfs/ports (zfs, local, nfsv4acls)
tmpfs on /tmp (tmpfs, local)
fdescfs on /dev/fd (fdescfs)
procfs on /proc (procfs, local)

% df -h
Filesystem     Size    Used   Avail Capacity  Mounted on
/dev/ada0p2    4.8G    3.0G    1.5G    67%    /
devfs          1.0K    1.0K      0B   100%    /dev
/dev/ada0p4    2.9G    1.0G    1.7G    37%    /var
/dev/da0p1      15G     14G    699M    95%    /home/distfiles
zfs/nsmrtks     14G    9.5G    4.7G    67%    /home/nsmrtks
zfs            4.7G     23K    4.7G     0%    /zfs
zfs/local      7.1G    2.3G    4.7G    33%    /zfs/local
zfs/ports      5.1G    362M    4.7G     7%    /zfs/ports
tmpfs          512M     84K    512M     0%    /tmp
fdescfs        1.0K    1.0K      0B   100%    /dev/fd
procfs         4.0K    4.0K      0B   100%    /proc
筆者が仕事で Flask 等を必要としているのだが、例えば Flask は py36-Flask という ports 名が存在しているが、前述のように、筆者は Python 3.7 を必要としている。 そして、portinstall コマンドでは「py37-Flask」などと指定してインストールできないようだ。
% pkg search flask
py27-Flask-1.0.2_1             Micro web framework
〜
py36-Flask-1.0.2_1             Micro web framework
〜

% portinstall -s py37-Flask
** No such package or port: py37-Flask
そこでこれらについては普通に /usr/ports 下の該当のディレクトリ
(Python についてバージョンの区別は無い) で make するといけるようだ。
(今に始まったわけではないが毎度 WARNING が出ているのが気になるが..)
% cd /usr/ports/

% ls -ld */*lask*
〜
drwxr-xr-x  2 nsmrtks  wheel       5  9月  6 10:06 mwww/py-flask
〜

% cd www/py-flask

% nice teetime -t install make install
logging (from the next line till the end) to install20191016.log
teetime! 2019年 10月16日 水曜日 13時25分13秒 JST
teetime! working directory is /zfs/ports/www/py-flask
teetime> make install
/!\ WARNING /!\

PYTHON_DEFAULT must be a version present in PYTHON2_DEFAULT or PYTHON3_DEFAULT,
if you want more Python flavors, set BUILD_ALL_PYTHON_FLAVORS in your make.conf

〜
Installing py37-Flask-1.0.2_1...
===>  Returning to user credentials
teetime! 2019年 10月16日 水曜日 13時26分10秒 JST

% pkg info | egrep -i flask
py37-Flask-1.0.2_1             Micro web framework

% ls
distinfo             Makefile             work-py37/
install20191016.log  pkg-descr

% make clean
===>  Cleaning for py37-werkzeug-0.15.6
===>  Cleaning for py37-itsdangerous-0.24
===>  Cleaning for py37-click-7.0
===>  Cleaning for py37-Flask-1.0.2_1
===>  Cleaning for py27-Flask-1.0.2_1
===>  Cleaning for py36-Flask-1.0.2_1

% ls
distinfo             Makefile
install20191016.log  pkg-descr
なお ports が存在していないものについては pip でインストールするしかない。 その場合、まず pip (py37-pip) 自体をインストールしないといけない。
%  cd /usr/ports/*/py-pip

% pwd
/zfs/ports/devel/py-pip

% nice teetime -t install make install
logging (from the next line till the end) to install20191016.log
teetime! 2019年 10月16日 水曜日 13時41分56秒 JST
teetime! working directory is /zfs/ports/devel/py-pip
teetime> make install
===>  Switching to root credentials to create /var/db/ports/devel_py-pip
〜
===>   Registering installation for py37-pip-19.1.1
Installing py37-pip-19.1.1...
pip MUST ONLY be used:

 * With the --user flag, OR
 * To install or manage Python packages in virtual environments

Failure to follow this warning can and will result in an inconsistent
system-wide Python environment (LOCALBASE/lib/pythonX.Y/site-packages) and
cause errors.

Avoid using pip as root unless you know what you're doing.

===>  Returning to user credentials
teetime! 2019年 10月16日 水曜日 13時42分50秒 JST
「Avoid using pip as root unless you know what you're doing.」 というメッセージが気になるが..
connexion をインストールする場合..
% where pip
/usr/local/bin/pip

%  pip^D
pip     pip-3.7

% ls -ld `where pip pip-3.7`
lrwxr-xr-x  1 root  wheel    7 10月 16 13:42 /usr/local/bin/pip@ -> pip-3.7
-rwxr-xr-x  1 root  wheel  373 10月 16 13:42 /usr/local/bin/pip-3.7*

% sudo pip-3.7 install connexion
〜
Successfully installed PyYAML-5.1.2 clickclick-1.2.2 connexion-2.3.0 inflection-0.3.1 jsonschema-2.6.0 openapi-spec-validator-0.2.8
主に仕事で使わせてもらっている。
%  pkg search ^jq
jq-1.6                         Lightweight and flexible command-line JSON processor

% cd /var/tmp/log/Install/

% nice teetime -t jq portinstall -s jq
logging (from the next line till the end) to jq20191016.log
teetime! 2019年 10月16日 水曜日 17時25分55秒 JST
teetime! working directory is /var/tmp/log/Install
teetime> portinstall -s jq
[Reading data from pkg(8) ... - 557 packages found - done]
〜
--->  [Executing a command as root: sudo /usr/local/sbin/pkgdb -aFOQ]
teetime! 2019年 10月16日 水曜日 17時27分27秒 JST
%  pkg search xload
〜
xload-1.1.3                    System load average display for X
〜

% cd /var/tmp/log/Install/

% nice teetime -t xload portinstall -s xload
logging (from the next line till the end) to xload20191016.log
teetime! 2019年 10月16日 水曜日 17時31分48秒 JST
teetime! working directory is /var/tmp/log/Install
teetime> portinstall -s xload
[Reading data from pkg(8) ... - 559 packages found - done]
〜
teetime! 2019年 10月16日 水曜日 17時32分02秒 JST
実行例。
% xload -bg tan -hl red2 &
% pkg search oclock
oclock-1.0.4                   Round clock application for X

% cd /var/tmp/log/Install/

% nice teetime -t oclock portinstall -s oclock
logging (from the next line till the end) to oclock20191016.log
teetime! 2019年 10月16日 水曜日 17時33分50秒 JST
teetime! working directory is /var/tmp/log/Install
teetime> portinstall -s oclock
[Reading data from pkg(8) ... - 560 packages found - done]
〜
teetime! 2019年 10月16日 水曜日 17時34分05秒 JST
ここで筆者の ~/.Xdefaults には、以下の記述があり、oclock に自動的に色が付く。
*customization: -color-transparent を付けて、さらに xload のウィンドウの上に置いてみた例。
% oclock -transparent &
% pkg search xlogo
xlogo-1.0.5                    Displays the X Window System logo

% cd /var/tmp/log/Install/

% nice teetime -t xlogo portinstall -s xlogo
logging (from the next line till the end) to xlogo20191016.log
teetime! 2019年 10月16日 水曜日 17時36分07秒 JST
teetime! working directory is /var/tmp/log/Install
teetime> portinstall -s xlogo
[Reading data from pkg(8) ... - 561 packages found - done]
〜
teetime! 2019年 10月16日 水曜日 17時36分22秒 JST
実行例。 これも ~/.Xdefaults の記述により自動的に色が付いている。
% xlogo -render &

筆者はずっと SeaMonkey を使っていたのだが、最近 ports から削除されてしまった。 :-(
% pkg search seamonkey
70で終了しました

% pkg search firefox
firefox-69.0.2,1               Web browser based on the browser portion of Mozilla
firefox-esr-68.1.0_4,1         Web browser based on the browser portion of Mozilla

% cd /var/tmp/log/Install/

% nice teetime -t firefox portinstall -s firefox
logging (from the next line till the end) to firefox20191017.log
teetime! 2019年 10月17日 木曜日 10時03分33秒 JST
teetime! working directory is /var/tmp/log/Install
teetime> portinstall -s firefox
[Reading data from pkg(8) ... - 562 packages found - done]
〜
sed: /zfs/ports/lang/rust/work/stage/usr/local/lib/rustlib/manifest-*: No such file or directory
*** Error code 1

Stop.
make[3]: stopped in /zfs/ports/lang/rust
*** Error code 1

Stop.
make[2]: stopped in /zfs/ports/lang/rust
*** Error code 1

Stop.
make[1]: stopped in /zfs/ports/devel/rust-cbindgen
*** Error code 1

Stop.
make: stopped in /zfs/ports/www/firefox
--->  [Executing a command as root: sudo /usr/local/sbin/pkgdb -aFOQ]
パスワード:
** Listing the failed packages (-:ignored / *:skipped / !:failed)
	! www/firefox	(dependent ports)
teetime! 2019年 10月17日 木曜日 14時24分13秒 JST
おやっ?
% nice teetime -t firefox portinstall -sw firefox
conflicting firefox20191017.log
logging (from the next line till the end) to firefox2019101714.log
teetime! 2019年 10月17日 木曜日 14時24分32秒 JST
teetime! working directory is /var/tmp/log/Install
teetime> portinstall -sw firefox
[Reading data from pkg(8) ... - 566 packages found - done]
〜
sed: /zfs/ports/lang/rust/work/stage/usr/local/lib/rustlib/manifest-*: No such file or directory
*** Error code 1

Stop.
make[3]: stopped in /zfs/ports/lang/rust
*** Error code 1

Stop.
make[2]: stopped in /zfs/ports/lang/rust
*** Error code 1

Stop.
make[1]: stopped in /zfs/ports/devel/rust-cbindgen
*** Error code 1

Stop.
make: stopped in /zfs/ports/www/firefox
--->  [Executing a command as root: sudo /usr/local/sbin/pkgdb -aFOQ]
パスワード:
sudo: パスワードの読み込みがタイムしました
〜
teetime! 2019年 10月17日 木曜日 14時38分10秒 JST
最後のパスワードの読み込みのタイムアウトはともかく、ビルドできない。 :-(
筆者は、ホームディレクトリのバックアップと、freebsd-update fetch
と、portupgrade 等を一括して行うスクリプトを、日々走らせている
(手動で起動)。
(なお普通の人はパッケージの更新は portupgrade ではなく
pkg upgrade でバイナリで行えばよいでしょう)
ただしここまで、新環境ではまだ走らせていなかった。 それを設定する。
以下がコマンドラインから実行するスクリプトである。 ファイル名は bup としている。
#!/bin/sh
# 2019-10-18 nsmrtks
# 2014-12-01,29 nsmrtks
# 2014-03-14 for fb092 ..
# 2012-03-16, 09-03, 11-18, 2013-02-21, 06-04 nsmrtks

# (require back2, updatefb and /var/tmp/log/pvc.sh)

# check the dir
cd /var/tmp/log || exit 1

# get the privilege
sudo pwd

# compress the logs
find . -name \*.log -mtime +1 -print0 | xargs -0 xz -v

# backup
back2

# updatefb
[ -d updatefb ] || ( set -x ; mkdir updatefb )
( cd updatefb && teetime updatefb )

# portupgrade
sh pvc.sh

# EoF
このスクリプトからはさらに、back2 と updatefb と pvc.sh
というスクリプトが呼び出されている。
bup 及び、back2 と updatefb は、~/bin
ディレクトリに配置してコマンドパスを通してある。
pvc.sh は /var/tmp/log に配置する。
back2 は、ホームディレクトリのバックアップを行うスクリプトである。 短いのでついでに紹介しておく。
#!/bin/sh
# 2015-02-03,11-25,2016-05-29,2017-10-02,2019-10-18 nsmrtks
# moved from bup

if [ `hostname`. != fb120.magic.or. ]; then
	echo this is not fb120, backup not supported
	exit 1
fi

[ -d /var/tmp/log/back ] || ( set -x ; mkdir /var/tmp/log/back )
cd /var/tmp/log/back || exit 1

set -x
teetime -t rsync \
 rsync -a --delete-before /home/nsmrtks/ fb111c:/zfs/nsmrtks/

# EoF
updatefb は、freebsd-update fetch や pkg audit -F や ports ツリーの更新を行うスクリプトである。 以下のような内容になっている。
#!/bin/sh
# 2010-11-04,12,2013-03-14-	Time-stamp: <2017-10-23 13:59:14 nsmrtks>

# (sudoers may need to have `Defaults env_keep += "http_proxy"')

date
echo ==========================================================================
( set -x ; sudo freebsd-update fetch )
echo ==========================================================================
if type pkg >/dev/null ; then
	# They hang. Why??
	( set -x ; sudo pkg update )
	echo ------------------------------------------------------------------
	( set -x ; sudo pkg audit -F )
else
	( set -x ; sudo portaudit -Fda )
fi
echo ==========================================================================
( set -x ; sudo portsnap fetch )
echo ==========================================================================
( set -x ; portsnap update )
echo ==========================================================================
( set -x ; sudo portversion -c > portversion-c.out )
echo ==========================================================================
date

# EoF
この最後の方で、/var/tmp/log/portversion-c.out というファイルを作成している。 これは中身が sh スクリプトになっており、sh で実行すると、更新があるパッケージについて portupgrade を実行してくれるというものになっている。
pvc.sh が、sh portversion-c.out を実行するスクリプトになっている。 (前述の通り /var/tmp/log に配置)
#!/bin/sh
# 2012-03-07,2019-10-18 nsmrtks

# Usage:
#	sh pvc.sh [portupgrade options..]
# Example:
#	sh pvc.sh
#	sh pvc.sh -w

# (require teetime and ../updatefb/portversion-c.out)

[ -d /var/tmp/log/pvc ] || ( set -x ; mkdir /var/tmp/log/pvc )

set -x
cd /var/tmp/log/pvc && \
 nice teetime -t pvc sh ../updatefb/portversion-c.out -s $*

# EoF
準備が出来た。おもむろに bup を実行する..
..が、色々うまくいかなかったりして、色々やり直した..
なお nice +20 〜 としているがこれは csh (tcsh) 系の場合で、もし bash 等 sh 系の場合は nice -n 20 〜 などとする。 (あるいは効果は変わるが nice だけでもよいしそもそも nice 無しでもよい)
% cd

% nice +20 bup
〜
+ mkdir /var/tmp/log/back
+ teetime -t rsync rsync -a --delete-before /home/nsmrtks/ fb111c:/zfs/nsmrtks/
logging (from the next line till the end) to rsync20191018.log
teetime! 2019年 10月18日 金曜日 10時23分41秒 JST
teetime! working directory is /var/tmp/log/back
teetime> rsync -a --delete-before /home/nsmrtks/ fb111c:/zfs/nsmrtks/
teetime! 2019年 10月18日 金曜日 10時25分45秒 JST
+ mkdir updatefb
logging (from the next line till the end) to updatefb20191018.log
teetime! 2019年 10月18日 金曜日 10時25分45秒 JST
teetime! working directory is /var/tmp/log/updatefb
teetime> updatefb
2019年 10月18日 金曜日 10時25分45秒 JST
==========================================================================
+ sudo freebsd-update fetch
Looking up update.FreeBSD.org mirrors... 3 mirrors found.
Fetching metadata signature for 12.0-RELEASE from update2.freebsd.org... failed.
Fetching metadata signature for 12.0-RELEASE from update4.freebsd.org... failed.
Fetching metadata signature for 12.0-RELEASE from update1.freebsd.org... failed.
No mirrors remaining, giving up.
==========================================================================
+ sudo pkg update
Updating FreeBSD repository catalogue...
pkg: http://pkg.FreeBSD.org/FreeBSD:12:amd64/quarterly/meta.txz: Proxy Authentication Required
repository FreeBSD has no meta file, using default settings
pkg: http://pkg.FreeBSD.org/FreeBSD:12:amd64/quarterly/packagesite.txz: Proxy Authentication Required
Unable to update repository FreeBSD
Error updating repositories!
------------------------------------------------------------------
+ sudo pkg audit -F
pkg: http://vuxml.freebsd.org/freebsd/vuln.xml.bz2: Proxy Authentication Required
pkg: cannot fetch vulnxml file
==========================================================================
+ sudo portsnap fetch
Looking up portsnap.FreeBSD.org mirrors... 6 mirrors found.
Fetching snapshot tag from ec2-ap-northeast-1.portsnap.freebsd.org... failed.
Fetching snapshot tag from ec2-ap-southeast-2.portsnap.freebsd.org... failed.
Fetching snapshot tag from metapeer.portsnap.freebsd.org... failed.
Fetching snapshot tag from your-org.portsnap.freebsd.org... failed.
Fetching snapshot tag from ec2-sa-east-1.portsnap.freebsd.org... failed.
Fetching snapshot tag from ec2-eu-west-1.portsnap.freebsd.org... failed.
No mirrors remaining, giving up.
==========================================================================
+ portsnap update
Ports tree is already up to date.
==========================================================================
+ sudo portversion -c
[Reading data from pkg(8) ... - 566 packages found - done]
==========================================================================
2019年 10月18日 金曜日 10時25分56秒 JST
teetime! 2019年 10月18日 金曜日 10時25分56秒 JST
+ mkdir /var/tmp/log/pvc
+ cd /var/tmp/log/pvc
+ nice teetime -t pvc sh ../updatefb/portversion-c.out -s
logging (from the next line till the end) to pvc20191018.log
teetime! 2019年 10月18日 金曜日 10時25分56秒 JST
teetime! working directory is /var/tmp/log/pvc
teetime> sh ../updatefb/portversion-c.out -s
[Reading data from pkg(8) ... - 566 packages found - done]
〜
teetime! 2019年 10月18日 金曜日 10時26分32秒 JST
職場の Proxy Authentication を通して、やり直し..
% nice +20 bup
/var/tmp/log
+ teetime -t rsync rsync -a --delete-before /home/nsmrtks/ fb111c:/zfs/nsmrtks/
conflicting rsync20191018.log
logging (from the next line till the end) to rsync2019101810.log
teetime! 2019年 10月18日 金曜日 10時27分22秒 JST
teetime! working directory is /var/tmp/log/back
teetime> rsync -a --delete-before /home/nsmrtks/ fb111c:/zfs/nsmrtks/
teetime! 2019年 10月18日 金曜日 10時28分12秒 JST
conflicting updatefb20191018.log
logging (from the next line till the end) to updatefb2019101810.log
teetime! 2019年 10月18日 金曜日 10時28分12秒 JST
teetime! working directory is /var/tmp/log/updatefb
teetime> updatefb
2019年 10月18日 金曜日 10時28分12秒 JST
==========================================================================
+ sudo freebsd-update fetch
Looking up update.FreeBSD.org mirrors... 3 mirrors found.
Fetching metadata signature for 12.0-RELEASE from update2.freebsd.org... done.
Fetching metadata index... done.
Inspecting system... done.
Preparing to download files... done.

No updates needed to update system to 12.0-RELEASE-p10.

WARNING: FreeBSD 12.0-RELEASE-p10 is approaching its End-of-Life date.
It is strongly recommended that you upgrade to a newer
release within the next 1 month.
==========================================================================
+ sudo pkg update
Updating FreeBSD repository catalogue...
Fetching meta.txz: . done
Fetching packagesite.txz: .......... done
Processing entries: .......... done
FreeBSD repository update completed. 32770 packages processed.
All repositories are up to date.
------------------------------------------------------------------
+ sudo pkg audit -F
Fetching vuln.xml.bz2: .......... done
webkit2-gtk3-2.24.3_1 is vulnerable:
〜

6 problem(s) in 5 installed package(s) found.
==========================================================================
+ sudo portsnap fetch
Looking up portsnap.FreeBSD.org mirrors... 6 mirrors found.
Fetching snapshot tag from ec2-ap-northeast-1.portsnap.freebsd.org... done.
Fetching snapshot metadata... done.
Updating from Fri Sep  6 09:12:45 JST 2019 to Fri Oct 18 09:44:20 JST 2019.
Fetching 5 metadata patches... done.
Applying metadata patches... done.
Fetching 5 metadata files... done.
Fetching 3534 patches.
〜
done.
Applying patches...
  Skipping 089d0f62b4861087dd08a826ca346f4ebb4acca6cdaf4d533f119b747f3dc161-5b15d40f29c6580826de67f52467351d18fd5b47930319949e67aa3897b594d5 (1 of     3534 patc
hlist).
〜
done.
Fetching 1200 new ports or files... done.
==========================================================================
+ portsnap update
Removing old files and directories... rm: /usr/ports/devel/cvsps/work/.PLIST.readelf: Permission denied
^C
sudo portsclean -C してやり直そうとしたがそれもうまくいかず、/usr/ports 以下を消去して portsnap extract をやり直し..
% sudo portsclean -C
〜
make: cannot open Mk/bsd.port.mk.
〜
1で終了しました

% sudo portsnap fetch
Looking up portsnap.FreeBSD.org mirrors... 6 mirrors found.
Fetching snapshot tag from ec2-ap-northeast-1.portsnap.freebsd.org... done.
Latest snapshot on server matches what we already have.
No updates needed.

% cd /usr/ports

% pwd
/zfs/ports

% sudo rm -fr * ; ln -s /home/distfiles

% portsnap extract
〜

% nice +20 bup
〜
/var/tmp/log
+ teetime -t rsync rsync -a --delete-before /home/nsmrtks/ fb111c:/zfs/nsmrtks/
conflicting rsync20191018.log
conflicting rsync2019101810.log
logging (from the next line till the end) to rsync201910181044.log
teetime! 2019年 10月18日 金曜日 10時44分26秒 JST
teetime! working directory is /var/tmp/log/back
teetime> rsync -a --delete-before /home/nsmrtks/ fb111c:/zfs/nsmrtks/
teetime! 2019年 10月18日 金曜日 10時45分09秒 JST
conflicting updatefb20191018.log
conflicting updatefb2019101810.log
logging (from the next line till the end) to updatefb201910181045.log
teetime! 2019年 10月18日 金曜日 10時45分09秒 JST
teetime! working directory is /var/tmp/log/updatefb
teetime> updatefb
2019年 10月18日 金曜日 10時45分09秒 JST
==========================================================================
+ sudo freebsd-update fetch
Looking up update.FreeBSD.org mirrors... 3 mirrors found.
Fetching metadata signature for 12.0-RELEASE from update2.freebsd.org... done.
Fetching metadata index... done.
Inspecting system... done.
Preparing to download files... done.

No updates needed to update system to 12.0-RELEASE-p10.
==========================================================================
+ sudo pkg update
Updating FreeBSD repository catalogue...
FreeBSD repository is up to date.
All repositories are up to date.
------------------------------------------------------------------
+ sudo pkg audit -F
vulnxml file up-to-date
webkit2-gtk3-2.24.3_1 is vulnerable:
〜

6 problem(s) in 5 installed package(s) found.
==========================================================================
+ sudo portsnap fetch
Looking up portsnap.FreeBSD.org mirrors... 6 mirrors found.
Fetching snapshot tag from ec2-ap-northeast-1.portsnap.freebsd.org... done.
Ports tree hasn't changed since last snapshot.
No updates needed.
==========================================================================
+ portsnap update
Ports tree is already up to date.
==========================================================================
+ sudo portversion -c
[Reading data from pkg(8) ... - 566 packages found - done]
[Updating the portsdb <format:bdb_btree> in /usr/ports ... - 33300 port entries found 〜 done]
==========================================================================
2019年 10月18日 金曜日 10時45分58秒 JST
teetime! 2019年 10月18日 金曜日 10時45分58秒 JST
+ cd /var/tmp/log/pvc
+ nice teetime -t pvc sh ../updatefb/portversion-c.out -s
conflicting pvc20191018.log
logging (from the next line till the end) to pvc2019101810.log
teetime! 2019年 10月18日 金曜日 10時45分58秒 JST
teetime! working directory is /var/tmp/log/pvc
teetime%gt; sh ../updatefb/portversion-c.out -s
[Reading data from pkg(8) ... - 566 packages found - done]
〜
override rw-r--r-- root/wheel for /tmp/portupgradeLVV6hAkQ/sudo-1.8.27_1.txz?
rm: /tmp/portupgradeLVV6hAkQ: ディレクトリが空ではありません
/zfs/local/lib/ruby/site_ruby/2.5/pkgtools/pkgmisc.rb:120:in `+#39;: no implicit conversion of CommandFailedError into String (TypeError)
	from /zfs/local/lib/ruby/site_ruby/2.5/pkgtools/pkgmisc.rb:120:in `rescue in block in init_tmpdir#39;
	from /zfs/local/lib/ruby/site_ruby/2.5/pkgtools/pkgmisc.rb:117:in `block in init_tmpdir#39;
/zfs/local/lib/ruby/site_ruby/2.5/pkgtools/pkgtools.rb:487:in `__system#39;: Command failed [exit code 127]: sudo /usr/local/sbin/pkgdb -aFOQ (CommandFailedErro
r)
	from /zfs/local/lib/ruby/site_ruby/2.5/pkgtools/pkgtools.rb:510:in `__sudo#39;
	from /zfs/local/lib/ruby/site_ruby/2.5/pkgtools/pkgtools.rb:516:in `xsudo#39;
	from /zfs/local/lib/ruby/site_ruby/2.5/pkgtools/pkgdb.rb:1062:in `autofix!#39;
	from /zfs/local/lib/ruby/site_ruby/2.5/pkgtools/pkgdb.rb:1058:in `autofix#39;
	from /usr/local/sbin/portupgrade:519:in `block (2 levels) in main#39;
	from /usr/local/sbin/portupgrade:855:in `block in main#39;
	from /zfs/local/lib/ruby/2.5/optparse.rb:1062:in `initialize#39;
	from /usr/local/sbin/portupgrade:238:in `new#39;
	from /usr/local/sbin/portupgrade:238:in `main#39;
	from /usr/local/sbin/portupgrade:2380:in `<main>#39;
teetime! 2019年 10月18日 金曜日 12時41分42秒 JST
途中で何かがビルドエラーになっていたり、また OpenJDK8
のビルドがハングしたので Ctrl-C で止めたりしたが、最後
sudo のインストールで止まってしまった。
これは portupgrade の途中で sudo コマンドを使うので
(portupgrade の -s オプション及び前述した /etc/make.conf の設定)、sudo
を portupgrade しようとするとおかしくなってしまうのだと考えられる。
そこで筆者は、sudo の portupgrade (というより portinstall) を su を用いて行うために、毎回手で打つのは面倒なので、以下のスクリプトを用いている。 (ファイル名は pisudo.sh)
#!/bin/sh
# 2012-03-01, 03-06 (on fb90), 2018-04-27 nsmrtks

# portinstall sudo with script logging

# usage: sh /path/to/pisudo.sh [portinstall option]

# Example:
#	cd /var/tmp/log/Install
#	sh ~/work/pisudo.sh -w

if type sudo ; then
	echo We already have sudo installed. Don\'t worry!
	exit 2
fi

set -x
script sudo`date +%Y%m%d%H%M%S`.log portinstall $* -s -S 'su root -c %s ' sudo

# EoF
先ほどの sudo のビルド成果物を無駄にしないように、-w を付けて実行すると、それが portinstall コマンドにそのまま渡される。 (付け忘れても致命的ではない)
% cd /var/tmp/log/Install

% nice sh ~/work/pisudo.sh -w
sudo: not found
+ date +%Y%m%d%H%M%S
+ script sudo20191018131207.log portinstall -w -s -S 'su root -c %s ' sudo
Script started, output file is sudo20191018131207.log
[Reading data from pkg(8) ... - 566 packages found - done]
〜
Script done, output file is sudo20191018131207.log
sudo コマンドが再びインストールされた。
bup コマンドは、最後のステップで pvc.sh を実行するようになっているので、pvc.sh のみやり直す。 ここでも -w を付けると、portupgrade コマンドにそのまま渡される。
% cd /var/tmp/log/pvc

% nice +20 sh pvc.sh -w
+ cd /var/tmp/log/pvc
+ nice teetime -t pvc sh ../updatefb/portversion-c.out -s -w
conflicting pvc20191018.log
logging (from the next line till the end) to pvc2019101813.log
teetime! 2019年 10月18日 金曜日 13時20分37秒 JST
teetime! working directory is /var/tmp/log/pvc
teetime> sh ../updatefb/portversion-c.out -s -w
[Reading data from pkg(8) ... - 567 packages found - done]
〜
** Listing the failed packages (-:ignored / *:skipped / !:failed)
	! databases/ruby-bdb (ruby25-bdb-0.6.6_6)	(dependent ports)
	! java/openjdk8 (openjdk8-8.222.10.1_2)	(interrupted by user)
	* devel/pycharm-ce (pycharm-ce-2019.2)
	* graphics/graphviz (graphviz-2.40.1_11)
teetime! 2019年 10月21日 月曜日 14時04分52秒 JST
少なくとも、またしても OpenJDK8 のビルドが途中でハングして Ctrl-C
で止めたりしている。
いま一度やり直す。
% nice teetime -t pvc sh ../updatefb/portversion-c.out -s -w
logging (from the next line till the end) to pvc20191021.log
teetime! 2019年 10月21日 月曜日 14時08分41秒 JST
teetime! working directory is /var/tmp/log/pvc
teetime> sh ../updatefb/portversion-c.out -s -w
[Reading data from pkg(8) ... - 581 packages found - done]
〜
--->  [Executing a command as root: sudo /usr/bin/touch /var/db/pkgdb.fixme]
〜
** Detected a package name change: ruby25-bdb (databases/ruby-bdb) -> 'ruby26-bdb' (databases/ruby-bdb)
〜
pkg-static: Unable to access file /zfs/ports/devel/ruby-gems/work/stage/usr/local/bin/gem26:No such file or directory
*** Error code 74

Stop.
make[3]: stopped in /zfs/ports/devel/ruby-gems
*** Error code 1

Stop.
make[2]: stopped in /zfs/ports/devel/ruby-gems
*** Error code 1

Stop.
make[1]: stopped in /zfs/ports/devel/rubygem-rdoc
*** Error code 1

Stop.
make: stopped in /zfs/ports/databases/ruby-bdb
〜
** Listing the failed packages (-:ignored / *:skipped / !:failed)
	! databases/ruby-bdb (ruby25-bdb-0.6.6_6)	(dependent ports)
	! java/openjdk8 (openjdk8-8.222.10.1_2)	(interrupted by user)
	* devel/pycharm-ce (pycharm-ce-2019.2)
teetime! 2019年 10月21日 月曜日 14時10分46秒 JST
やはりまたしても OpenJDK8 のビルドが途中でハングして Ctrl-C
で止めたりしているのだが、ruby-bdb については、どうも Ruby
のバージョンが上がっているのに関連してうまくいっていないように思える?
こういうときは、/usr/ports/UPDATING
というファイルを見て、すると、詳細は省略するが、20190909
の所に関係しそうな記述があったので、そこから辿れる指示に(途中まで)従ってみたりしたが..
ダメだった。
しかも作業の手順により portupgrade がアンインストールされ、かつ portupgrade の再ビルドも失敗するようになった。
最後の手段で pkg で portupgrade を再インストールする.. (最初からそうしろというのもあるが)
% cd /var/tmp/log/Install/

% nice teetime -t portupgrade sudo pkg install portupgrade
logging (from the next line till the end) to portupgrade20191021.log
teetime! 2019年 10月21日 月曜日 14時35分53秒 JST
teetime! working directory is /var/tmp/log/Install
teetime> sudo pkg install portupgrade
〜
teetime! 2019年 10月21日 月曜日 14時36分18秒 JST
何とか元に戻ったようだ。
あとは openjdk8 と pycharm-ce の portupgrade が失敗しているが..
ビルドログを眺めてみて思いついたのが、だめもとで、pkg delete openjdk8
を行い (依存関係で pycharm-ce もアンインストールされてしまう)、portinstall
-s pycharm-ce をやり直したら.. 何故かいけた。
以降は一日一回のペースで bup コマンド
(前述だがホームディレクトリのバックアップと freebsd-update fetch と
portupgrade) を実行することにする。
なお、もし freebsd-update fetch で何か出たなら、freebsd-update install
を実行し、必要なら FreeBSD を再起動しないといけない。
前述の portupgrade により、virtualbox-ose-additions が、5.2.32_1 から 5.2.34 に上がった。
そこで、VBoxService が起動しない現象が直っていないか期待し、また /usr/local/etc/rc.d/vboxservice ファイルに追記していた内容が元に戻ってしまった。
このまま、VBoxService が、--disable-control 無しでも起動しないだろうか。
% ps ax | egrep -i vbox
 1008  -  Is      0:37.80 /usr/local/sbin/VBoxService --disable-control
 3696  -  IWs     0:00.00 /usr/local/bin/VBoxClient --clipboard
 3698  -  I       0:01.49 /usr/local/bin/VBoxClient --clipboard
 3702  -  IWs     0:00.00 /usr/local/bin/VBoxClient --display
 3704  -  S       0:00.39 /usr/local/bin/VBoxClient --display
 3705  -  IWs     0:00.00 /usr/local/bin/VBoxClient --seamless
 3707  -  I       0:00.35 /usr/local/bin/VBoxClient --seamless
 3708  -  IWs     0:00.00 /usr/local/bin/VBoxClient --draganddrop
 3710  -  I       8:36.55 /usr/local/bin/VBoxClient --draganddrop
17688  7  S+      0:00.00 egrep -i vbox

% sudo /usr/local/etc/rc.d/vboxservice stop
〜
Stopping vboxservice.
Waiting for PIDS: 1008.

% cd /

% sudo /usr/local/etc/rc.d/vboxservice start
Starting vboxservice.
VBoxService 5.2.34 r133883 (verbosity: 0) freebsd.amd64 (Oct 21 2019 10:49:20) release log
00:00:00.000084 main     Log opened 2019-10-21T05:02:24.650539000Z
00:00:00.000225 main     OS Product: FreeBSD
00:00:00.000253 main     OS Release: 12.0-RELEASE-p10
00:00:00.000296 main     OS Version: FreeBSD 12.0-RELEASE-p10 GENERIC
00:00:00.000319 main     Executable: /zfs/local/sbin/VBoxService
00:00:00.000322 main     Process ID: 22502
00:00:00.000325 main     Package type: BSD_64BITS_GENERIC (OSE)
00:00:00.102943 main     5.2.34 r133883 started. Verbose level = 0

% ps ax | egrep -i box
 3696  -  IWs     0:00.00 /usr/local/bin/VBoxClient --clipboard
 3698  -  I       0:01.49 /usr/local/bin/VBoxClient --clipboard
 3702  -  IWs     0:00.00 /usr/local/bin/VBoxClient --display
 3704  -  I       0:00.39 /usr/local/bin/VBoxClient --display
 3705  -  IWs     0:00.00 /usr/local/bin/VBoxClient --seamless
 3707  -  I       0:00.35 /usr/local/bin/VBoxClient --seamless
 3708  -  IWs     0:00.00 /usr/local/bin/VBoxClient --draganddrop
 3710  -  I       8:36.65 /usr/local/bin/VBoxClient --draganddrop
22559 17  S+      0:00.00 egrep -i box
だめやった..
先ほどと同じように、/usr/local/etc/rc.d/vboxservice の command= の直後に start_cmd="${command} --disable-control" を追記すると、今度は起動した。
% sudo /usr/local/etc/rc.d/vboxservice start
VBoxService 5.2.34 r133883 (verbosity: 0) freebsd.amd64 (Oct 21 2019 10:49:20) release log
00:00:00.000138 main     Log opened 2019-10-21T05:03:25.155361000Z
00:00:00.000218 main     OS Product: FreeBSD
00:00:00.000233 main     OS Release: 12.0-RELEASE-p10
00:00:00.000246 main     OS Version: FreeBSD 12.0-RELEASE-p10 GENERIC
00:00:00.000255 main     Executable: /zfs/local/sbin/VBoxService
00:00:00.000258 main     Process ID: 28936
00:00:00.000262 main     Package type: BSD_64BITS_GENERIC (OSE)
00:00:00.001601 main     5.2.34 r133883 started. Verbose level = 0

% ps ax | egrep -i box
 3696  -  IWs     0:00.00 /usr/local/bin/VBoxClient --clipboard
 3698  -  I       0:01.49 /usr/local/bin/VBoxClient --clipboard
 3702  -  IWs     0:00.00 /usr/local/bin/VBoxClient --display
 3704  -  S       0:00.39 /usr/local/bin/VBoxClient --display
 3705  -  IWs     0:00.00 /usr/local/bin/VBoxClient --seamless
 3707  -  I       0:00.35 /usr/local/bin/VBoxClient --seamless
 3708  -  IWs     0:00.00 /usr/local/bin/VBoxClient --draganddrop
 3710  -  I       8:36.78 /usr/local/bin/VBoxClient --draganddrop
28937  -  Ss      0:00.00 /usr/local/sbin/VBoxService --disable-control
28965 17  S+      0:00.00 egrep -i box
デフォルトの FreeBSD の設定では、/etc/crontab にて、夜中〜早朝深夜に daily / weekly / monthly の自動メンテナンスが走るようになっている。
# /etc/crontab - root's crontab for FreeBSD
〜
#minute	hour	mday	month	wday	who	command
〜
# Perform daily/weekly/monthly maintenance.
1	3	*	*	*	root	periodic daily
15	4	*	*	6	root	periodic weekly
30	5	1	*	*	root	periodic monthly
〜
筆者の環境はそのような時間に PC の電源が入っていないので、これを日中に実行するように変更する。
% cd /etc

% sudo cp -ip crontab crontab.ORG
〜
Emacs の C-x C-f からファイル名を /sudo::/etc/crontab というものを指定して編集した。
〜
12	9	*	*	*	root	periodic daily
12	12	*	*	2	root	periodic weekly
12	17	1	*	*	root	periodic monthly
〜
なお、/etc/crontab ファイルの更新さえすれば、cron デーモンの再起動等は特に不要である。 (cron(8))
これを設定すると、毎日 root 宛にメールが来るようになる。
自分は sudo -i して mail コマンドで見ている。
前述で ports ツリーを更新したので、ビルドできるようになったりしないだろうか??
% cd /var/tmp/log/Install/

% nice +20 teetime -t firefox portinstall -s firefox
logging (from the next line till the end) to firefox20191021.log
teetime! 2019年 10月21日 月曜日 16時20分27秒 JST
teetime! working directory is /var/tmp/log/Install
teetime> portinstall -s firefox
[Reading data from pkg(8) ... - 580 packages found - done]
〜
===>   firefox-70.0_2,1 depends on package: llvm90>0 - not found
===>  llvm90-9.0.0_1 needs Python 3.6 at least, but 2.7 was specified.
*** Error code 1

Stop.
make[1]: stopped in /zfs/ports/devel/llvm90
*** Error code 1

Stop.
make: stopped in /zfs/ports/www/firefox
--->  [Executing a command as root: sudo /usr/local/sbin/pkgdb -aFOQ]
** Listing the failed packages (-:ignored / *:skipped / !:failed)
	! www/firefox	(dependent ports)
teetime! 2019年 10月21日 月曜日 16時21分52秒 JST
むむっ。 llvm90 を単独でビルドを試みる
% nice +20 teetime -t llvm90_ portinstall -s llvm90
logging (from the next line till the end) to llvm90_20191021.log
teetime! 2019年 10月21日 月曜日 16時26分27秒 JST
teetime! working directory is /var/tmp/log/Install
teetime> portinstall -s llvm90
[Reading data from pkg(8) ... - 581 packages found - done]
--->  [Executing a command as root: sudo /usr/bin/touch /var/db/pkgdb.fixme]
〜
Installing llvm90-9.0.0_1...
〜
===>  Cleaning for llvm90-9.0.0_1
teetime! 2019年 10月23日 水曜日 11時16分36秒 JST
そうすると何故かうまくいく。 firefox のビルドに戻る。
% nice +20 teetime -t firefox portinstall -sw firefox
logging (from the next line till the end) to firefox20191023.log
teetime! 2019年 10月23日 水曜日 13時26分16秒 JST
teetime! working directory is /var/tmp/log/Install
teetime> portinstall -sw firefox
[Reading data from pkg(8) ... - 588 packages found - done]
〜
cp: /zfs/ports/lang/rust/work/stage/zfs/local/lib/rustlib/x86_64-unknown-freebsd/lib/librustc_mir-5b21a9970e18fd06.rlib: No space left on device
echo: write error on stdout
chmod: /zfs/ports/lang/rust/work/stage/zfs/local/lib/rustlib/x86_64-unknown-freebsd/lib/librustc_mir-5b21a9970e18fd06.rlib: No space left on device
echo: write error on stdout
install: error: file creation failed. see logs at '/zfs/ports/lang/rust/work/stage/zfs/local/lib/rustlib/install.log'
echo: write error on stdout


command did not execute successfully: "sh" "/zfs/ports/lang/rust/work/rustc-1.38.0-src/build/tmp/dist/rust-std-1.38.0-x86_64-unknown-freebsd/install.sh" "--pref
ix=/zfs/ports/lang/rust/work/stage/zfs/local" "--sysconfdir=/zfs/ports/lang/rust/work/stage/usr/local/etc" "--datadir=/zfs/ports/lang/rust/work/stage/zfs/local/
share" "--docdir=/zfs/ports/lang/rust/work/stage/zfs/local/share/doc/rust" "--bindir=/zfs/ports/lang/rust/work/stage/zfs/local/bin" "--libdir=/zfs/ports/lang/ru
st/work/stage/zfs/local/lib" "--mandir=/zfs/ports/lang/rust/work/stage/usr/local/man" "--disable-ldconfig"
expected success, got: exit code: 1


Traceback (most recent call last):
  File "/zfs/ports/lang/rust/work/rustc-1.38.0-src/x.py", line 11, in
    bootstrap.main()
  File "/zfs/ports/lang/rust/work/rustc-1.38.0-src/src/bootstrap/bootstrap.py", line 866, in main
    bootstrap(help_triggered)
  File "/zfs/ports/lang/rust/work/rustc-1.38.0-src/src/bootstrap/bootstrap.py", line 852, in bootstrap
    run(args, env=env, verbose=build.verbose)
  File "/zfs/ports/lang/rust/work/rustc-1.38.0-src/src/bootstrap/bootstrap.py", line 141, in run
    raise RuntimeError(err)
RuntimeError: failed to run: /zfs/ports/lang/rust/work/rustc-1.38.0-src/build/bootstrap/debug/bootstrap install --verbose --config ./config.toml --jobs 2
*** Error code 1

Stop.
make[3]: stopped in /zfs/ports/lang/rust
*** Error code 1

Stop.
make[2]: stopped in /zfs/ports/lang/rust
*** Error code 1

Stop.
make[1]: stopped in /zfs/ports/devel/rust-cbindgen
*** Error code 1

Stop.
make: stopped in /zfs/ports/www/firefox
--->  [Executing a command as root: sudo /usr/local/sbin/pkgdb -aFOQ]
パスワード:
sudo: パスワードの読み込みがタイムしました
〜
teetime! 2019年 10月23日 水曜日 17時52分06秒 JST
なんと、zfs 領域が足りなくなってエラーで止まってしまった
(/usr/ports や /usr/local が zfs 領域に取られている)。
最初に仮想ディスクの大きさを 30GB としたが、ケチりすぎたかもしれない。
やはり zfs で容量を共有しているホームディレクトリ (/home/nsmrtks)
から、消して大丈夫そうなファイルを消して、やり直す。
しかし、
% nice +20 teetime -t firefox portinstall -sw firefox
logging (from the next line till the end) to firefox20191024.log
teetime! 2019年 10月24日 木曜日 09時13分00秒 JST
teetime! working directory is /var/tmp/log/Install
teetime> portinstall -sw firefox
[Reading data from pkg(8) ... - 588 packages found - done]
〜
sed: /zfs/ports/lang/rust/work/stage/usr/local/lib/rustlib/manifest-*: No such file or directory
*** Error code 1

Stop.
make[3]: stopped in /zfs/ports/lang/rust
*** Error code 1

Stop.
make[2]: stopped in /zfs/ports/lang/rust
*** Error code 1

Stop.
make[1]: stopped in /zfs/ports/devel/rust-cbindgen
*** Error code 1

Stop.
make: stopped in /zfs/ports/www/firefox
--->  [Executing a command as root: sudo /usr/local/sbin/pkgdb -aFOQ]
パスワード:
** Listing the failed packages (-:ignored / *:skipped / !:failed)
	! www/firefox	(dependent ports)
teetime! 2019年 10月24日 木曜日 09時25分46秒 JST
うーん。
xdu とは、du の出力を入力すると、それをグラフィカルに表示してくれるツールである。
応用次第で、du の出力に類似のテキストをグラフィカルに表示するといった用途も考えられる (筆者はそれを思い付いて実際にやったことがある)。
% cd /var/tmp/log/Install/

% nice teetime -t xdu portinstall -s xdu
logging (from the next line till the end) to xdu20191023.log
teetime! 2019年 10月23日 水曜日 09時06分51秒 JST
teetime! working directory is /var/tmp/log/Install
teetime> portinstall -s xdu
[Reading data from pkg(8) ... - 581 packages found - done]
〜
teetime! 2019年 10月23日 水曜日 09時09分02秒 JST
ルートパーティションの使用量を表示させる実行例。 (du に -x オプションを付けることにより、別パーティションである /var パーティション等が対象外になっている。)
% sudo du -kx / | xdu
〜
n を押すと大きさ順にソートされたり、h を押すとヘルプが表示されたりする。 n を押した所。
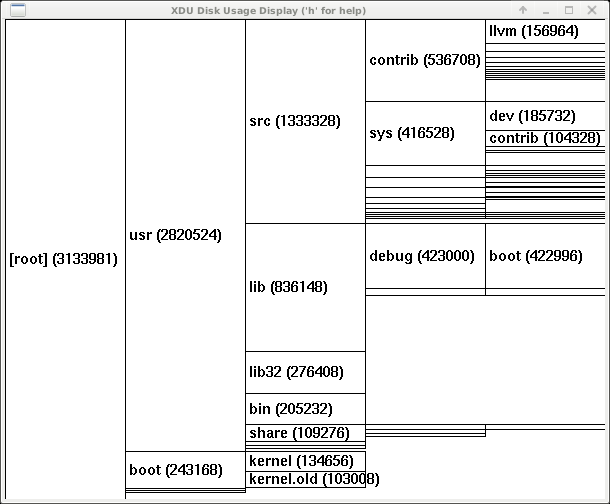
% cd /var/tmp/log/Install/

% pkg search xpdf
ja-xpdf-jafont-3.03_3          Japanese font support for xpdf
ko-xpdf-kofont-3.03_4          Korean font support for xpdf
xpdf-4.01_2,1                  Display PDF files and convert them to other formats
xpdf3-3.04_11                  Display PDF files and convert them to other formats
xpdf4-4.01_2,1                 Display PDF files and convert them to other formats
xpdfopen-0.86                  Command line utility for PDF viewers

% nice teetime -t xpdf portinstall -s xpdf
logging (from the next line till the end) to xpdf20191024.log
teetime! 2019年 10月24日 木曜日 15時06分01秒 JST
teetime! working directory is /var/tmp/log/Install
teetime> portinstall -s xpdf
[Reading data from pkg(8) ... - 587 packages found - done]
〜
teetime! 2019年 10月24日 木曜日 15時11分34秒 JST
% pkg search chromium
chromium-76.0.3809.132         Google web browser based on WebKit
chromium-bsu-0.9.16.1_1        Arcade-style, top-scrolling space shooter
chromium-gn-76.0.3809.132      Gn meta build framework

% cd /var/tmp/log/Install/

% nice +20 teetime -t chromium portinstall -s chromium
logging (from the next line till the end) to chromium20191024.log
teetime! 2019年 10月24日 木曜日 15時18分26秒 JST
teetime! working directory is /var/tmp/log/Install
teetime> portinstall -s chromium
[Reading data from pkg(8) ... - 591 packages found - done]
〜
===>  Checking if noto-basic is already installed
===>  Switching to root credentials for 'install' target
Password:
sudo: timed out reading password
*** Error code 1

Stop.
make[2]: stopped in /usr/ports/x11-fonts/noto-basic
*** Error code 1

Stop.
make[1]: stopped in /zfs/ports/www/chromium
*** Error code 1

Stop.
make: stopped in /zfs/ports/www/chromium
** Command failed [exit code 1]: /usr/bin/script -qa /tmp/portinstall20191024-80465-8bxtvo env make FETCH_BEFORE_ARGS=-q
** Fix the problem and try again.
--->  [Executing a command as root: sudo /usr/local/sbin/pkgdb -aFOQ]
パスワード:
sudo: パスワードの読み込みがタイムしました
〜
teetime! 2019年 10月25日 金曜日 01時56分59秒 JST
時間がかかるので放置ししていたら sudo がタイムアウトしたのでもう一度。
% nice +20 teetime -t chromium portinstall -sw chromium
logging (from the next line till the end) to chromium20191025.log
teetime! 2019年 10月25日 金曜日 08時58分12秒 JST
teetime! working directory is /var/tmp/log/Install
teetime> portinstall -sw chromium
[Reading data from pkg(8) ... - 630 packages found - done]
〜
teetime! 2019年 10月25日 金曜日 09時01分50秒 JST
無事にビルド・インストールできた。 (もっと時間かかるかと思っていた)
Chromium の実行コマンドは chrome である。
% chrome &無事に起動した。
uim で日本語入力・漢字変換が出来ることを期待したが、Chromium (chrome) や rxvt-unicode (urxvt) や Xfc4 のターミナルで、Shift-SPC でローマ字でひらがなは入力できるのだが、漢字変換が出来なかった。
このとき、uim-xim を起動したターミナル (urxvt) に、以下のような文字列が出ていた。
libuim: [fatal] 初期化失敗今まで他の環境で uim を使っていてトラブルが出たことがなかったのだが.. (ただし旧環境の VirtualBox では SCIM を使用しており uim ではなかった)
そこで、やはり別の環境で動作実績のあった fcitx (ja-fcitx-mozc) をインストールしてみることにする。
% pkg search fcitx
fcitx-m17n-0.2.3_1             Multilingualization support for Fcitx
fcitx-qt5-1.2.3_4              Fcitx support for Qt5
fcitx-table-other-0.2.3        Table-based input methods for Fcitx
ja-fcitx-anthy-0.2.3_1         Anthy support for Fcitx
ja-fcitx-mozc-2.23.2815.102.00_5 Mozc engine for Fcitx
ja-fcitx-skk-0.1.4_3           SKK support for Fcitx
ko-fcitx-hangul-0.3.0_1        Hangul support for Fcitx
zh-fcitx-4.2.9.6_3             Flexible Input Method Framework
zh-fcitx-chewing-0.2.3_1       Chewing support for Fcitx
zh-fcitx-cloudpinyin-0.3.6_1   Cloud-based Pinyin module for Fcitx
zh-fcitx-configtool-0.4.9      Fcitx IM framework configuration tool
zh-fcitx-libpinyin-0.5.3_2     Libpinyin support for Fcitx
zh-fcitx-rime-0.3.2_1          RIME support for Fcitx
zh-fcitx-sunpinyin-0.4.2_1     SunPinyin support for Fcitx
zh-fcitx-table-extra-0.3.8_1   Table-based input methods for Fcitx
zh-fcitx-ui-light-0.1.3_2      Alternative light weight UI for Fcitx
zh-scim-fcitx-3.1.1_9          SCIM IMEngine module for fcitx

% cd /var/tmp/log/Install/

% nice +20 teetime -t ja-fcitx-mozc_ portinstall -s ja-fcitx-mozc
logging (from the next line till the end) to ja-fcitx-mozc_20191025.log
teetime! 2019年 10月25日 金曜日 09時34分56秒 JST
teetime! working directory is /var/tmp/log/Install
teetime> portinstall -s ja-fcitx-mozc
[Reading data from pkg(8) ... - 633 packages found - done]
〜
Installing ja-fcitx-mozc-2.23.2815.102.00_5...
To activate fcitx-mozc, please add the following into ~/.xinitrc,
~/.xsession, or ~/.kde4/env (for KDE4):

export GTK_IM_MODULE=fcitx
export QT_IM_MODULE=xim
export XMODIFIERS=@im=fcitx
/usr/local/bin/mozc start
fcitx -r -d

〜
teetime! 2019年 10月25日 金曜日 10時19分11秒 JST
無事にビルド・インストールは出来た。
ビルドのメッセージに出ているように環境変数を設定し、fcitx を起動する。
(/usr/local/bin/mozc start は既に実行していた)
また uim-xim を停止させる (順番が逆だったかも)。
% setenv GTK_IM_MODULE fcitx

% setenv QT_IM_MODULE xim

% setenv XMODIFIERS @im=fcitx

% fcitx -r -d

% ps ax | egrep uim
20330  9  S       0:01.98 uim-xim
20333  9  I       0:00.10 /usr/local/libexec/uim-helper-server
20341  9  I       0:00.17 /usr/local/libexec/uim-candwin-gtk
73062 17  S+      0:00.00 egrep uim

% killall uim-xim
〜

% ps ax | egrep uim
73068 17  S+      0:00.00 egrep uim
この環境変数を設定したターミナルから chrome を起動し直すと、Ctrl-SPC でローマ字かな変換できた後、SPC で無事に漢字変換できることを確認した。
..のだが、この urxvt から emacs を起動すると、Ctrl-SPC が fcitx に食われてしまい、Emacs の set-mark-command が実行できなくなった。
fcitx-configtool というコマンドがあるようだが、これを実行すると、~/.config/fcitx/config ファイルが Mousepad というテキストエディタ? で開いたような画面が出てきた。 また、fcitx-configtool がインストールされていないようなメッセージが出た。
zh-fcitx-configtool というのをインストールしていないようなので (先ほどの pkg search を参照)、インストールしてみる。
% pkg info | egrep fcitx
ja-fcitx-mozc-2.23.2815.102.00_5 Mozc engine for Fcitx
zh-fcitx-4.2.9.6_3             Flexible Input Method Framework

% cd /var/tmp/log/Install/

% nice teetime -t zh-fcitx-configtool_ portinstall -s zh-fcitx-configtool
logging (from the next line till the end) to zh-fcitx-configtool_20191025.log
teetime! 2019年 10月25日 金曜日 10時44分58秒 JST
teetime! working directory is /var/tmp/log/Install
teetime> portinstall -s zh-fcitx-configtool
[Reading data from pkg(8) ... - 645 packages found - done]
〜
=> fcitx-configtool-0.4.9.tar.xz doesn't seem to exist in /usr/ports/distfiles/fcitx.
=> /usr/ports/distfiles/fcitx is not writable by you; cannot fetch.
*** Error code 1

Stop.
make[1]: stopped in /zfs/ports/chinese/fcitx-configtool
*** Error code 1

Stop.
make: stopped in /zfs/ports/chinese/fcitx-configtool
** Command failed [exit code 1]: /usr/bin/script -qa /tmp/portinstall20191025-73527-vl2yaf env make FETCH_BEFORE_ARGS=-q
** Fix the problem and try again.
--->  [Executing a command as root: sudo /usr/local/sbin/pkgdb -aFOQ]
** Listing the failed packages (-:ignored / *:skipped / !:failed)
	! chinese/fcitx-configtool	(unknown build error)
teetime! 2019年 10月25日 金曜日 10時46分17秒 JST
おやっ?
% ls -ld /usr/ports/distfiles/fcitx
drwxr-xr-x  2 root  wheel  512 10月 25 09:37 /usr/ports/distfiles/fcitx/

% sudo chown nsmrtks /usr/ports/distfiles/fcitx

% nice teetime -t zh-fcitx-configtool_ portinstall -sw zh-fcitx-configtool
conflicting zh-fcitx-configtool_20191025.log
logging (from the next line till the end) to zh-fcitx-configtool_2019102510.log
teetime! 2019年 10月25日 金曜日 10時46分52秒 JST
teetime! working directory is /var/tmp/log/Install
teetime> portinstall -sw zh-fcitx-configtool
[Reading data from pkg(8) ... - 645 packages found - done]
〜
teetime! 2019年 10月25日 金曜日 10時47分48秒 JST
無事にビルド・インストール出来た。
今度は fcitx-configtool で、GUI の設定ウィンドウが出たので、「全体の設定」という所から、「入力メソッドのオンオフ」が、『CTRL_SPACE』になっていた所を、『SHIFT_SPACE』に変更して、「適用」を押した後、fcitx-configtool を終了させた。
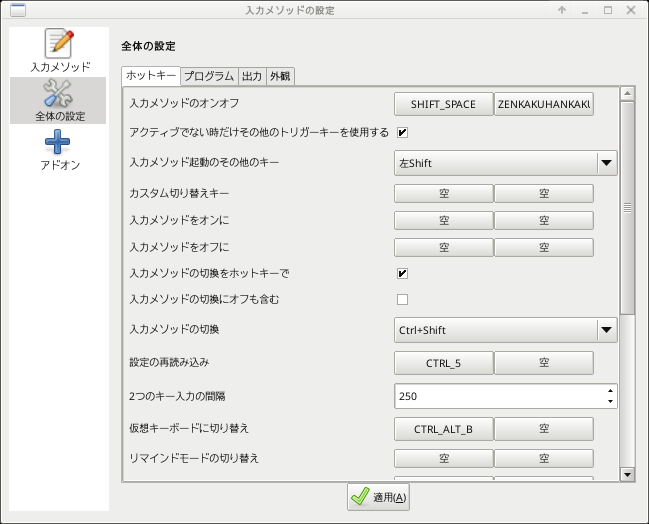
これで、Chromium では Shift-SPC で fcitx
入力がオンオフするようになったが、Emacs や urxvt では、Shift-SPC で fcitx
がオンせず、まさかと思い Chromium を終了して再度起動させると Shift-SPC
は効かなくなっていた。
??
あせったが、killall fcitx して fcitx -r -d し直すと、正常になった。
大丈夫かな..
~/.vnc/xstartup (筆者は tcsh で実行) の ja-uim-mozc 用の設定を、ja-fcitx-mozc 用に変更した。
#!/bin/tcsh
〜
setenv GTK_IM_MODULE fcitx
setenv QT_IM_MODULE xim
setenv XMODIFIERS @im=fcitx
/usr/local/bin/mozc start
fcitx -r -d
〜
ふと、lshal というコマンドが存在することを知った。 しかし、動かなかった。
% lshal
Could not initialise connection to hald.
Normally this means the HAL daemon (hald) is not running or not ready.
1で終了しました
/usr/local/etc/rc.d/hald というファイルがいつの間にか存在していた。
が、hald は有効にしていなかった。
Xfce と共に hal がインストールされていたようだ。
以下を /etc/rc.conf に追記して、sudo /usr/local/etc/rc.d/hald start を実行した。
# 2019-10-25 nsmrtks
# (see /usr/local/etc/rc.d/hald)
hald_enable="YES"		# to enable the HAL daemon
これで lshal も動作するようになった。
% lshal | head

Dumping 47 device(s) from the Global Device List:
-------------------------------------------------
〜
portupgrade (pvc.sh) を実行していると、たまに以下のようなエラーが出ていて失敗することがある。 (昔は出なかったように思うのだが..)
〜
--->  Deinstalling 'boost-libs-1.71.0_1'
--->  Preserving /usr/local/lib/libboost_atomic.so.1 as /usr/local/lib/compat/pkg/libboost_atomic.so.1
--->  Preserving /usr/local/lib/libboost_atomic.so.1.71 as /usr/local/lib/compat/pkg/libboost_atomic.so.1.71
cp: symlink: libboost_atomic.so.1.71.0: File exists
Copy failed!
[Reading data from pkg(8) ... - 646 packages found - done]
** Listing the failed packages (-:ignored / *:skipped / !:failed)
	! boost-libs-1.71.0_1	(copy failed)
〜
このようなとき、上にも出ている /usr/local/lib/compat/pkg/ 以下に、指し示す先が無いシンボリックリンクがたいてい存在しており (上の例でいうと libboost_atomic.so.1.71.0 のようなもの)、それを削除すると、うまくいく。
今回、以下のようにして一括して削除してみた。
% cd /usr/local/lib/compat/pkg/

% file libboost_*
〜

% file *
〜

% sudo rm -fv `file * | egrep 'broken symbolic link' | awk -F: '{ print $1 }'`
そうして portupgrade (/var/tmp/log にて sh pvc.sh -w) をやり直すと、うまくいった。
% pkg search bsdstat
bsdstats-6.0_2                 Monthly script for reporting anonymous statistics about your machine

% cd /var/tmp/log/Install/

% nice teetime -t bsdstats portinstall -s bsdstats
logging (from the next line till the end) to bsdstats20191028.log
teetime! 2019年 10月28日 月曜日 08時53分45秒 JST
teetime! working directory is /var/tmp/log/Install
teetime> portinstall -s bsdstats
[Reading data from pkg(8) ... - 645 packages found - done]
〜
Installing bsdstats-6.0_2...
BSDstats runs on this system for the first time, generating registration ID
Posting OS statistics to rpt.bsdstats.org (through proxy) ... SUCCESS
Posting device statistics to rpt.bsdstats.org (through proxy) ... SUCCESS
Posting CPU information to rpt.bsdstats.org (through proxy) ... SUCCESS
Posting port statistics to rpt.bsdstats.org (through proxy) ... SUCCESS

If you're installing BSDstats on a system that won't always be on, such as a
desktop or a laptop, it is recommended that you enable it in /etc/rc.conf so
that it will run on bootup. This will ensure that, even if your computer is
off when "monthly" runs, your computer will be counted properly.

You installed BSDstats: script reporting statistics about your machine

To disable monthly reporting, add this line to /etc/periodic.conf:
	monthly_statistics_enable="NO"

To disable parts of reporting, add these lines to /etc/periodic.conf:
	monthly_statistics_report_devices="NO"
	monthly_statistics_report_ports="NO"

To enable reporting on bootup, add this line to /etc/rc.conf:
	bsdstats_enable="YES"

To run it manually any time:
	bsdstats-send

To view current statistics, go to:
	http://www.bsdstats.org/

You can build bsdstats with TOR port option to submit anonymously

〜
teetime! 2019年 10月28日 月曜日 08時55分08秒 JST
ビルド・インストールすると、BSDstats の初回実行 (おそらく bsdstats-send コマンド) も自動的に行われた。 筆者の環境では http_proxy 環境変数等に従ってプロキシ経由で動作した。
また、以下の行が自動的に /etc/rc.conf の末尾に追記されていた。
bsdstats_enable="YES"これはブート時に自動的に bsdstats-send コマンドを実行するものだが、ただし筆者の環境ではブート時に http_proxy 環境変数等が設定できていないので、正常に動作しない。
筆者は、思い出した時 (月始め等) に sudo bsdstats-send を実行している。
これを実行すると、 *BSD Usage Statistics: Home で表示される (BSDstats で報告された各 BSD の稼働台数やシェア等が表示される)、世界中の *BSD の統計情報に追加される。