「Oracle VM VirtualBox マネージャー」の画面で、「fb130」が選択された状態で『起動』押す!
root でログイン。
freebsd-update fetch を実行する。
(なおこれはインストール後も定期的に行った方が良いもの。後述)
root@fb130:~ # freebsd-update fetch
Looking up update.FreeBSD.org mirrors... 2 mirrors found.
Fetching public key from update1.freebsd.org... done.
Fetching metadata signature for 13.0-RELEASE from update1.freebsd.org... done.
Fetching metadata index... done.
Fetching 1 metadata files... done.
Inspecting system... done.
Preparing to download files... done.

No updates needed to update system to 13.0-RELEASE-p0.
今回、FreeBSD 13.0-RELEASE がリリースされて間もないこともあり、何も更新が無かった。
もし何か更新が表示された場合、次に freebsd-update install を実行する。 再起動も必要かもしれない。
ちなみに、ここで uname -a を実行した所、以下のようであった。
root@fb130:~ # uname -a
FreeBSD fb130.magic.or 13.0-RELEASE FreeBSD 13.0-RELEASE #0 releng/13.0-n244733-ea31abc261f: Fri Apr  9 04:24:09 UTC 2021
     root@releng1.nyi.freebsd.org:/usr/obj/usr/src/amd64.amd64/sys/GENERIC  amd64
root@fb130:~ # vi /etc/rc.conf以下を追記。 (上の方に似たような行があるのでそれをコピーすると入力の手間を省ける)
ifconfig_em1=""
ifconfig_em1_ipv6="inet6 accept_rtadv"
ifconfig_em2="inet 192.168.56.130 netmask 255.255.255.0"
ifconfig_em2_ipv6="inet6 accept_rtadv"
ここで IPv6 アドレスについて、後でユニークローカルアドレス (ULA) を割り当てたいが、一旦このようにしておく。
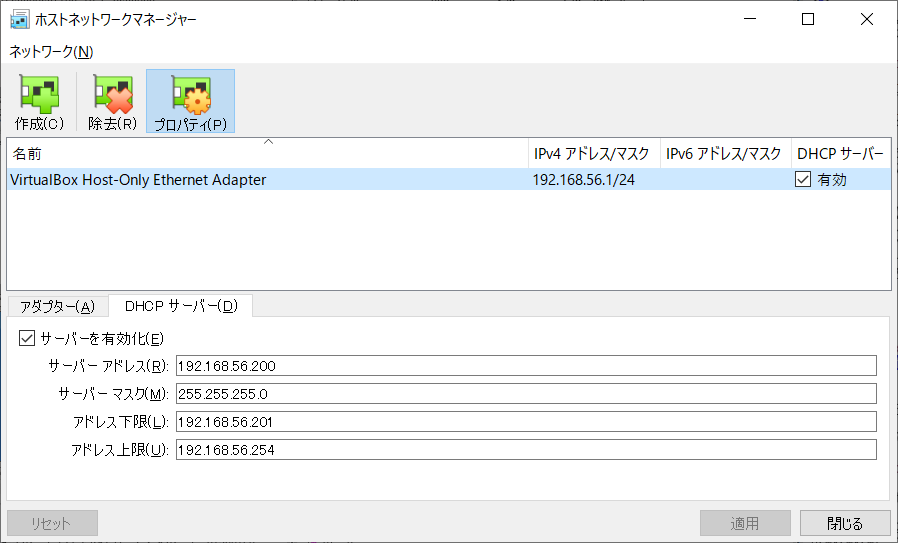
また、em2 に与えた 192.168.56.130 などという固定 IPv4 アドレスについては、em2 には VirtualBox の DHCP サーバがいるのだが、そのアドレス範囲と重複しないように、『ホストネットワークマネージャー』の「DHCP サーバー」の設定を変更してある。 (初期状態では重複していた)
(変更後)

/tmp に何か存在していたので、以下のようにして全て削除しておいた。
root@fb130:~ # cd /tmp

root@fb130:/tmp # ls -lA
total 16
drwxrwxrwt  2 root  wheel  512 May  2 20:35 .ICE-unix
drwxrwxrwt  2 root  wheel  512 May  2 20:35 .X11-unix
drwxrwxrwt  2 root  wheel  512 May  2 20:35 .XIM-unix
drwxrwxrwt  2 root  wheel  512 May  2 20:35 .font-unix

root@fb130:/tmp # rmdir .*-unix

root@fb130:/tmp # ls -lA
total 0
/etc/rc.conf に追記するために、まずは以下のようにする。
root@fb130:/tmp # egrep ^tmp /etc/defaults/rc.conf >> /etc/rc.conf
(「>>」で追記する。 くれぐれも間違って「>」で上書きしないように注意する。)
次に
root@fb130:/tmp # vi /etc/rc.conf追記した部分が以下などのようになるように編集。
tmpmfs="YES"		# Set to YES to always create an mfs /tmp, NO to never
tmpsize="1g"		# Size of mfs /tmp if created
(tmpsize (上では 1GB) をどれくらいにするかはメモリーサイズによるだろう。 (ちなみに NetBSD のインストーラではメモリーサイズの 25% がデフォルトのようだ)
ここでシャットダウン・電源 OFF (shutdown -p now) した。
再び起動すると、以下のように IP アドレスが割り当たっていた (vtnet0 は未割り当て)
root@fb130:~ # ifconfig -a
em0: flags=8863<UP,BROADCAST,RUNNING,SIMPLEX,MULTICAST> metric 0 mtu 1500
	options=481009b<RXCSUM,TXCSUM,VLAN_MTU,VLAN_HWTAGGING,VLAN_HWCSUM,VLAN_HWFILTER,NOMAP>
	ether 08:00:27:f8:3f:39
	inet6 fe80::a00:27ff:fef8:3f39%em0 prefixlen 64 scopeid 0x1
	inet 10.0.2.15 netmask 0xffffff00 broadcast 10.0.2.255
	media: Ethernet autoselect (1000baseT <full-duplex>)
	status: active
	nd6 options=23<PERFORMNUD,ACCEPT_RTADV,AUTO_LINKLOCAL>
em1: flags=8863<UP,BROADCAST,RUNNING,SIMPLEX,MULTICAST> metric 0 mtu 1500
	options=481009b<RXCSUM,TXCSUM,VLAN_MTU,VLAN_HWTAGGING,VLAN_HWCSUM,VLAN_HWFILTER,NOMAP>
	ether 08:00:27:f7:72:7a
	inet6 fe80::a00:27ff:fef7:727a%em1 prefixlen 64 scopeid 0x2
	media: Ethernet autoselect (1000baseT <full-duplex>)
	status: active
	nd6 options=23<PERFORMNUD,ACCEPT_RTADV,AUTO_LINKLOCAL>
em2: flags=8863<UP,BROADCAST,RUNNING,SIMPLEX,MULTICAST> metric 0 mtu 1500
	options=481009b<RXCSUM,TXCSUM,VLAN_MTU,VLAN_HWTAGGING,VLAN_HWCSUM,VLAN_HWFILTER,NOMAP>
	ether 08:00:27:3e:ac:4a
	inet 192.168.56.130 netmask 0xffffff00 broadcast 192.168.56.255
	inet6 fe80::a00:27ff:fe3e:ac4a%em2 prefixlen 64 scopeid 0x3
	media: Ethernet autoselect (1000baseT <full-duplex>)
	status: active
	nd6 options=23<PERFORMNUD,ACCEPT_RTADV,AUTO_LINKLOCAL>
vtnet0: flags=8822<BROADCAST,SIMPLEX,MULTICAST> metric 0 mtu 1500
	options=4c07bb<RXCSUM,TXCSUM,VLAN_MTU,VLAN_HWTAGGING,JUMBO_MTU,VLAN_HWCSUM,TSO4,TSO6,LRO,VLAN_HWTSO,LINKSTATE,TXCSUM_IPV6>
	ether 08:00:27:a5:d0:f7
	media: Ethernet autoselect (10Gbase-T <full-duplex>)
	status: active
	nd6 options=29<PERFORMNUD,IFDISABLED,AUTO_LINKLOCAL>
lo0: flags=8049<UP,LOOPBACK,RUNNING,MULTICAST> metric 0 mtu 16384
	options=680003<RXCSUM,TXCSUM,LINKSTATE,RXCSUM_IPV6,TXCSUM_IPV6>
	inet6 ::1 prefixlen 128
	inet6 fe80::1%lo0 prefixlen 64 scopeid 0x5
	inet 127.0.0.1 netmask 0xff000000
	groups: lo
	nd6 options=21<PERFORMNUD,AUTO_LINKLOCAL>
また /tmp が正しく Memory Disk になっていた。
root@fb130:~ # df -h
Filesystem     Size    Used   Avail Capacity  Mounted on
/dev/ada0p2    4.8G    3.2G    1.3G    71%    /
devfs          1.0K    1.0K      0B   100%    /dev
/dev/ada0p4    2.9G     30M    2.6G     1%    /var
tmpfs          1.0G    4.0K    1.0G     0%    /tmp

root@fb130:~ # ls -al /tmp
total 4
drwxrwxrwt   6 root  wheel   256 May  2 21:06 .
drwxr-xr-x  19 root  wheel  1024 May  2 21:06 ..
drwxrwxrwt   2 root  wheel     0 May  2 21:06 .ICE-unix
drwxrwxrwt   2 root  wheel     0 May  2 21:06 .X11-unix
drwxrwxrwt   2 root  wheel     0 May  2 21:06 .XIM-unix
drwxrwxrwt   2 root  wheel     0 May  2 21:06 .font-unix
まずは、/usr/ports と、/usr/local を、ZFS 上に置くことにする。 (筆者は ports を使うが使わないなら不要であろう)
root@fb130:~ # df -h
Filesystem     Size    Used   Avail Capacity  Mounted on
/dev/ada0p2    4.8G    3.2G    1.3G    71%    /
devfs          1.0K    1.0K      0B   100%    /dev
/dev/ada0p4    2.9G     30M    2.6G     1%    /var
tmpfs          1.0G    4.0K    1.0G     0%    /tmp

root@fb130:~ # gpart show
=>      40  67108784  ada0  GPT  (32G)
        40      1024     1  freebsd-boot  (512K)
      1064  10485760     2  freebsd-ufs  (5.0G)
  10486824   8388608     3  freebsd-swap  (4.0G)
  18875432   6291456     4  freebsd-ufs  (3.0G)
  25166888  41941936     5  freebsd-zfs  (20G)
上記に見えるように、ZFS 用に用意したパーティションが ada0p5 であることを確認した。 (gpart show で、freebsd-zfs の行が、ada0 の列が 5 になっており、GPT の場合は「p」が間にはさまるようだ。)
zpool create を実行する。 プール名は「zfs」としておいた
root@fb130:~ # zpool create zfs ada0p5なおここで、以下のようなものが (コンソールに) 表示された。 (後から dmesg コマンドで確認することも出来る)
ZFS filesystem version: 5
ZFS storage pool version: features support (5000)
次に zfs create で、/usr/ports 用と
/usr/local 用のファイルシステムを作成する。
mountpoint も同時に設定することにする
(以前は mountpoint にする代わりにシンボリックリンクにしていたが
ports のビルドが正常にいかないことがあることが分かった)。
また zfs set で compression=lz4 (圧縮) を指定しておく。
root@fb130:~ # zfs create -o mountpoint=/usr/ports zfs/ports

root@fb130:~ # zfs set compression=lz4 zfs/ports

root@fb130:~ # zfs create -o mountpoint=/usr/local zfs/local

root@fb130:~ # zfs set compression=lz4 zfs/local

root@fb130:~ # df -h
Filesystem     Size    Used   Avail Capacity  Mounted on
/dev/ada0p2    4.8G    3.2G    1.3G    71%    /
devfs          1.0K    1.0K      0B   100%    /dev
/dev/ada0p4    2.9G     30M    2.6G     1%    /var
tmpfs          1.0G    4.0K    1.0G     0%    /tmp
zfs             19G     24K     19G     0%    /zfs
zfs/ports       19G     24K     19G     0%    /usr/ports
zfs/local       19G     24K     19G     0%    /usr/local
起動時に ZFS が自動的にマウントされるように、/etc/rc.conf に設定しておく。
root@fb130:~ # egrep zfs_enable /etc/defaults/rc.conf >> /etc/rc.conf

root@fb130:~ # vi /etc/rc.conf
/etc/rc.conf の追加行が以下のようになるように編集する。
zfs_enable="YES" # Set to YES to automatically mount ZFS file systems
/usr/ports のオーナーも設定しておく。
root@fb130:~ # cd /usr

root@fb130:/usr # ls -ld ports
drwxr-xr-x  2 root  wheel  2 May  2 22:19 ports

root@fb130:/usr # chown nsmrtks ports

root@fb130:/usr # ls -ld ports
drwxr-xr-x  2 nsmrtks  wheel  2 May  2 22:19 ports
ここでシャットダウン・電源 OFF した。
再び起動すると、ZFS が自動的にマウントされていた。
root@fb130:~ # df -h
Filesystem     Size    Used   Avail Capacity  Mounted on
/dev/ada0p2    4.8G    3.2G    1.3G    71%    /
devfs          1.0K    1.0K      0B   100%    /dev
/dev/ada0p4    2.9G     30M    2.6G     1%    /var
tmpfs          1.0G    4.0K    1.0G     0%    /tmp
zfs/ports       19G     24K     19G     0%    /usr/ports
zfs             19G     24K     19G     0%    /zfs
zfs/local       19G     24K     19G     0%    /usr/local
自分は ports で行くが、普通の人は代わりにバイナリパッケージを pkg コマンドでインストールした方が圧倒的に楽だと思います。 ただしその詳細はここでは触れません。 あしからず。
それでも簡単にいうと、pkg search 〜 でパッケージ名を探し、(sudo) pkg install 〜 でパッケージをインストールする感じ。
なお最初に「pkg」コマンドを実行すると、最初に pkg コマンド自体のインストールを尋ねられるので、y を押してインストールする。
なお以降の手順で pkg install でインストールしている箇所もある。
まず portsnap fetch を実行する。
root@fb130:~ # portsnap fetch
Looking up portsnap.FreeBSD.org mirrors... 4 mirrors found.
Fetching public key from ipv4.aws.portsnap.freebsd.org... done.
Fetching snapshot tag from ipv4.aws.portsnap.freebsd.org... done.
Fetching snapshot metadata... done.
Fetching snapshot generated at Mon May  3 09:18:26 JST 2021:
〜
Extracting snapshot... done.
Verifying snapshot integrity... done.
Fetching snapshot tag from ipv4.aws.portsnap.freebsd.org... done.
Fetching snapshot metadata... done.
Updating from Mon May  3 09:18:26 JST 2021 to Mon May  3 15:48:25 JST 2021.
Fetching 5 metadata patches... done.
Applying metadata patches... done.
Fetching 0 metadata files... done.
Fetching 7 patches.
〜
done.
Applying patches...
done.
Fetching 0 new ports or files... done.
次に、初回なので portsnap extract を実行する。
root@fb130:~ # su nsmrtks

nsmrtks@fb130:/root % portsnap extract
〜
Building new INDEX files... done.

nsmrtks@fb130:/root % ls /usr/ports/
CHANGES		arabic		emulators	misc		textproc
CONTRIBUTING.md	archivers	finance		multimedia	ukrainian
COPYRIGHT	astro		french		net		vietnamese
GIDs		audio		ftp		net-im		www
INDEX-13	base		games		net-mgmt	x11
Keywords	benchmarks	german		net-p2p		x11-clocks
LEGAL		biology		graphics	news		x11-drivers
MOVED		cad		hebrew		polish		x11-fm
Makefile	chinese		hungarian	ports-mgmt	x11-fonts
Mk		comms		irc		portuguese	x11-servers
README		converters	japanese	print		x11-themes
Templates	databases	java		russian		x11-toolkits
Tools		deskutils	korean		science		x11-wm
UIDs		devel		lang		security
UPDATING	dns		mail		shells
accessibility	editors		math		sysutils

nsmrtks@fb130:/root % exit
ところで、先に zfs set したとおり、ファイルシステムは圧縮されており、
root@fb130:~ # zfs get compression
NAME       PROPERTY     VALUE           SOURCE
zfs        compression  off             default
zfs/local  compression  lz4             local
zfs/ports  compression  lz4             local
以下のように圧縮率が得られた。
root@fb130:~ # zfs get compressratio
NAME       PROPERTY       VALUE  SOURCE
zfs        compressratio  2.65x  -
zfs/local  compressratio  1.00x  -
zfs/ports  compressratio  2.65x  -
これは筆者の環境だけかもしれない。
筆者は、/usr/ports/distfiles
(ports でビルドを行う時に取得してきたファイルが置かれる場所) を、VirtualBox
の仮想ディスクごと分離している。
(サイズは 16GB)
そして、旧環境から新環境へ移行する際には、(内容を残したまま)
マウントを付け替えることにしている。
今回まさに旧環境から新環境へ移行する。
まず旧環境にて、distfiles の仮想ディスクを umount し、/etc/fstab 及び /etc/exports (後述) のエントリもコメントアウトした。
いったん旧環境をシャットダウン・電源 OFF する。 新環境 (fb130) もシャットダウン・電源 OFF する。
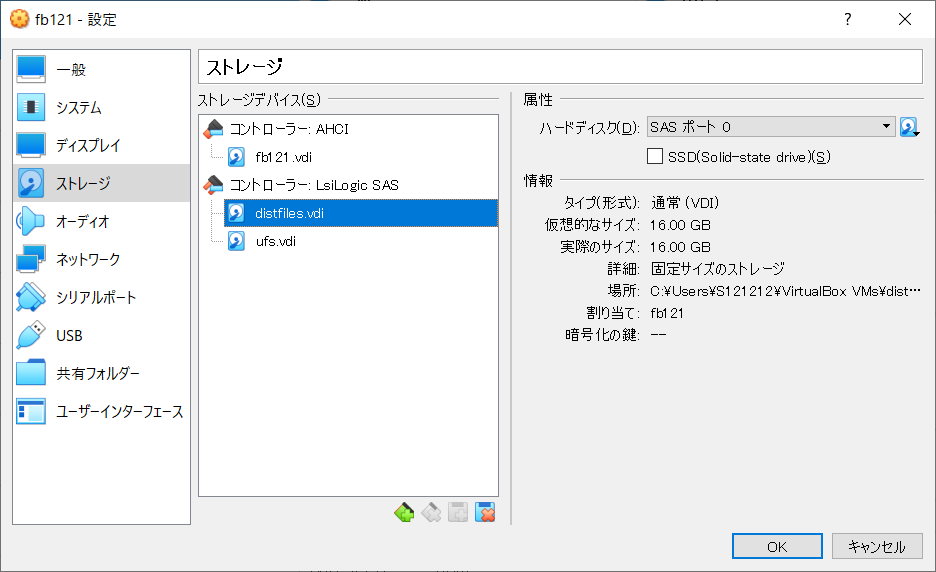
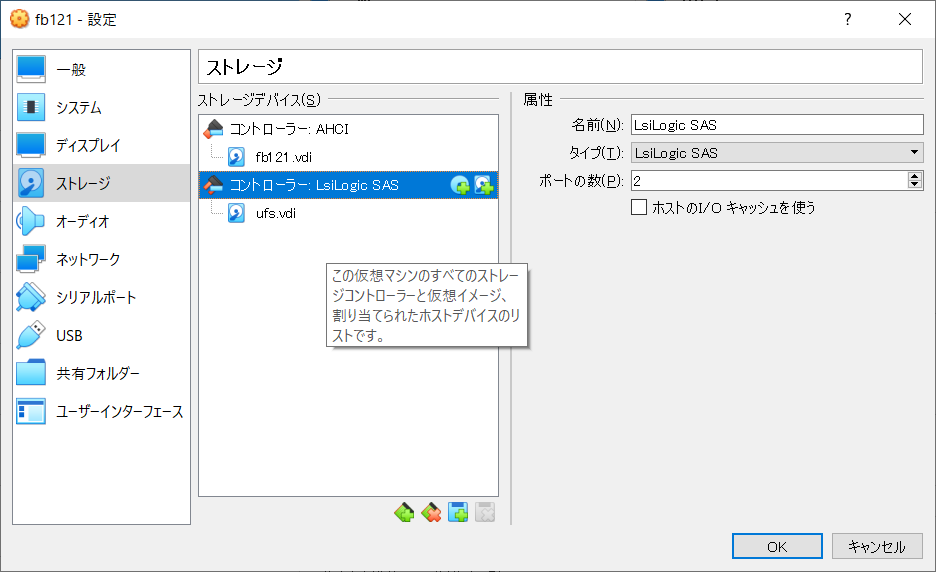
VirtualBox にて、旧環境 (fb121) の distfiles の仮想ディスクは、以下に見えている、「コントローラー: SAS」配下にある distfiles.vdi である。
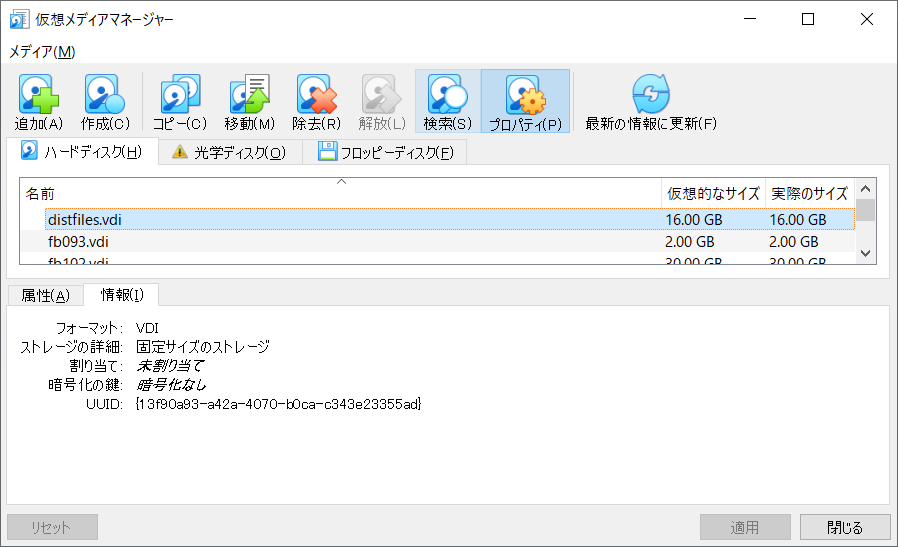
そうしたら、『仮想メディアマネージャー』に見えている distfiles.vdi を選択し..
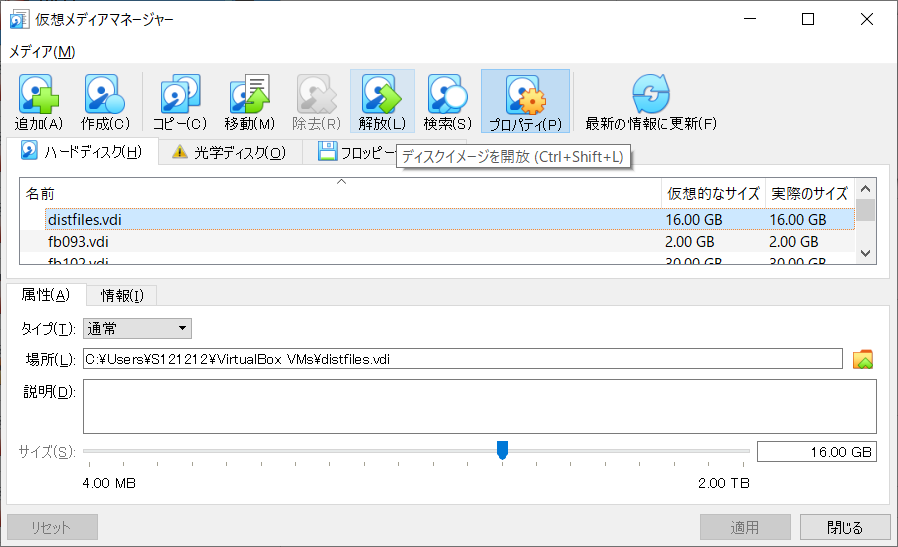
..『解放』を押すと、
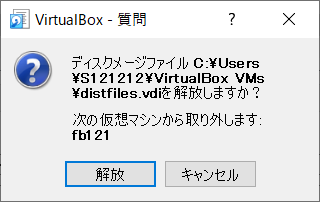
..ダイアログが出るので「解放」を押すと、distfiles.vdi が、以下のように「未割り当て」になった (『情報』のタブを押して確認できる)。
旧環境 (fb121) の設定のストレージからも、SAS 配下にあった distfiles.vdi が、以下のように、いなくなった。
今度は、新環境 (fb130) のストレージの設定にて、以下のようになっているが..
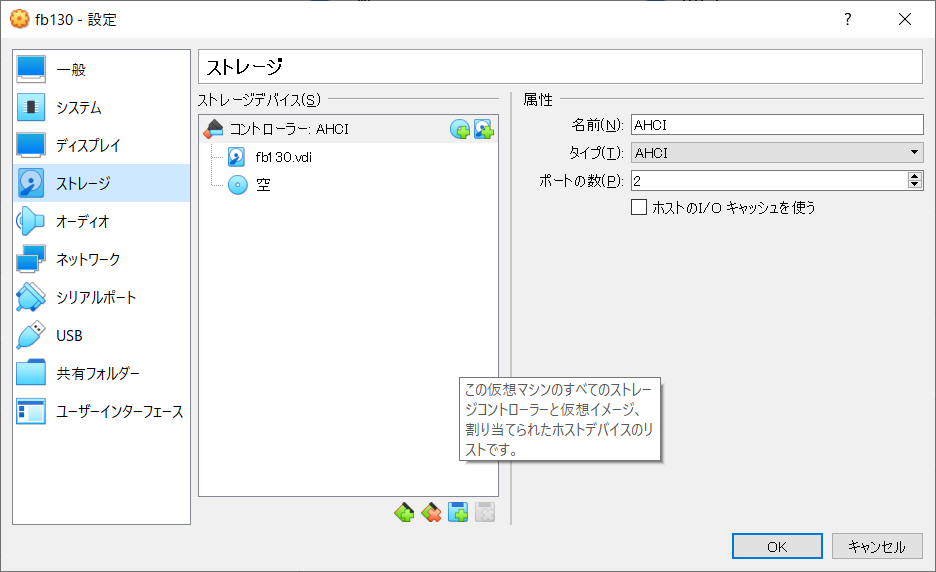
下の方の「◆」に「+」のアイコンを押し、「LsiLogic SAS (SAS)」を選択する。 (SAS にしなくてもよいが深い理由はない)
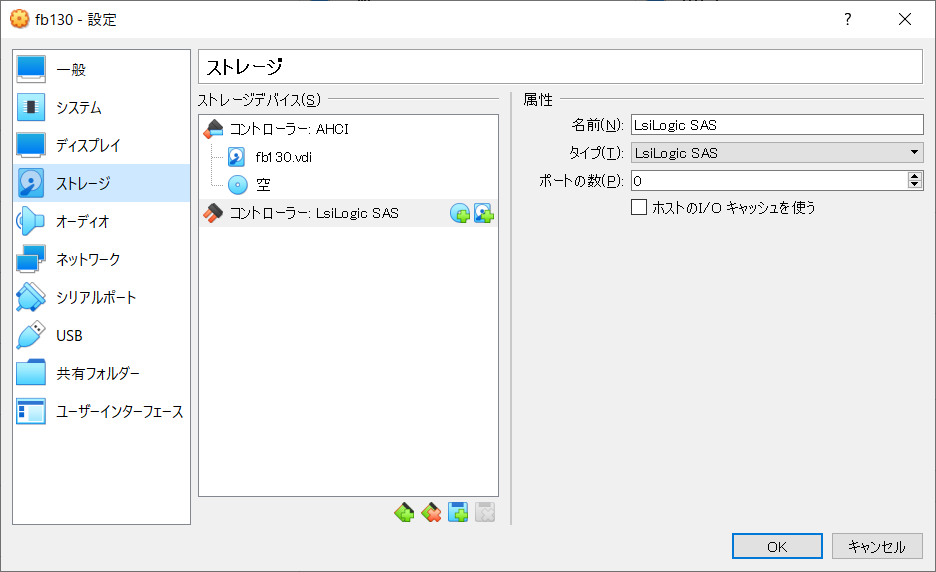
「コントローラー: LsiLogic SAS」が追加された。
さらに、「コントローラー: LsiLogic SAS」の右側の方にある「■」に「+」のようなアイコン (「ハードディスクの追加」) を選択し..
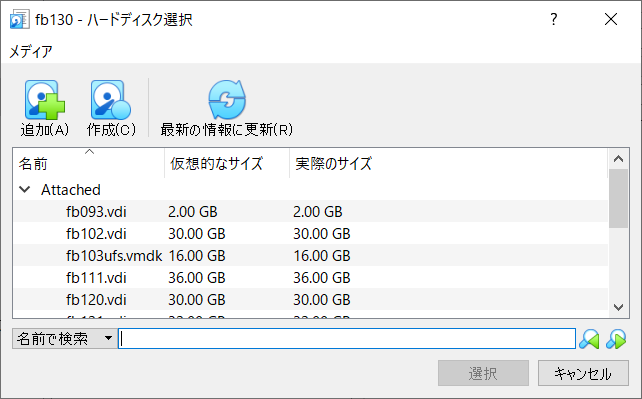
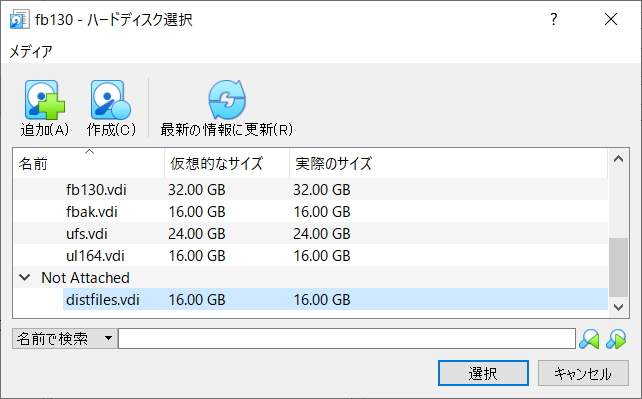
「追加」を押したら、distfiles.vdi ファイルを探して「開く」を押し、「選択」すると、
「コントローラー: LsiLogic SAS」配下に distfiles.vdi が現れた。
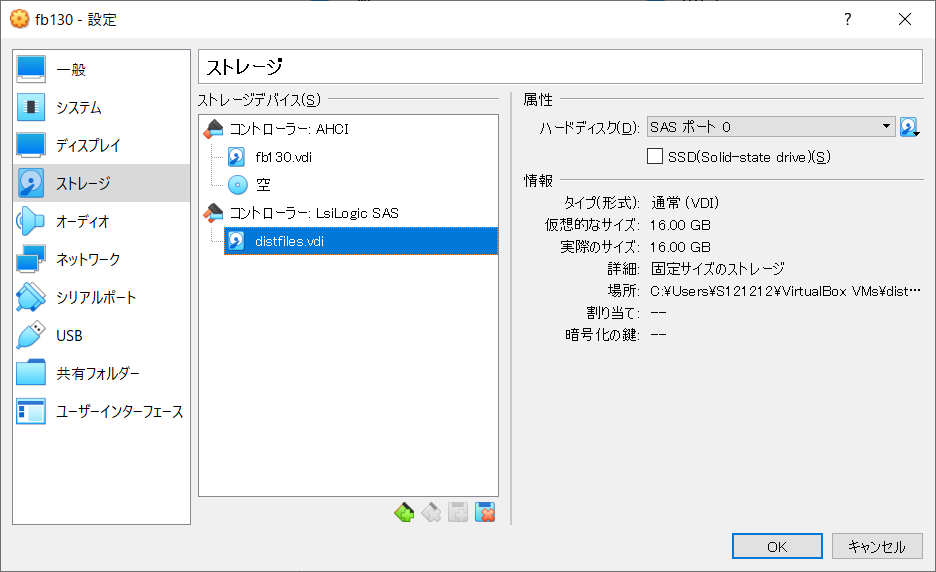
忘れずに「OK」押す。
さて、新環境 (fb130) を再び起動する。
追加した仮想ハードディスクは以下のように見えている。
(起動時に表示される他 dmesg コマンドでも後から確認できる)
〜
da0 at mpt0 bus 0 scbus2 target 0 lun 0
da0: <VBOX HARDDISK 1.0> Fixed Direct Access SPC-3 SCSI device
da0: 300.000MB/s transfers
da0: Command Queueing enabled
da0: 16384MB (33554432 512 byte sectors)
〜
今回、/home/distfiles
というディレクトリにマウントすることとし、/usr/ports/distfiles
からシンボリックリンクを張ることとする。
(なぜ /usr/ports/distfiles に直接マウントしないかというと、/home/
の下の distfiles/ を NFS エクスポートしたいという事情がある。)
まず /home は、/usr/home へのシンボリックリンクになっていたので、実ディレクトリに変更した。
root@fb130:~ # ls -ld /home
lrwxr-xr-x  1 root  wheel  8 May  1 18:03 /home -> usr/home

root@fb130:~ # cd /

root@fb130:/ # rm -i home
remove home? y

root@fb130:/ # mv -i usr/home .

root@fb130:/ # ls -ld home
drwxr-xr-x  3 root  wheel  512 May  3 17:50 home

root@fb130:/ # ls -l home
total 4
drwxr-xr-x  2 nsmrtks  nsmrtks  512 May  3 16:40 nsmrtks

root@fb130:/ # df -h
Filesystem     Size    Used   Avail Capacity  Mounted on
/dev/ada0p2    4.8G    3.2G    1.3G    71%    /
devfs          1.0K    1.0K      0B   100%    /dev
/dev/ada0p4    2.9G    203M    2.5G     7%    /var
tmpfs          1.0G    4.0K    1.0G     0%    /tmp
zfs/ports       19G    197M     19G     1%    /usr/ports
zfs/local       19G     24K     19G     0%    /usr/local
zfs             19G     24K     19G     0%    /zfs
ディレクトリの作成と /etc/fstab の編集を行う。
root@fb130:/ # mkdir /home/distfiles

root@fb130:/ # chown nsmrtks /home/distfiles

root@fb130:/ # ls -l /home
total 8
drwxr-xr-x  2 nsmrtks  wheel    512 May  3 17:51 distfiles
drwxr-xr-x  2 nsmrtks  nsmrtks  512 May  3 16:40 nsmrtks

root@fb130:/ # gpart show da0
=>      40  33554352  da0  GPT  (16G)
        40  33554352    1  freebsd-ufs  (16G)

root@fb130:/ # vi /etc/fstab
以下の行を /etc/fstab に追記した。
# 2021-05-03 nsmrtks
/dev/da0p1	/home/distfiles	ufs	rw	2	2
さらに作業を続ける.. (シンボリックリンクの作成を行う)
root@fb130:/ # cd /usr/ports

root@fb130:/usr/ports # ls -ld distfiles
ls: distfiles: No such file or directory

root@fb130:/usr/ports # ln -s /home/distfiles

root@fb130:/usr/ports # ls -ld distfiles
lrwxr-xr-x  1 root  wheel  15 May  3 17:52 distfiles -> /home/distfiles

root@fb130:/usr/ports # mount /home/distfiles

root@fb130:/usr/ports # ls /usr/ports/distfiles/
〜 (既にファイルが存在しているのでたくさん表示される)

root@fb130:/usr/ports # df -h
Filesystem     Size    Used   Avail Capacity  Mounted on
/dev/ada0p2    4.8G    3.2G    1.3G    71%    /
devfs          1.0K    1.0K      0B   100%    /dev
/dev/ada0p4    2.9G    203M    2.5G     7%    /var
tmpfs          1.0G    4.0K    1.0G     0%    /tmp
zfs/ports       19G    197M     19G     1%    /usr/ports
zfs/local       19G     24K     19G     0%    /usr/local
zfs             19G     24K     19G     0%    /zfs
/dev/da0p1      15G     14G    549M    96%    /home/distfiles
先ほどの手順で ports をインストールしたので、とりあえず普通にビルド・インストールする。
(繰り返しになるが普通の人は代わりにバイナリパッケージを pkg install sudo でインストールすればいいと思います。 以下同様。 なお後述の teetime も参考)
root@fb130:~ # cd /usr/ports/security/sudo

root@fb130:/usr/ports/security/sudo # ls
Makefile	distinfo	files		pkg-descr	pkg-plist

root@fb130:/usr/ports/security/sudo # nice make install |& tee install.log
〜
たまにダイアログが出てきて、オプションを選べるので、もしデフォルトから変えたければ設定する。 (ただし経験上、あまりデフォルトから変えると、ビルドに失敗することもあった。)
結果、無事ビルド・インストール出来たようだ。
次に sudoers ファイル (実体は /usr/local/etc/sudoers にある) を visudo で編集する。
root@fb130:/usr/ports/security/sudo # cd

root@fb130:~ # ls /usr/local/etc/
bash_completion.d		sudo.conf.sample
pam.d				sudo_logsrvd.conf
periodic			sudo_logsrvd.conf.sample
pkg.conf			sudoers
pkg.conf.sample			sudoers.d
sudo.conf			sudoers.dist

root@fb130:~ # ls -ld /usr/local/etc/sudoers*
-r--r-----  1 root  wheel  3634 May  3 18:04 /usr/local/etc/sudoers
drwxr-x---  2 root  wheel     2 May  3 18:04 /usr/local/etc/sudoers.d
-r--r-----  1 root  wheel  3634 May  3 18:04 /usr/local/etc/sudoers.dist

root@fb130:~ # md5 /usr/local/etc/sudoers*
MD5 (/usr/local/etc/sudoers) = 70032ba0e9122e9ee597d768ee2f2df5
md5: /usr/local/etc/sudoers.d: Is a directory
MD5 (/usr/local/etc/sudoers.dist) = 70032ba0e9122e9ee597d768ee2f2df5

root@fb130:~ # visudo
このとき、オリジナルと同一の /usr/local/etc/sudoers.dist というファイルも元から横に置かれているので、わざわざ自分でコピーを取っておかなくても変更点を比較できる。
筆者の環境では以下のように変更を行った。
diff で示すと以下のようである。
root@fb130:~ # diff -u /usr/local/etc/sudoers.dist /usr/local/etc/sudoers
--- /usr/local/etc/sudoers.dist	2021-05-03 18:04:04.211958000 +0900
+++ /usr/local/etc/sudoers	2021-05-03 18:08:35.847671000 +0900
@@ -49,7 +49,9 @@
 ## Run X applications through sudo; HOME is used to find the
 ## .Xauthority file.  Note that other programs use HOME to find
 ## configuration files and this may lead to privilege escalation!
-# Defaults env_keep += "HOME"
+Defaults env_keep += "HOME"
+# 2021-05-03 nsmrtks
+
 ##
 ## X11 resource path settings
 # Defaults env_keep += "XAPPLRESDIR XFILESEARCHPATH XUSERFILESEARCHPATH"
@@ -77,6 +79,9 @@
 # Defaults!/usr/local/bin/sudoreplay !log_output
 # Defaults!REBOOT !log_output

+# 2021-05-03 nsmrtks
+Defaults env_keep += "http_proxy https_proxy"
+
 ##
 ## Runas alias specification
 ##
@@ -87,7 +92,8 @@
 root ALL=(ALL) ALL

 ## Uncomment to allow members of group wheel to execute any command
-# %wheel ALL=(ALL) ALL
+%wheel ALL=(ALL) ALL
+# 2021-05-03 nsmrtks

 ## Same thing without a password
 # %wheel ALL=(ALL) NOPASSWD: ALL
これで、wheel グループに所属している一般ユーザ nsmrtks は、sudo が実行できるようになった。
nsmrtks@fb130:~ % sudo pwd

We trust you have received the usual lecture from the local System
Administrator. It usually boils down to these three things:

    #1) Respect the privacy of others.
    #2) Think before you type.
    #3) With great power comes great responsibility.

Password:パスワード↵
/home/nsmrtks
これも、ports でなく pkg を用いるなら不用と思われる。
/etc/make.conf ファイルを新規作成して、以下の内容にした。 (これは旧環境からそのまま持ってきたもの)
# 2017-09-27,2020-12-15 nsmrtks

# see /usr/ports/Mk/bsd.command.mk
SU_CMD?=/usr/local/bin/sudo -E sh -c

# Keep ruby 2.6 as default version
#DEFAULT_VERSIONS+=ruby=2.6

# EoF
この SU_CMD は、ports でビルドするときに、たまに出て来る su を代わりに sudo を用いるように設定している。
ここで、筆者の環境でいつも用いている「teetime」スクリプトを紹介する。
これは、「コマンド |& tee ログ.txt」 (csh 系)
あるいは「コマンド 2>&1 | tee ログ.txt」 (sh 系)
に毛の生えたようなコマンドで、コマンドを何回かやり直しても、ログのファイル名を、既に存在するファイル名とぶつからないように、日付時刻のファイル名を自動的に付けてくれるものである。
(コマンドにあまり複雑なものを指定するとうまくいかない制限事項がある)
「teetime [-t タグ] コマンド..」のように用いる。
筆者の環境では、いちどホームディレクトリを旧環境からコピーしてしまえば
(後述)、~/bin
にある teetime コマンドが使えるようになるのだが、この時点で未だホームディレクトリをコピーしてきていない。
筆者は一般ユーザ nsmrtks の作成時、ログインシェルに tcsh
を選択したが、デフォルトで配置される ~/.cshrc によれば、/etc/login.conf
により、~/bin が自動的に $path に追加されているらしい。
そこで、~/bin ディレクトリを作成し、そこに teetime
スクリプトを配置すれば、使えるようになるので、今の所はこれでしのぐことにする。
(もしかすると rehash コマンドの実行が 1回必要かもしれない)
なお、ここまで説明してこなかったが、この時点でホスト (MS-Windows) 側とファイルをやり取りするには、ホスト側に Cygwin をインストールし、Cygwin64 Terminal 側から ssh で 192.168.56.130 (先ほど設定した IPv4 アドレス) に対してアクセスするか、FreeBSD 側から 10.0.2.2 に対し ssh アクセスすれば、ファイルのやり取り等が出来る。
後者は、あらかじめ Cygwin64 Terminal を右クリック『管理者として実行』→ ssh-host-config コマンドの実行が一度必要である。 (コントロールパネル → 『Windows Defender ファイアウォール』に、「新しい規則...」で TCP 22 を許可する設定も必要かもしれない。 筆者は特に他 PC とファイルをやり取りするためにこれも設定した。)
これも ports でなく pkg を用いるなら不用である。
先ほど紹介した teetime スクリプトを用いている。
nsmrtks@fb130:~ % cd /usr/ports/ports-mgmt/portupgrade

nsmrtks@fb130:/usr/ports/ports-mgmt/portupgrade % pwd
/usr/ports/ports-mgmt/portupgrade

nsmrtks@fb130:/usr/ports/ports-mgmt/portupgrade % nice teetime -t install make install
logging (from the next line till the end) to install20210503.log
teetime! Mon May  3 18:41:02 JST 2021
teetime! working directory is /usr/ports/ports-mgmt/portupgrade
teetime> make install
〜
===>   Registering installation for portupgrade-2.4.16,2
Installing portupgrade-2.4.16,2...
===>  Returning to user credentials
teetime! Mon May  3 18:50:16 JST 2021
無事ビルド・インストール出来たようだ。
virtualbox-ose-additions をインストールしていないと、ホストをサスペンド/レジュームするたびに、VirtualBox ゲストの時計が遅れていったり、いろいろ不都合が発生する。
ここからは、先ほどインストールした portupgrade に付属の portinstall コマンドを用いて ports のソフトをインストールしていく。 (繰り返しになるが pkg を用いるなら考慮不要)
また、/var/tmp の下に log というディレクトリと、さらにその下に Install
というディレクトリを作成し、その下にログを保存して、後で参考にできるようにすることにする。
これについては、pkg でインストールする場合も役に立つと思う。
MS-Windows や Linux では、Guest Additions CD を挿入して.. などというのがあった気がするが、FreeBSD では ports や pkg からインストールできる。
nsmrtks@fb130:~ % cd /var/tmp

nsmrtks@fb130:/var/tmp % mkdir log

nsmrtks@fb130:/var/tmp % cd log

nsmrtks@fb130:/var/tmp/log % mkdir Install

nsmrtks@fb130:/var/tmp/log % cd Install

nsmrtks@fb130:/var/tmp/log/Install % nice teetime -t virtualbox-ose-additions_ portinstall -s virtualbox-ose-additions
logging (from the next line till the end) to virtualbox-ose-additions_20210503.log
teetime! Mon May  3 19:55:28 JST 2021
teetime! working directory is /var/tmp/log/Install
teetime> portinstall -s virtualbox-ose-additions
〜
gmp のオプション 『CPU_OPTS』「Enable assembly optimizations for your CPU」 というのをチェックを付けてみた (スペースキーを押す)。
〜
--->  [Executing a command as root: sudo /usr/local/sbin/pkgdb -aFOQ]
teetime! Mon May  3 22:10:58 JST 2021
無事にビルド・インストールが終わった。
さて、ビルド・インストール中のメッセージが、teetime コマンドにより
/var/tmp/log/Install/ 以下のログファイルに残っているので、それを見てみる。
(今回は virtualbox-ose-additions_20210503.log というファイル名であった)
これと、/usr/local/etc/rc.d/ 以下にインストールされた
vboxguest と vboxservice とさらに dbus を参考にして..
nsmrtks@fb130:~ % ls /usr/local/etc/rc.d/
dbus		vboxguest	vboxservice
/etc/rc.conf に以下のような行を追加した。
# 2021-05-03 nsmrtks
#
# (see /usr/local/etc/rc.d/dbus)
dbus_enable="YES"		# to enable the D-BUS messaging system
#
# (see /usr/local/etc/rc.d/{vboxguest,vboxservice}
vboxguest_enable="YES"		# Set it to YES to enable vboxguest on startup
vboxservice_enable="YES"	# Set it to "YES" to enable VBoxService.
いったんシャットダウン・電源 OFF した。
そうして起動すると、「vboxguest: loaded successfully」や、VBoxService が起動したようなメッセージが出ていた。
kldstat で見ると vboxguest.ko がロードされていた。
nsmrtks@fb130:~ % kldstat
Id Refs Address                Size Name
 1   15 0xffffffff80200000  1f11ef8 kernel
 2    1 0xffffffff82400000   478910 zfs.ko
 3    1 0xffffffff82318000    35b00 vboxguest.ko
 4    1 0xffffffff8234e000     3218 intpm.ko
 5    1 0xffffffff82352000     2180 smbus.ko
また、VBoxService が起動していた。 (以前、起動していなかったことがあった。)
nsmrtks@fb130:~ % ps ax | egrep -i box
 997  -  Is    0:00.09 /usr/local/sbin/VBoxService
1119  0  S+    0:00.00 egrep -i box
virtualbox-ose-additions をインストールしたことによって、X11 サーバ (xorg-server) もインストールされていた。
nsmrtks@fb130:~ % pkg info | egrep X
〜
xorg-server-1.20.11,1          X.Org X server and related programs
〜
しかし、startx コマンドが入っていない。
nsmrtks@fb130:~ % where startxそこで、xorg をちゃんとインストールしてみる..
nsmrtks@fb130:~ % cd /var/tmp/log/Install/

nsmrtks@fb130:/var/tmp/log/Install % nice teetime -t xorg portinstall -s xorg
logging (from the next line till the end) to xorg20210503.log
teetime! Mon May  3 23:13:24 JST 2021
teetime! working directory is /var/tmp/log/Install
teetime> portinstall -s xorg
〜
しかし、
〜
Running custom install script '/usr/local/bin/python3.8 /usr/ports/x11-fonts/fontconfig/work/fontconfig-2.13.93/fc-cache/../instal
l-cache.py /usr/ports/x11-fonts/fontconfig/work/fontconfig-2.13.93/_build/fc-cache/fc-cache'
--- stdout ---
Font directories:
	/usr/local/share/fonts
	/usr/local/lib/X11/fonts
	/usr/local/share/fonts/util
/usr/local/share/fonts: caching, new cache contents: 0 fonts, 1 dirs
/usr/local/share/fonts/util: caching, new cache contents: 0 fonts, 0 dirs
/usr/local/lib/X11/fonts: skipping, no such directory
/usr/local/share/fonts/util: skipping, looped directory detected
/var/db/fontconfig: not cleaning non-existent cache directory
/usr/ports/x11-fonts/fontconfig/work/fontconfig-2.13.93/_build/fc-cache/fc-cache: failed

--- stderr ---
Fontconfig error: Cannot load default config file: No such file: (null)
Fontconfig error: No writable cache directories
Fontconfig error: No writable cache directories
Fontconfig error: No writable cache directories
/usr/local/share/fonts: failed to write cache
Fontconfig error: No writable cache directories
/usr/local/share/fonts/util: failed to write cache

FAILED: install script '/usr/local/bin/python3.8 /usr/ports/x11-fonts/fontconfig/work/fontconfig-2.13.93/fc-cache/../install-cache
.py /usr/ports/x11-fonts/fontconfig/work/fontconfig-2.13.93/_build/fc-cache/fc-cache' exit code 2, stopped
FAILED: meson-install
/usr/local/bin/meson install --no-rebuild
ninja: build stopped: subcommand failed.
*** Error code 1

Stop.
make[7]: stopped in /usr/ports/x11-fonts/fontconfig
*** Error code 1

Stop.
make[6]: stopped in /usr/ports/x11-fonts/fontconfig
*** Error code 1

Stop.
make[5]: stopped in /usr/ports/x11-fonts/libXft
*** Error code 1

Stop.
make[4]: stopped in /usr/ports/x11/x11perf
*** Error code 1

Stop.
make[3]: stopped in /usr/ports/x11/xorg-apps
*** Error code 1

Stop.
make[2]: stopped in /usr/ports/x11/xorg-apps
*** Error code 1

Stop.
make[1]: stopped in /usr/ports/x11/xorg
*** Error code 1

Stop.
make: stopped in /usr/ports/x11/xorg
egrep: empty (sub)expression
** Command failed [exit code 1]: /usr/bin/script -qa /tmp/portinstall20210503-1246-1vv6auk env make FETCH_BEFORE_ARGS=-q
** Fix the problem and try again.
--->  [Executing a command as root: sudo /usr/local/sbin/pkgdb -aFOQ]
** Listing the failed packages (-:ignored / *:skipped / !:failed)
	! x11/xorg	(unknown build error)
teetime! Mon May  3 23:17:07 JST 2021
もう一度試してみたが、同様にダメであった。 (ビルド成果物を clean しないように今度は portinstall に -w を付けている)
nsmrtks@fb130:/var/tmp/log/Install % nice teetime -t xorg portinstall -sw xorg
logging (from the next line till the end) to xorg20210504.log
teetime! Tue May  4 00:11:26 JST 2021
teetime! working directory is /var/tmp/log/Install
teetime> portinstall -sw xorg
〜
「/usr/local/share/fonts/util: skipping, looped directory detected」 と言っているのがおかしなように思えるが、そんなはずはないのだが..
nsmrtks@fb130:/var/tmp/log/Install % ls /usr/local/share/fonts/util/
map-ISO8859-1		map-ISO8859-16		map-ISO8859-7
map-ISO8859-10		map-ISO8859-2		map-ISO8859-8
map-ISO8859-11		map-ISO8859-3		map-ISO8859-9
map-ISO8859-13		map-ISO8859-4		map-JISX0201.1976-0
map-ISO8859-14		map-ISO8859-5		map-KOI8-R
map-ISO8859-15		map-ISO8859-6
話はそれるが、ここで作業時間の都合で、VirtualBox の機能で FreeBSD 環境を「閉じる」→「保存状態」で保存した後に、また再開している。
なお前述の virtualbox-ose-additions を設定していないと、時計がずれてしまう。
しょうがないので、最後の手段で、失敗の原因になっている fontconfig を pkg install でインストールすることにする。 (最初から (xorg を) そうしろというのもあるが)
nsmrtks@fb130:/var/tmp/log/Install % teetime -t fontconfig sudo pkg install fontconfig
logging (from the next line till the end) to fontconfig20210504.log
teetime! Tue May  4 19:19:43 JST 2021
teetime! working directory is /var/tmp/log/Install
teetime> sudo pkg install fontconfig
〜
teetime! Tue May  4 19:25:05 JST 2021
うまくいったようなので、いまいちど xorg を portinstall する。 (今度は当初と同様に portinstall に -w は無しにしてみた)
nsmrtks@fb130:/var/tmp/log/Install % nice teetime -t xorg portinstall -s xorg
conflicting xorg20210504.log
logging (from the next line till the end) to xorg2021050419.log
teetime! Tue May  4 19:31:50 JST 2021
teetime! working directory is /var/tmp/log/Install
teetime> portinstall -s xorg
〜
途中、xorg-drivers の設定で、VMMOUSE と VMWARE にチェックを入れてみる。 FreeBSD 12.1 のとき は、そうしないとうまくいかなかった。
これについては、ports でオプションを変えてビルドして対処しているので、バイナリパッケージでは対応できないことになる。 その場合は、VirtualBox で警告が出るかもしれないが「グラフィックスコントローラー」の設定を 「VBoxVGA」で使うしかないだろうか。
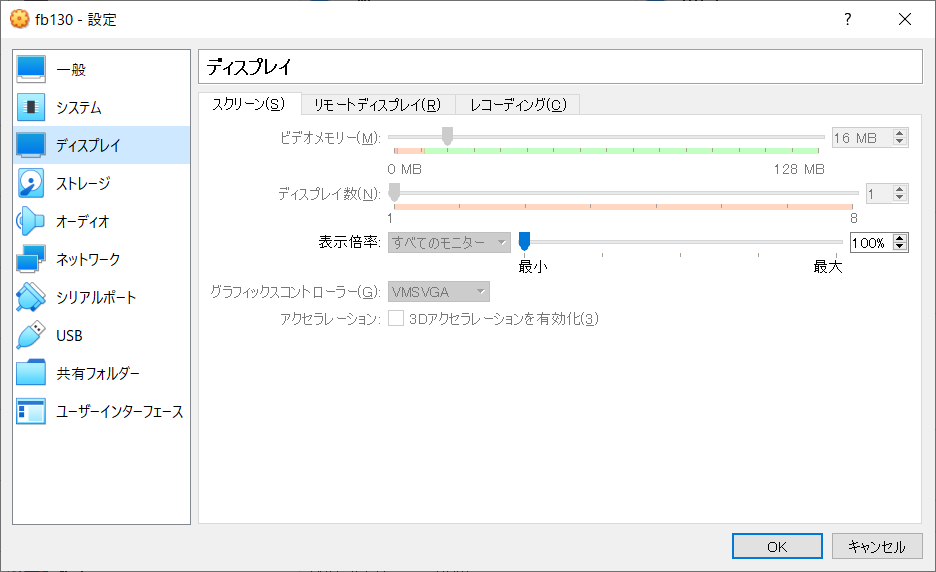
そういえば VirtualBox の「グラフィックスコントローラー」の設定が、今回は当初から (「VBoxVGA」でなく) 「VMsVGA」になっていた。
あらためて、startx を実行すると、X11 サーバを起動できるだろうか。
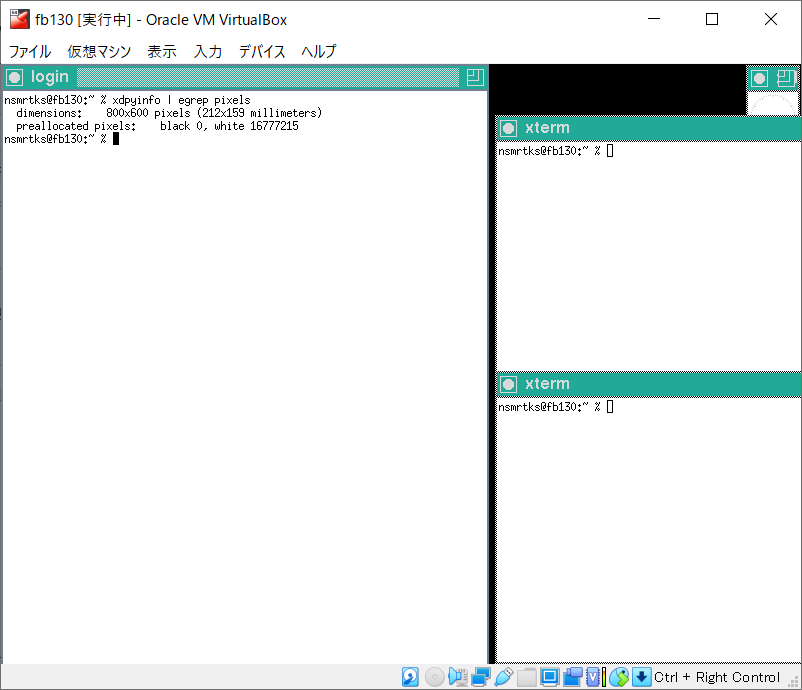
xdpyinfo でも確かめた所、SVGA (800x600) で起動したようだ。
いったん X11 サーバを終了して、今度は VirtualBox をフルスクリーンモードにして、startx してみると.. (注: 写真の下の方に見えている赤いのは紙を両面テープで貼ったものである)
ここでフルスクリーンモードは 1920x1080 のはずなのだが、それでも 800x600 で起動してしまったようだ。
念のため xrandr を引数なしで実行した所、1920x1080 にも出来るようだ。
そこで早速 xarndr -s 1920x1080 を実行してみた所..
画面をいっぱいに広げることが出来た。
筆者は以前までウィンドウマネージャとして mwm (Motif Window Manager) を長らく使っていたり、また WindowMaker も少し使っていたのだが、どうも古くて動作に支障が出ていると思うようになった。 (なおこれまでのスクリーンショットを見ても分かる通り今起動しているのは twm である。twm も昔は使っていた。)
やはり GNOME か KDE なのか.. と、昔に環境を構築する時に思っていた時、第三の統合デスクトップとして、「GNOME で使われている GTK+ ツールキットをベースにしたデスクトップ環境」 でありながらより軽い Xfce というものもあるということを以下などで知った。
昔の環境ではどれにするか決めあぐねて、3つともインストール(!)したりしていた。
ここでは Xfce にしてみる。
(他の作業環境では KDE を使ったり GNOME を試したりもしている)
nsmrtks@fb130:~ % cd /var/tmp/log/Install
nsmrtks@fb130:/var/tmp/log/Install % nice teetime -t xfce portinstall -s xfce
logging (from the next line till the end) to xfce20210504.log
teetime! Tue May  4 21:18:28 JST 2021
teetime! working directory is /var/tmp/log/Install
teetime> portinstall -s xfce
〜
./grammar.y:799.1-12: warning: deprecated directive: ‘%pure-parser’, use ‘%define api.pure’ [〜id=a2c14c40005c18206c4e01300000
000Segmentation fault (core dumped)
gmake[15]: *** [Makefile:842: grammar.tab.h] Error 139
gmake[15]: Leaving directory '/usr/ports/multimedia/gstreamer1/work/gstreamer-1.16.2/gst/parse'
gmake[14]: *** [Makefile:1813: all-recursive] Error 1
gmake[14]: Leaving directory '/usr/ports/multimedia/gstreamer1/work/gstreamer-1.16.2/gst'
gmake[13]: *** [Makefile:1011: all] Error 2
gmake[13]: Leaving directory '/usr/ports/multimedia/gstreamer1/work/gstreamer-1.16.2/gst'
gmake[12]: *** [Makefile:742: all-recursive] Error 1
gmake[12]: Leaving directory '/usr/ports/multimedia/gstreamer1/work/gstreamer-1.16.2'
gmake[11]: *** [Makefile:648: all] Error 2
gmake[11]: Leaving directory '/usr/ports/multimedia/gstreamer1/work/gstreamer-1.16.2'
===> Compilation failed unexpectedly.
Try to set MAKE_JOBS_UNSAFE=yes and rebuild before reporting the failure to
the maintainer.
*** Error code 1

Stop.
make[10]: stopped in /usr/ports/multimedia/gstreamer1
*** Error code 1

Stop.
make[9]: stopped in /usr/ports/multimedia/gstreamer1
*** Error code 1

Stop.
make[8]: stopped in /usr/ports/multimedia/gstreamer1-plugins
*** Error code 1

Stop.
make[7]: stopped in /usr/ports/deskutils/xfce4-tumbler
*** Error code 1

Stop.
make[6]: stopped in /usr/ports/deskutils/xfce4-tumbler
*** Error code 1

Stop.
make[5]: stopped in /usr/ports/x11-fm/thunar
*** Error code 1

Stop.
make[4]: stopped in /usr/ports/x11-fm/thunar
*** Error code 1

Stop.
make[3]: stopped in /usr/ports/x11-wm/xfce4-desktop
*** Error code 1

Stop.
make[2]: stopped in /usr/ports/x11-wm/xfce4-desktop
*** Error code 1

Stop.
make[1]: stopped in /usr/ports/x11-wm/xfce4
*** Error code 1

Stop.
make: stopped in /usr/ports/x11-wm/xfce4
** Command failed [exit code 1]: /usr/bin/script -qa /tmp/portinstall20210504-91164-1q995rb env make FETCH_BEFORE_ARGS=-q
** Fix the problem and try again.
--->  [Executing a command as root: sudo /usr/local/sbin/pkgdb -aFOQ]
Password:
Sorry, try again.
Password:
Sorry, try again.
Password:
sudo: 3 incorrect password attempts
/usr/local/lib/ruby/site_ruby/2.7/pkgtools/pkgtools.rb:487:in `__system': Command failed [exit code 1]: sudo /usr/local/sbin/pkgdb
 -aFOQ (CommandFailedError)
	from /usr/local/lib/ruby/site_ruby/2.7/pkgtools/pkgtools.rb:510:in `__sudo'
	from /usr/local/lib/ruby/site_ruby/2.7/pkgtools/pkgtools.rb:516:in `xsudo'
	from /usr/local/lib/ruby/site_ruby/2.7/pkgtools/pkgdb.rb:1062:in `autofix!'
	from /usr/local/lib/ruby/site_ruby/2.7/pkgtools/pkgdb.rb:1058:in `autofix'
	from /usr/local/sbin/portinstall:1139:in `do_install'
	from /usr/local/sbin/portinstall:842:in `block (2 levels) in main'
	from /usr/local/sbin/portinstall:838:in `each'
	from /usr/local/sbin/portinstall:838:in `block in main'
	from /usr/local/lib/ruby/2.7/optparse.rb:1093:in `initialize'
	from /usr/local/sbin/portinstall:238:in `new'
	from /usr/local/sbin/portinstall:238:in `main'
	from /usr/local/sbin/portinstall:2380:in `<main>'
teetime! Tue May  4 23:43:37 JST 2021
.. Segmentation fault
で停止すると同時に、変なメッセージが出力されて、(この覚書を書くために使っている) script コマンドがおかしくなり、よくわからない状態になった。
もう一度再開させてみたが
(portinstall に -w あり)、同じようにおかしくなってしまうようだ。
nsmrtks@fb130:/var/tmp/log/Install % nice teetime -t xfce portinstall -sw xfce
logging (from the next line till the end) to xfce20210505.log
teetime! Wed May  5 00:01:33 JST 2021
teetime! working directory is /var/tmp/log/Install
teetime> portinstall -sw xfce
〜
./grammar.y:799.1-12: warning: deprecated directive: ‘%pure-parser’, use ‘%define api.pure’ [〜id=a2c14c40005c1825cbc787e00000
000Segmentation fault (core dumped)
〜
** Listing the failed packages (-:ignored / *:skipped / !:failed)
	! x11-wm/xfce4	(coredump)
teetime! Wed May  5 00:02:24 JST 2021
しょうがないので、最後の手段で、失敗の原因になっている gstreamer1 を pkg install でインストールすることにする。 (最初から (xfce を) そうしろというのもあるが)
nsmrtks@fb130:/var/tmp/log/Install % teetime -t gstreamer1_ sudo pkg install gstreamer1
logging (from the next line till the end) to gstreamer1_20210505.log
teetime! Wed May  5 00:08:17 JST 2021
teetime! working directory is /var/tmp/log/Install
teetime> sudo pkg install gstreamer1
〜
teetime! Wed May  5 00:15:12 JST 2021
うまくいったようなので、いまいちど xfce を portinstall する。 (今度は当初と同様に -w は無しにしてみた)
nsmrtks@fb130:/var/tmp/log/Install % nice teetime -t xfce portinstall -s xfce
conflicting xfce20210505.log
logging (from the next line till the end) to xfce2021050500.log
teetime! Wed May  5 00:39:19 JST 2021
teetime! working directory is /var/tmp/log/Install
teetime> portinstall -s xfce
〜
===>  Switching to root credentials for 'install' target
Password:
sudo: timed out reading password
sudo: a password is required
*** Error code 1

Stop.
make[10]: stopped in /usr/ports/www/webkit2-gtk3
*** Error code 1

Stop.
make[9]: stopped in /usr/ports/www/webkit2-gtk3
*** Error code 1

Stop.
make[8]: stopped in /usr/ports/textproc/libgepub
*** Error code 1

Stop.
make[7]: stopped in /usr/ports/deskutils/xfce4-tumbler
*** Error code 1

Stop.
make[6]: stopped in /usr/ports/deskutils/xfce4-tumbler
*** Error code 1

Stop.
make[5]: stopped in /usr/ports/x11-fm/thunar
*** Error code 1

Stop.
make[4]: stopped in /usr/ports/x11-fm/thunar
*** Error code 1

Stop.
make[3]: stopped in /usr/ports/x11-wm/xfce4-desktop
*** Error code 1

Stop.
make[2]: stopped in /usr/ports/x11-wm/xfce4-desktop
*** Error code 1

Stop.
make[1]: stopped in /usr/ports/x11-wm/xfce4
*** Error code 1

Stop.
make: stopped in /usr/ports/x11-wm/xfce4
** Command failed [exit code 1]: /usr/bin/script -qa /tmp/portinstall20210505-38064-1vf8u4c env make FETCH_BEFORE_ARGS=-q
** Fix the problem and try again.
--->  [Executing a command as root: sudo /usr/local/sbin/pkgdb -aFOQ]
Password:
sudo: timed out reading password
sudo: a password is required
/usr/local/lib/ruby/site_ruby/2.7/pkgtools/pkgtools.rb:487:in `__system': Command failed [exit code 1]: sudo /usr/local/sbin/pkgdb
 -aFOQ (CommandFailedError)
	from /usr/local/lib/ruby/site_ruby/2.7/pkgtools/pkgtools.rb:510:in `__sudo'
	from /usr/local/lib/ruby/site_ruby/2.7/pkgtools/pkgtools.rb:516:in `xsudo'
	from /usr/local/lib/ruby/site_ruby/2.7/pkgtools/pkgdb.rb:1062:in `autofix!'
	from /usr/local/lib/ruby/site_ruby/2.7/pkgtools/pkgdb.rb:1058:in `autofix'
	from /usr/local/sbin/portinstall:1139:in `do_install'
	from /usr/local/sbin/portinstall:842:in `block (2 levels) in main'
	from /usr/local/sbin/portinstall:838:in `each'
	from /usr/local/sbin/portinstall:838:in `block in main'
	from /usr/local/lib/ruby/2.7/optparse.rb:1093:in `initialize'
	from /usr/local/sbin/portinstall:238:in `new'
	from /usr/local/sbin/portinstall:238:in `main'
	from /usr/local/sbin/portinstall:2380:in `<main>'
teetime! Wed May  5 01:18:35 JST 2021
..放置していたら sudo がタイムアウトしてしまったので、今度は portinstall に -w を付けてもう一度。
nsmrtks@fb130:/var/tmp/log/Install % nice teetime -t xfce portinstall -sw xfce
conflicting xfce20210505.log
logging (from the next line till the end) to xfce2021050501.log
teetime! Wed May  5 01:32:06 JST 2021
teetime! working directory is /var/tmp/log/Install
teetime> portinstall -sw xfce
〜
--->  [Executing a command as root: sudo /usr/local/sbin/pkgdb -aFOQ]
teetime! Wed May  5 02:09:47 JST 2021
無事にビルド・インストールできた。
Xfce は startxfce4 コマンドで起動できる。
お試しとして、まず、先ほどと同様に startx で X11 と、twm を起動する。
次に、その twm を左クリックメニューから終了させて、startxfce4 で Xfce を起動する。
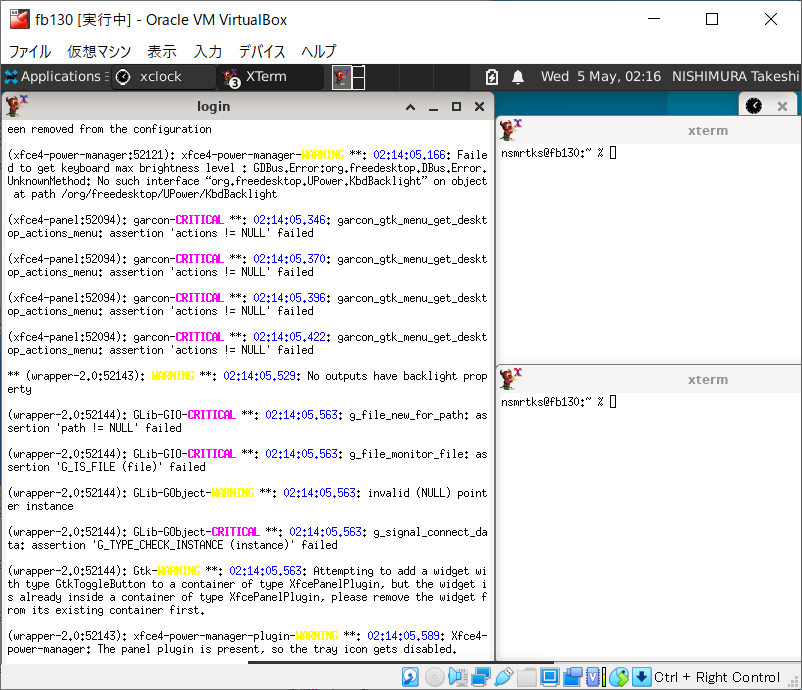
無事に Xfce が起動した。
これもおそらく筆者の環境に特有の話かもしれない..
FreeBSD や NetBSD では、IPv6 のリンクローカルアドレス (IPv6 ルーターがなくても自動的に割り当てられるが同一ネットワーク内でしか通信できない) で NFS が通信できたが、これが Ubuntu Linux 相手だとどうしてもうまくいかなかった (同一の VirtualBox の「ホストオンリーアダプター」を経由している場合でも)。
なお、別の物理 PC をまたぎ、少なくとも一方が VirtualBox の「ブリッジアダプター」(他の物理 PC と直接通信できる) という場合も、経験上、リンクローカルアドレスではうまくいかないことがあった。
ここで筆者の環境では、VirtualBox のネットワークの設定で、em2 が「ホストオンリーアダプター」 (同一の VirtualBox の他の仮想マシンと通信できる) になっている。
しかし VirtualBox の「ホストオンリーアダプター」には、IPv6
アドレスとしては、リンクローカルアドレスしか割当たっていない。
このような場合、リンクローカルアドレスよりもよりしっかりした IPv6
アドレスとして、ユニークローカルアドレス (ULA) を用いるのがいいようだ。
前置きが長くなったが、ここでは、ULA に基づく IPv6 アドレスを、em2 インターフェイスに割り当ててみることにする。
筆者は、かつて http://www.kame.net/~suz/gen-ula.html を使用させてもらって生成した ULA を従来より用いている。 ただし、このページは現在では無くなってしまったようだ。 (参考までに同様の目的を果たせるものが ローカルな環境でIPv6を使う に見つかった)
筆者の環境の ULA は、fd39:8b7f:067e::/48 というものである。
その際 16 ビットの「サブネットID」として、em2 では 1
を用いることにする
(em1 用に 0 を取っておいているのだが今回は割り当てない)
。
ここまでで IPv6 の 128 ビットのアドレスのうち上位 64 ビットまでで、残り
64 ビットは、(em2 の) MAC (イーサネット) アドレスから算出した
EUI-64 でよいはずだ。
あらためて以下を参照することにする。
(em2 の) MAC アドレスは、ifconfig で知ることが出来る。 (以下の出力の「ether」)
nsmrtks@fb130:~ % ifconfig
〜
em2: 〜
	〜
	ether 08:00:27:3e:ac:4a
	inet 192.168.56.130 netmask 0xffffff00 broadcast 192.168.56.255
	inet6 fe80::a00:27ff:fe3e:ac4a%em2 prefixlen 64 scopeid 0x3
	〜
〜
em2 の 08:00:27:3e:ac:4a の EUI-64 は 0a 00 27 ff fe 3e ac 4a である。
が、実は em2 の IPv6 リンクローカルアドレス
(上記の ifconfig の出力で既に inet6 が割り当たっているもの)
を見れば同じ値なので分かったりする。
これらから、IPv6 アドレス (ULA) が、em2 については fd39:8b7f:67e:1:a00:27ff:fe3e:ac4a が得られた。
このアドレスを、まずは /etc/rc.conf に設定する。 ifconfig_em2_ipv6 の所を以下のように変更した。
ifconfig_em2="inet 192.168.56.130 netmask 255.255.255.0"
#ifconfig_em2_ipv6="inet6 accept_rtadv"
ifconfig_em2_ipv6="inet6 fd39:8b7f:67e:1:a00:27ff:fe3e:ac4a prefixlen 64"
また、/etc/hosts と、相手ホストの /etc/hosts にも、エントリを追加する。
自ホスト (fb130) の /etc/hosts の
fb130 に関するエントリは以下のようになった。
(リンクローカルアドレスも追加しておいた (%em2 がついているもの))
# 2021-05-03,06 nsmrtks
fe80::a00:27ff:fe3e:ac4a%em2		fb130.magic.or	fb130		fb130c
fd39:8b7f:67e:1:a00:27ff:fe3e:ac4a	fb130.magic.or	fb130	fb130v6
相手ホスト (fb121 等) の IPv6 ULA アドレスも /etc/hosts に追記した。
再起動すると、新しく IPv6 ULA アドレスが割り当てられた。
nsmrtks@fb130:~ % ifconfig
〜
em2: 〜
	〜
	ether 08:00:27:3e:ac:4a
	inet 192.168.56.130 netmask 0xffffff00 broadcast 192.168.56.255
	inet6 fe80::a00:27ff:fe3e:ac4a%em2 prefixlen 64 scopeid 0x3
	inet6 fd39:8b7f:67e:1:a00:27ff:fe3e:ac4a prefixlen 64
	〜
〜
確認のため、同一の VirtualBox にある、旧環境 (fb121) と、新環境 (fb130) が、ping6 で、ULA で通信できた。
fb130 (新環境) → fb121 (旧環境)
nsmrtks@fb130:~ % ping6 fb121v6
PING6(56=40+8+8 bytes) fd39:8b7f:67e:1:a00:27ff:fe3e:ac4a --> fd39:8b7f:67e:1:a00:27ff:fe52:d95a
16 bytes from fd39:8b7f:67e:1:a00:27ff:fe52:d95a, icmp_seq=0 hlim=64 time=0.468 ms
16 bytes from fd39:8b7f:67e:1:a00:27ff:fe52:d95a, icmp_seq=1 hlim=64 time=0.612 ms
^C
--- fb121.magic.or ping6 statistics ---
2 packets transmitted, 2 packets received, 0.0% packet loss
round-trip min/avg/max/std-dev = 0.468/0.540/0.612/0.072 ms
fb121 (旧環境) → fb130 (新環境)
% ping6 fb130v6
PING6(56=40+8+8 bytes) fd39:8b7f:67e:1:a00:27ff:fe52:d95a --> fd39:8b7f:67e:1:a00:27ff:fe3e:ac4a
16 bytes from fd39:8b7f:67e:1:a00:27ff:fe3e:ac4a, icmp_seq=0 hlim=64 time=0.811 ms
16 bytes from fd39:8b7f:67e:1:a00:27ff:fe3e:ac4a, icmp_seq=1 hlim=64 time=0.778 ms
^C
--- fb130.magic.or ping6 statistics ---
2 packets transmitted, 2 packets received, 0.0% packet loss
round-trip min/avg/max/std-dev = 0.778/0.795/0.811/0.017 ms
リンクローカルアドレスでも通信できる。
fb130 (新環境) → fb121 (旧環境)
nsmrtks@fb130:~ % ping6 fb121c
PING6(56=40+8+8 bytes) fe80::a00:27ff:fe3e:ac4a%em2 --> fe80::a00:27ff:fe52:d95a%em2
16 bytes from fe80::a00:27ff:fe52:d95a%em2, icmp_seq=0 hlim=64 time=1.393 ms
16 bytes from fe80::a00:27ff:fe52:d95a%em2, icmp_seq=1 hlim=64 time=0.883 ms
^C
--- fb121.magic.or ping6 statistics ---
2 packets transmitted, 2 packets received, 0.0% packet loss
round-trip min/avg/max/std-dev = 0.883/1.138/1.393/0.255 ms
fb121 (旧環境) → fb130 (新環境)
% ping6 fb130d
PING6(56=40+8+8 bytes) fe80::a00:27ff:fe52:d95a%vtnet0 --> fe80::a00:27ff:fe3e:ac4a%vtnet0
16 bytes from fe80::a00:27ff:fe3e:ac4a%vtnet0, icmp_seq=0 hlim=64 time=3.044 ms
16 bytes from fe80::a00:27ff:fe3e:ac4a%vtnet0, icmp_seq=1 hlim=64 time=0.916 ms
^C
--- fb130.magic.or ping6 statistics ---
2 packets transmitted, 2 packets received, 0.0% packet loss
round-trip min/avg/max/std-dev = 0.916/1.980/3.044/1.064 ms
少し余談になるが、Windows で BusyBox と GNU Make を組み合わせた環境で、入力データによっては、nkf ならいけるが iconv コマンドだとうまく作動しないということが最近あった。
Cygwin や FreeBSD では iconv でも作動したのだが。
nkf は、(fj のような) 昔から (日本で) インターネットを使っている世代には標準的なコマンドということもあるが、環境を揃えるためにも、nkf をインストールしておくことにする..
nsmrtks@fb130:~ % cd /var/tmp/log/Install/

nsmrtks@fb130:/var/tmp/log/Install % nice teetime -t ja-nkf_ portinstall -s ja-nkf
logging (from the next line till the end) to ja-nkf_20210506.log
teetime! Thu May  6 21:46:30 JST 2021
teetime! working directory is /var/tmp/log/Install
teetime> portinstall -s ja-nkf
〜
teetime! Thu May  6 21:46:38 JST 2021
筆者が好んで使わせてもらっているフォントである。 これを Emacs や rxvt-unicode やブラウザで使う。
nsmrtks@fb130:~ % cd /var/tmp/log/Install/

nsmrtks@fb130:/var/tmp/log/Install % nice teetime -t ja-font-ume_ portinstall -s ja-font-ume
logging (from the next line till the end) to ja-font-ume_20210506.log
teetime! Thu May  6 21:58:50 JST 2021
teetime! working directory is /var/tmp/log/Install
teetime> portinstall -s ja-font-ume
〜
teetime! Thu May  6 21:59:15 JST 2021
nsmrtks@fb130:~ % cd /var/tmp/log/Install/

nsmrtks@fb130:/var/tmp/log/Install % nice teetime -t emacs portinstall -s emacs
logging (from the next line till the end) to emacs20210506.log
teetime! Thu May  6 22:02:03 JST 2021
teetime! working directory is /var/tmp/log/Install
teetime> portinstall -s emacs
〜
teetime! Thu May  6 22:18:07 JST 2021
無事にビルド・インストールできた。
xterm 等の代わりに用いる。
nsmrtks@fb130:~ % cd /var/tmp/log/Install/

nsmrtks@fb130:/var/tmp/log/Install % nice teetime -t rxvt-unicode_ portinstall -s rxvt-unicode
logging (from the next line till the end) to rxvt-unicode_20210506.log
teetime! Thu May  6 22:30:31 JST 2021
teetime! working directory is /var/tmp/log/Install
teetime> portinstall -s rxvt-unicode
〜
teetime! Thu May  6 22:32:17 JST 2021
無事にビルド・インストールできた。
nsmrtks@fb130:~ % cd /var/tmp/log/Install/

nsmrtks@fb130:/var/tmp/log/Install % nice teetime -t chromium portinstall -s chromium
logging (from the next line till the end) to chromium20210506.log
teetime! Thu May  6 22:39:54 JST 2021
teetime! working directory is /var/tmp/log/Install
teetime> portinstall -s chromium
〜
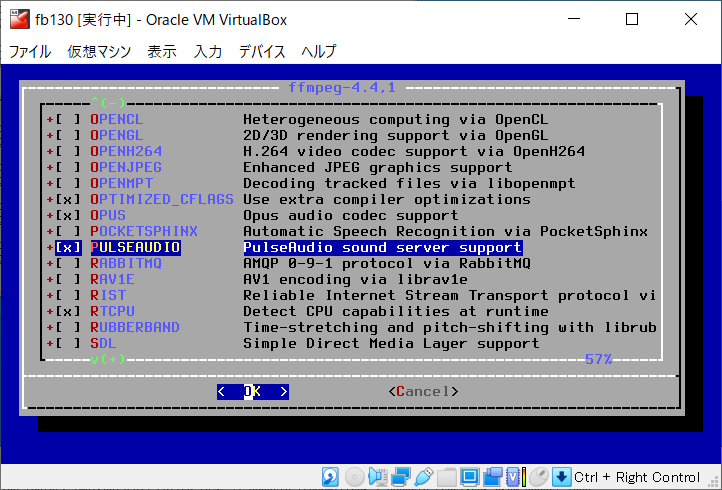
ここで、ffmpeg の設定で、『PULSEAUDIO』 (PulseAudio sound server support) にチェックを入れておいてみる。
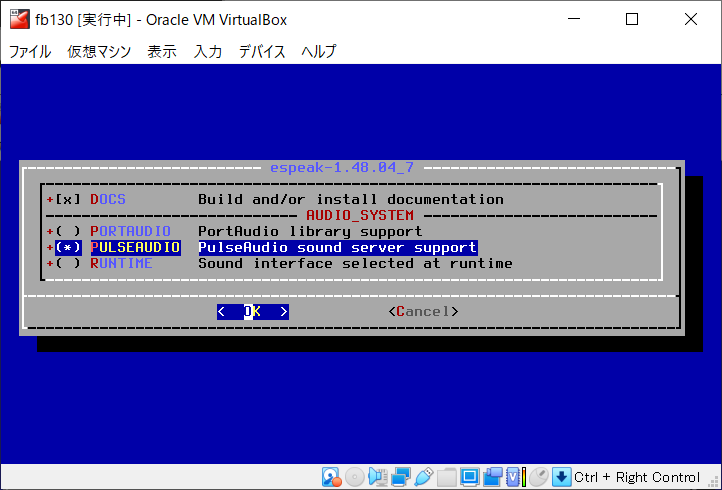
espeak というのでも、『PULSEAUDIO』 (PulseAudio sound server support) にチェックを入れておいてみた。 (後からよく見たらどれか1つを選ぶ形式だった..まあいいか)
chromium 本体でも、『PULSEAUDIO』 (PulseAudio sound server support) にチェックを入れておいてみる..
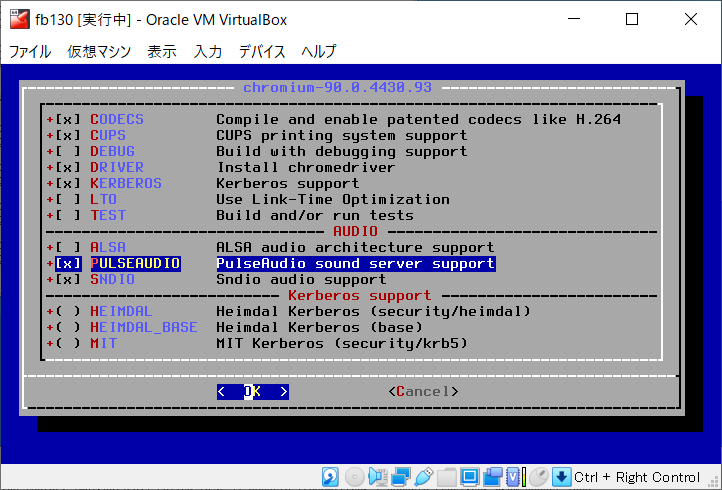
..おっと。
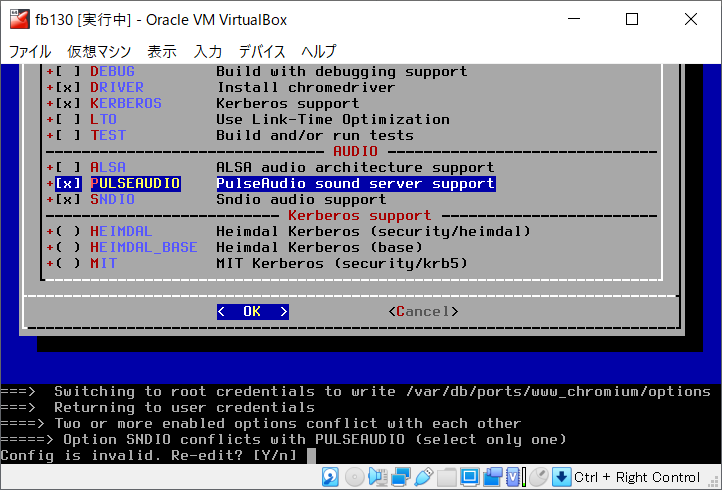
SNDIO のチェックを外す。
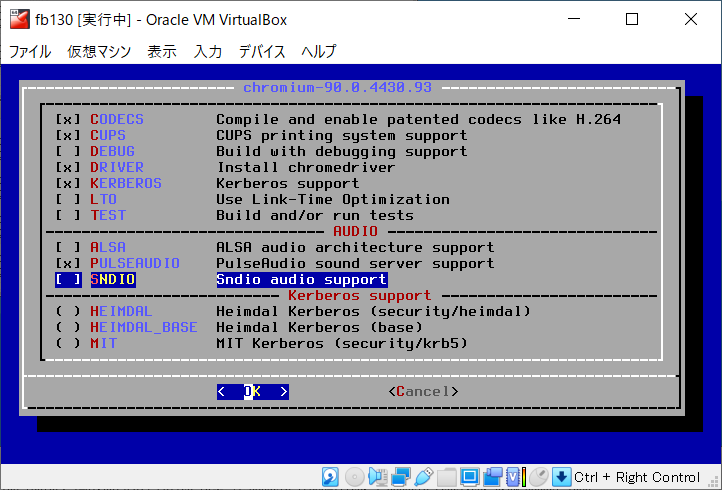
この設定だと chromium から VirtualBox 自体で音が鳴らないという問題に後になって気づいた。 解消方法は後の方を参照。
〜
===>  Staging for chromium-90.0.4430.93
===>   chromium-90.0.4430.93 depends on executable: xdg-open - not found
===>  Switching to root credentials to create /var/db/ports/devel_xdg-utils
Password:
sudo: timed out reading password
sudo: a password is required
===> Cannot create /var/db/ports/devel_xdg-utils, check permissions
*** Error code 1

Stop.
make[3]: stopped in /usr/ports/devel/xdg-utils
*** Error code 1

Stop.
make[2]: stopped in /usr/ports/devel/xdg-utils
*** Error code 1

Stop.
make[1]: stopped in /usr/ports/www/chromium
*** Error code 1

Stop.
make: stopped in /usr/ports/www/chromium
egrep: empty (sub)expression
** Command failed [exit code 1]: /usr/bin/script -qa /tmp/portinstall20210506-86743-644hr8 env make FETCH_BEFORE_ARGS=-q
** Fix the problem and try again.
--->  [Executing a command as root: sudo /usr/local/sbin/pkgdb -aFOQ]
Password:
sudo: timed out reading password
sudo: a password is required
/usr/local/lib/ruby/site_ruby/2.7/pkgtools/pkgtools.rb:487:in `__system': Command failed [exit code 1]: sudo /usr/local/sbin/pkgdb
 -aFOQ (CommandFailedError)
	from /usr/local/lib/ruby/site_ruby/2.7/pkgtools/pkgtools.rb:510:in `__sudo'
	from /usr/local/lib/ruby/site_ruby/2.7/pkgtools/pkgtools.rb:516:in `xsudo'
	from /usr/local/lib/ruby/site_ruby/2.7/pkgtools/pkgdb.rb:1062:in `autofix!'
	from /usr/local/lib/ruby/site_ruby/2.7/pkgtools/pkgdb.rb:1058:in `autofix'
	from /usr/local/sbin/portinstall:1139:in `do_install'
	from /usr/local/sbin/portinstall:842:in `block (2 levels) in main'
	from /usr/local/sbin/portinstall:838:in `each'
	from /usr/local/sbin/portinstall:838:in `block in main'
	from /usr/local/lib/ruby/2.7/optparse.rb:1093:in `initialize'
	from /usr/local/sbin/portinstall:238:in `new'
	from /usr/local/sbin/portinstall:238:in `main'
	from /usr/local/sbin/portinstall:2380:in `<main>'
teetime! Fri May  7 04:38:15 JST 2021
放置していたら sudo がタイムアウトしてしまったので、portinstall に -w を付けて再開。
nsmrtks@fb130:/var/tmp/log/Install % nice teetime -t chromium portinstall -sw chromium
logging (from the next line till the end) to chromium20210507.log
teetime! Fri May  7 07:28:22 JST 2021
teetime! working directory is /var/tmp/log/Install
teetime> portinstall -sw chromium
〜
teetime! Fri May  7 07:33:06 JST 2021
無事にビルド・インストールできた。
nsmrtks@fb130:~ % cd /var/tmp/log/Install/

nsmrtks@fb130:/var/tmp/log/Install % nice teetime -t rsync portinstall -s rsync
logging (from the next line till the end) to rsync20210507.log
teetime! Fri May  7 15:24:29 JST 2021
teetime! working directory is /var/tmp/log/Install
teetime> portinstall -s rsync
〜
teetime! Fri May  7 15:29:04 JST 2021
無事にビルド・インストールできた。
これも、筆者の環境に特有の話が続くが..
筆者は、新環境 (すなわち今インストール中のこの環境「fb130」)
を立ち上げたら、旧環境で運用していたホームディレクトリを新環境に移動して切り替えることにしている。
非圧縮状態で
10 GB 以上に相当するファイル群なので、コピーにそれなりの時間を要する。
コピーの間じゅう、環境が使えないのは不便なので、あらかたの内容を裏でコピーしておき、最後に残りをコピーすることにする。
色々やることがある。
まずコピーの前に、ZFS に空のホームディレクトリを作成する。
ここで、後で /home を
NFS エクスポートしようと思っているので、ホームディレクトリを
/home に下にマウントするようにする。
ところがそうすると、(新環境の) 現状のホームディレクトリも
/home/nsmrtks なので、sudo でなく root でログインし直して作業する。
現状の /home/nsmrtks は一応リネームして保存しておくことにする。
また、(zfs/ports や zfs/local と同様に) lz4 圧縮を指定することにする。
root@fb130:~ # cd /home

root@fb130:/home # ls
distfiles	nsmrtks

root@fb130:/home # mv -i nsmrtks nsmrtks.bak

root@fb130:/home # zfs create -o mountpoint=/home/nsmrtks zfs/nsmrtks

root@fb130:/home # df -h
Filesystem     Size    Used   Avail Capacity  Mounted on
/dev/ada0p2    4.8G    3.2G    1.3G    71%    /
devfs          1.0K    1.0K      0B   100%    /dev
/dev/ada0p4    2.9G    757M    1.9G    28%    /var
/dev/da0p1      15G     13G    1.4G    90%    /home/distfiles
tmpfs          1.0G    4.0K    1.0G     0%    /tmp
zfs/local       18G    2.4G     16G    13%    /usr/local
zfs             16G     24K     16G     0%    /zfs
zfs/ports       16G    490M     16G     3%    /usr/ports
zfs/nsmrtks     16G     24K     16G     0%    /home/nsmrtks

root@fb130:/home # zfs set compression=lz4 zfs/nsmrtks

root@fb130:/home # zfs get compression
NAME         PROPERTY     VALUE           SOURCE
zfs          compression  off             default
zfs/local    compression  lz4             local
zfs/nsmrtks  compression  lz4             local
zfs/ports    compression  lz4             local

root@fb130:/home # ls /home
distfiles	nsmrtks		nsmrtks.bak

root@fb130:/home # ls -a /home/nsmrtks/
.	..
忘れずにオーナーも設定しておく。
root@fb130:/home # ls -ld /home/nsmrtks
drwxr-xr-x  2 root  wheel  2 May  7 15:46 /home/nsmrtks

root@fb130:/home # chown nsmrtks:nsmrtks /home/nsmrtks

root@fb130:/home # ls -ld /home/nsmrtks
drwxr-xr-x  2 nsmrtks  nsmrtks  2 May  7 15:46 /home/nsmrtks

root@fb130:/home # ls -l /home
total 61
drwxr-xr-x  42 nsmrtks  wheel    55296 May  6 23:39 distfiles
drwxr-xr-x   2 nsmrtks  nsmrtks      2 May  7 15:46 nsmrtks
drwxr-xr-x  10 nsmrtks  nsmrtks   1024 May  7 15:46 nsmrtks.bak
あとは、fb121 (旧環境) にあるホームディレクトリを fb130 (新環境) にコピーする。 以下のようにした。
root@fb130:~ # date ; rsync -az --del nsmrtks@fb121c:/home/nsmrtks/ /home/nsmrtks/ ; date
Fri May  7 15:57:49 JST 2021
〜
Fri May  7 16:08:19 JST 2021
無事にコピーが完了した。
これ以降は、ユーザ nsmrtks の環境は、旧環境からコピーしてきた ~/.tcshrc 等もろもろに従って動作している。
これも、必要なのは筆者の環境だけかもしれない。
筆者は、新環境 (すなわち今インストール中のこの環境「fb130」) を立ち上げてからも、引き継ぎのためやバックアップのために、旧環境もしばらく残して運用することにしており、その際、ホームディレクトリや /usr/ports/distfiles (前述) を旧環境から新環境に移動して切り替え、旧環境からは NFS でそのまま参照するようにしている。
NFS というと、どのディレクトリをエクスポートするかという設定が必要だが、/etc/exports ファイルと、ZFS の sharenfs の二段構えで行くことにする。
あらためて /etc/hosts の編集を行う。
ここで、同じホスト上の VirtualBox
の仮想マシンどうしは、「ホストオンリーアダプター」を通して通信できる。
それは、これまでの経緯により、fb130 においては
仮想マシンの作成
時に「アダプター3」として割り当てており、em2 として見えている。
% ifconfig em2
em2: flags=8863<UP,BROADCAST,RUNNING,SIMPLEX,MULTICAST> metric 0 mtu 1500
	options=481009b<RXCSUM,TXCSUM,VLAN_MTU,VLAN_HWTAGGING,VLAN_HWCSUM,VLAN_HWFILTER,NOMAP>
	ether 08:00:27:3e:ac:4a
	inet 192.168.56.130 netmask 0xffffff00 broadcast 192.168.56.255
	inet6 fe80::a00:27ff:fe3e:ac4a%em2 prefixlen 64 scopeid 0x3
	inet6 fd39:8b7f:67e:1:a00:27ff:fe3e:ac4a prefixlen 64
	media: Ethernet autoselect (1000baseT <full-duplex>)
	status: active
	nd6 options=21<PERFORMNUD,AUTO_LINKLOCAL>
/etc/hosts には、この
IP アドレスを書いておけば、仮想マシンどうしがホスト名で通信できる。
前置きが長くなったが、筆者の環境では /etc/hosts
に以下のようなものを追記した (抜粋)。
# 2021-05-03,06 nsmrtks
fe80::a00:27ff:fe3e:ac4a%em2		fb130.magic.or	fb130		fb130c
fd39:8b7f:67e:1:a00:27ff:fe3e:ac4a	fb130.magic.or	fb130	fb130v6

# 2020-01-23,2021-05-06 nsmrtks
fe80::a00:27ff:fe52:d95a%em2		fb121.magic.or	fb121		fb121c
fd39:8b7f:67e:1:a00:27ff:fe52:d95a	fb121.magic.or	fb121	fb121v6

# 2020-04-28,2021-05-06 nsmrtks
fe80::a00:27ff:fe7a:6647%em2		fbak.magic.or	fbak	fbak6

# 2017-09-27,2021-05-06 nsmrtks
fe80::a00:27ff:fea3:3469%em2		fb111.magic.or	fb111		fb111c
fd39:8b7f:67e:1:a00:27ff:fea3:3469	fb111.magic.or	fb111	fb111v6

# 2016-05-22,2021-05-06 nsmrtks
fe80::a00:27ff:fe07:b6d8%em2		fb093.magic.or	fb093	fb093v6	fb093c

# 2019-10-03 nsmrtks
fd39:8b7f:67e:1:a00:27ff:fefa:187	ul164	ul164v6
ここで、IPv6 アドレスを使用している。 FreeBSD や Ubuntu Linux の NFS は IPv6 で通信可能である。
NFS の話に戻って、まず /etc/exports に以下のように記述することにする。
# 2019-09-18,20,2020-01-29,2021-05-08 nsmrtks

V4: /home

/home/distfiles	fb121c fb111c

# EoF
先に /home/distfiles の方の行について述べると、これは /home/distfiles ディレクトリをホスト fb121c と fb111c に export している。
V4: /home という行について、これは NFSv4 を使用している。
/home というディレクトリを NFSv4 tree root にするという指定になっている。
そして /home については、ZFS の
sharenfs の指定と組み合わせて設定することにする。
ZFS の sharenfs の設定が未だだが、先に
NFS サーバを立ち上げる設定をしてみる。
それには、以下のように実行して..
(繰り返しになるが、「>>」で追記するのであり、
くれぐれも間違って「>」で上書きしないように注意する。)
% sudo -i
〜

root@fb130:~ # egrep ^nfs /etc/defaults/rc.conf >> /etc/rc.conf

root@fb130:~ # exit
logout
/etc/rc.conf に以下のように追記されるように編集した。 (Emacs で /sudo::/etc/rc.conf というファイル名を指定すると sudo を使って /etc/rc.conf を編集/保存することが出来る)
# 2021-05-08 nsmrtks
nfs_server_enable="YES"                 # This host is an NFS server (or NO).
nfsv4_server_enable="YES"               # Enable support for NFSv4
nfsuserd_enable="YES"                   # NFSv4 user/group name mapping daemon
nfsuserd_flags="-domain magic.or"       # Flags for nfsuserd
ここで筆者の環境では nfsuserd_flags に -domain オプションで「magic.or」という名前を設定した。 これはサーバ側(すなわちこのホスト)とクライアント側で合わせる必要がある。
この段階で、NFS サーバを立ち上げてみる。
% sudo service nfsd start
〜
Starting rpcbind.
Starting mountd.
Starting nfsd.

% showmount -e
Exports list on localhost:
/home/distfiles                    fb121.magic.or fb111.magic.or
この段階で、ホスト fb121c 及び fb111c から、fb130 の
/distfiles が NFS マウントできるようになるだろう..
たとえば fb111 (fb111c) については、fb130c を /etc/hosts
に追加し、/etc/fstab を以下のように書き換えて
(先頭の方にある fb121c:/distfiles 〜 の行をコメントアウトし最後の
2行を追記した)
..
〜
#fb121c:/distfiles	/zfs/distfiles	nfs	rw,nfsv4
# 2021-05-03,08 nsmrtks
fb130c:/distfiles	/zfs/distfiles	nfs	rw,nfsv4
この状態で fb111 を再起動すると、以下のように /zfs/distfiles 以下のファイルとしてアクセスできることを確認した。
% df -h
Filesystem            Size    Used   Avail Capacity  Mounted on
〜
fb130c:/distfiles      15G     13G    2.6G    83%    /zfs/distfiles
〜

% mount
〜
fb130c:/distfiles on /zfs/distfiles (nfs)
〜

% ls -l /zfs/distfiles/ | head
total 9164888
-rw-r--r--   1 nsmrtks  wheel         24459  6月 30  2020 0001-Add-ability-for-ffmpeg-to-run-svt-av1-with-svt-hevc.patch
-rw-r--r--   1 nsmrtks  wheel         25023  7月 13  2020 0001-Add-ability-for-ffmpeg-to-run-svt-av1.patch
-rw-r--r--   1 nsmrtks  wheel         22103  6月 17  2020 0001-lavc-svt_hevc-add-libsvt-hevc-encoder-wrapper.patch
-rw-r--r--   1 nsmrtks  wheel          1273  2月 27  2015 0001-Remove-pure-attribute-from-functions-with-side-effec.patch
-rw-r--r--   1 nsmrtks  wheel          5332  6月 17  2020 0002-doc-Add-libsvt_hevc-encoder-docs.patch
-rw-r--r--   1 nsmrtks  wheel           412  8月 21  2020 01a75ed76ea7e57f1b7a5c183e2b1e890e6aa0fd.diff
-rw-r--r--   1 nsmrtks  wheel        218971  7月 17  2018 01org-libva-2.2.0_GH0.tar.gz
-rw-r--r--   1 nsmrtks  wheel       2580540 12月 12  2019 01org-tbb-2019.8-2019_U8_GH0.tar.gz
-rw-r--r--   1 nsmrtks  wheel          1457  2月  9 18:07 03eaa9779f2c9c7b0acf0521a5547036bdec2245.patch
〜

% head /zfs/distfiles/0001-Add-ability-for-ffmpeg-to-run-svt-av1-with-svt-hevc.patch
From 0fc7f3504857ea1c8c31b52934db2a9fdf39f992 Mon Sep 17 00:00:00 2001
〜
次に、/home/nsmrtks を NFS エクスポートする。
そのやり方だが、/etc/exports はこれ以上触らず、即ち /etc/exports
の「V4: /home」と書いた行 (のみ) を利用し、残りを
ZFS の機能で行うことにする。
以下のように、zfs set sharenfs= にホストを指定する。 なおこの操作で、mountd に HUP シグナルを送る相当まで自動的に実行してくれるので、直後に shouwmount -e を実行するとちゃんと動作に反映されている。
% zfs get sharenfs
NAME         PROPERTY  VALUE     SOURCE
zfs          sharenfs  off       default
zfs/local    sharenfs  off       default
zfs/nsmrtks  sharenfs  off       default
zfs/ports    sharenfs  off       default

% sudo zfs set sharenfs='fb121c fb111c fb093c fbak ul164' zfs/nsmrtks

% zfs get sharenfs
NAME         PROPERTY  VALUE                            SOURCE
zfs          sharenfs  off                              default
zfs/local    sharenfs  off                              default
zfs/nsmrtks  sharenfs  fb121c fb111c fb093c fbak ul164  local
zfs/ports    sharenfs  off                              default

% showmount -e
Exports list on localhost:
/home/distfiles                    fb121.magic.or fb111.magic.or
/home/nsmrtks                      fb121.magic.or fb111.magic.or fb093.magic.or fbak.magic.or ul164
ここで早速マウントできるか確かめたい所だが..
筆者は未だここまで、旧環境 (fb121)
で仕事をしながら、新環境の準備を整えていた。
旧環境を使っているということは、前回ホームディレクトリをコピーしたときから内容が変わってしまっているから、ここで最後にコピーを行った。
また筆者の旧環境 (fb121) について、/home/nsmrtks は ZFS の mountpoint になっていたので、それを解除した。
root@fb121:~ # df -h
Filesystem           Size    Used   Avail Capacity  Mounted on
〜
zfs/nsmrtks           11G    5.8G    4.9G    54%    /home/nsmrtks
zfs                  4.9G     23K    4.9G     0%    /zfs
〜

root@fb121:~ # zfs set mountpoint=/zfs/nsmrtks zfs/nsmrtks

root@fb121:~ # df -h
Filesystem           Size    Used   Avail Capacity  Mounted on
〜
zfs                  4.9G     23K    4.9G     0%    /zfs
〜
zfs/nsmrtks           11G    5.8G    4.9G    54%    /zfs/nsmrtks

root@fb121:~ # ls -l /zfs
total 6
drwxr-xr-x  59 nsmrtks  nsmrtks  121 May  8 23:43 nsmrtks
その上で、/etc/fstab にて、新環境のホームディレクトリを /home/nsmrtks として NFS マウントできるように設定した。
そうして、ホスト fb121 / fb111 / fb093 / fbak / ul164 から NFS マウントでき、ファイルを書き込めて共有できることを確かめた。
余談だが、前述の rsync の公式サイトは https://rsync.samba.org/ で、Samba と同じ所にある。
筆者は、仮想マシン上の FreeBSD ←→ ホストの MS-Windows 間でファイルをやり取りするために、従来より Samba を用いている。
Samba は、既に何かの依存関係でインストールされていたようだ。
% pkg info | egrep -i samba
samba412-4.12.14_1             Free SMB/CIFS and AD/DC server and client for Unix
以下のような /usr/local/etc/smb4.conf ファイルを作成した (旧環境から持って来た)。 ここではワークグループ名を「MAGIC」、NetBIOS 名を「fb」と設定している。
# 2019-10-08 nsmrtks

[global]
	workgroup = MAGIC
	netbios name = fb
	map archive = no

[homes]
	comment = Home Directories (%h)
	browseable = no
	writable = yes

# end-of-file
また、以下を /etc/rc.conf に追記する。 (/usr/local/etc/rc.d/samba_server を参照)
# 2021-05-10 nsmrtks
# (see /usr/local/etc/rc.d/samba_server)
samba_server_enable="YES"
Samba を起動する..前に、筆者は旧環境で動作している Samba が同じ名前
(「fb」) であり、衝突するし、新環境の Samba
があれば不要なので、停止させ、また起動しないようにした。
そうしたら、新環境の Samba を起動する。
% sudo service samba_server start
〜
Performing sanity check on Samba configuration: OK
Starting nmbd.
Starting smbd.

% ps ax | egrep mb
19160  -  Ss       0:00.01 /usr/local/sbin/nmbd --daemon --configfile=/usr/loca
19165  -  Is       0:01.02 /usr/local/sbin/smbd --daemon --configfile=/usr/loca
19168  -  I        0:00.01 /usr/local/sbin/smbd --daemon --configfile=/usr/loca
19169  -  I        0:00.00 /usr/local/sbin/smbd --daemon --configfile=/usr/loca
19170  -  I        0:00.01 /usr/local/sbin/smbd --daemon --configfile=/usr/loca
19174  0  S+       0:00.00 egrep mb
そして、ユーザ (自分) を Samba に追加する。 (コマンド名が類推しにくいが pdbedit である)
% sudo pdbedit -a -u nsmrtks
〜
new password:パスワードを考えて入力↵
retype new password:もう一度入力↵
Unix username:        nsmrtks
NT username:
Account Flags:        [U          ]
User SID:             S-1-5-21-3050182638-1462602421-4030076632-1000
Primary Group SID:    S-1-5-21-3050182638-1462602421-4030076632-513
Full Name:            NISHIMURA Takeshi
Home Directory:       \\fb\nsmrtks
HomeDir Drive:
Logon Script:
Profile Path:         \\fb\nsmrtks\profile
Domain:               FB
Account desc:
Workstations:
Munged dial:
Logon time:           0
Logoff time:          9223372036854775807 seconds since the Epoch
Kickoff time:         9223372036854775807 seconds since the Epoch
Password last set:    月, 10  5月 2021 17:41:24 JST
Password can change:  月, 10  5月 2021 17:41:24 JST
Password must change: never
Last bad password   : 0
Bad password count  : 0
Logon hours         : FFFFFFFFFFFFFFFFFFFFFFFFFFFFFFFFFFFFFFFFFF
これで、MS-Windows 側から \\fb でアクセスできるようになった。
旧環境から切り替えるために、~/.login や ~/.xinitrc の調整を行った。
startx を実行すると、筆者の ~/.xinitrc は xrandr -s 1920x1080
を実行するようになっており、1920x1080 に切り替わって表示された。
(旧環境から引き継いだ設定により Xfce
の上下のバーは自動的に隠すようになっており見えていない)
rxvt-unicode (コマンド名は urxvt) については、~/.Xdefaults ファイルに、以下のように記述してある。 筆者の環境では pixelsize=12 でちょうどよくなるが環境によっては調整が必要であろう。 (もし ~/.Xdefaults の内容が反映されていない場合、xrdb ~/.Xdefaults を実行してみる。)
〜
! urxvt (rxvt-unicode)
URxvt.transparent:	true
URxvt.shading:		193
URxvt.font:		xft:UMEgothic:pixelsize=12
〜
Emacs で梅フォントを用いる設定は、以前 Emacs のメニューバーから設定しホームディレクトリ下のファイルに保存してある。 こちらもサイズについては環境によって調整が必要であろう。
以前は何かの依存関係でインストールされていた気がするのだが (Emacs か?)、今回はインストールされていないようだ。
% cd /var/tmp/log/Install/

% nice teetime -t ImageMagick portinstall -s ImageMagick
logging (from the next line till the end) to ImageMagick20210510.log
teetime! 2021年 5月10日 月曜日 19時03分18秒 JST
teetime! working directory is /var/tmp/log/Install
teetime> portinstall -s ImageMagick
** No such package or port: ImageMagick
teetime! 2021年 5月10日 月曜日 19時03分19秒 JST
/usr/ports/graphics/ を見た所、ImageMagick6 と ImageMagick6-nox11 と ImageMagick7 と ImageMagick7-nox11 が存在していたので、ImageMagick7 をインストールすることにした。
% nice teetime -t ImageMagick7_ portinstall -s ImageMagick7
logging (from the next line till the end) to ImageMagick7_20210510.log
teetime! 2021年 5月10日 月曜日 19時03分35秒 JST
teetime! working directory is /var/tmp/log/Install
teetime> portinstall -s ImageMagick7
〜
teetime! 2021年 5月10日 月曜日 19時17分55秒 JST
無事にビルド・インストールできた。
mozc-el の正確なパッケージ名が分からなかったので、pkg search
コマンドで調べている。
インストールされている Emacs が 27 であり、ja-mozc-el-emacs27
をインストールすることにした。
% pkg search mozc-el
ja-mozc-el-emacs27-2.23.2815.102.01_3 Emacs input method for Mozc
ja-mozc-el-emacs27_canna-2.23.2815.102.01_3 Emacs input method for Mozc
ja-mozc-el-emacs27_nox-2.23.2815.102.01_3 Emacs input method for Mozc
ja-mozc-el-emacs28-2.23.2815.102.01_3 Emacs input method for Mozc
ja-mozc-el-emacs28_nox-2.23.2815.102.01_3 Emacs input method for Mozc

% pkg info | egrep emacs
emacs-27.2,3                   GNU editing macros

% cd /var/tmp/log/Install/

% nice teetime -t ja-mozc-el-emacs27_ portinstall -s ja-mozc-el-emacs27
logging (from the next line till the end) to ja-mozc-el-emacs27_20210510.log
teetime! 2021年 5月10日 月曜日 19時24分54秒 JST
teetime! working directory is /var/tmp/log/Install
teetime> portinstall -s ja-mozc-el-emacs27
〜
Installing ja-mozc-el-emacs27-2.23.2815.102.01_3...
To activate mozc, you will need to add the following lines to
your ~/.emacs:

(set-language-environment "Japanese")
(setq default-input-method "japanese-mozc")
(global-set-key (kbd "C-o") 'toggle-input-method)
〜
teetime! 2021年 5月10日 月曜日 19時29分50秒 JST
mozc-server (ja-mozc-server) もインストールされる。
% pkg info | egrep -i mozc
ja-mozc-el-emacs27-2.23.2815.102.01_3 Emacs input method for Mozc
ja-mozc-server-2.23.2815.102.01_3 Mozc Japanese Input Method, Server
起動については後述する。
Emacs への設定方法について、ビルドのログにもメッセージが出ている。 (再掲)
To activate mozc, you will need to add the following lines to
your ~/.emacs:

(set-language-environment "Japanese")
(setq default-input-method "japanese-mozc")
(global-set-key (kbd "C-o") 'toggle-input-method)
この 3行を ~/.emacs
に書くわけだが、(setq default-input-method "japanese-mozc")
については、設定すると、もし mozc がインストールされていない状態で
C-\ を押すとエラーになる。
その場合は C-u C-\ とすると、他の入力方法 ("japanese" 等) を選べる。
または、この行を書かなくても、C-u C-\ で "japanese-mozc" を選ぶと
mozc で入力が可能である。
ただし毎回やらないといけない。
最後の (global-set-key (kbd "C-o") 'toggle-input-method)
は、好みの問題だろう。
筆者は設定していない。
(C-\ を用いる)
(set-language-environment "Japanese") の行があると、過去に Emacs
の挙動がおかしくなったことがあった。
筆者は設定していない。
無くても mozc-el は正常に動作するようである。
他には ja-fcitx-mozc や ja-ibus-mozc という選択肢もある。
% pkg search mozc | egrep -v emacs
ja-fcitx-mozc-2.23.2815.102.01_3 Mozc engine for Fcitx
ja-ibus-mozc-2.23.2815.102.01_3 Mozc engine for IBus
ja-mozc-server-2.23.2815.102.01_3 Mozc Japanese Input Method, Server
ja-mozc-tool-2.23.2815.102.01_3 Mozc tool for IBus, SCIM, and others
ja-uim-mozc-2.23.2815.102.01_3 Mozc engine for uim

% cd /var/tmp/log/Install/

% nice teetime -t ja-uim-mozc_ portinstall -s ja-uim-mozc
logging (from the next line till the end) to ja-uim-mozc_20210510.log
teetime! 2021年 5月10日 月曜日 19時48分36秒 JST
teetime! working directory is /var/tmp/log/Install
teetime> portinstall -s ja-uim-mozc
〜
--->  Building '/usr/ports/japanese/uim-mozc'
===>  Cleaning for py38-gyp-20200512
===>   /usr/ports/devel/py-gyp/work-py38 not writable, skipping
===>  Cleaning for protobuf-3.14.0,1
===>   /usr/ports/devel/protobuf/work not writable, skipping
===>  Cleaning for ja-zinnia-0.06_1
===>   /usr/ports/japanese/zinnia/work not writable, skipping
===>  Cleaning for ja-mozc-server-2.23.2815.102.01_3
===>  Cleaning for ja-uim-mozc-2.23.2815.102.01_4
〜
** Listing the failed packages (-:ignored / *:skipped / !:failed)
	! japanese/uim-mozc	(dependent ports)
teetime! 2021年 5月10日 月曜日 19時49分19秒 JST
よく見ると、「〜 not writable, skipping」という変なのが出ている。
実は、その後に、それとは関係ない、筆者の環境要因が原因でビルドが止まってしまったので、気付いた。
portupgrade に付属の portsclean コマンドに -C を付けると、各 work ディレクトリを一括して消すことが出来 (ただしうまくいかないこともあるようだ)、この場合 not writable とも言っているので、sudo も付けることにする。
% sudo portsclean -C
〜
Cleaning out /usr/ports/*/*/work...
Delete /usr/ports/audio/sndio/work
Delete /usr/ports/databases/db5/work
Delete /usr/ports/databases/ruby-bdb/work
Delete /usr/ports/java/bootstrap-openjdk8/work
Delete /usr/ports/japanese/zinnia/work
Delete /usr/ports/ports-mgmt/portupgrade/work
Delete /usr/ports/print/libotf/work
Delete /usr/ports/devel/m17n-db/work
Delete /usr/ports/devel/ruby-gems/work
Delete /usr/ports/devel/protobuf/work
Delete /usr/ports/devel/boehm-gc-threaded/work
Delete /usr/ports/devel/m17n-lib/work
Delete /usr/ports/devel/libatomic_ops/work
Delete /usr/ports/devel/boehm-gc/work
Delete /usr/ports/devel/rubygem-rdoc/work
Delete /usr/ports/security/sudo/work
Delete /usr/ports/mail/mailutils/work
done.
もう一度同じようにビルドする.. (なお portsclean -C しているので -w を付けても無意味である)
% nice teetime -t ja-uim-mozc_ portinstall -s ja-uim-mozc
conflicting ja-uim-mozc_20210510.log
logging (from the next line till the end) to ja-uim-mozc_2021051020.log
teetime! 2021年 5月10日 月曜日 20時02分00秒 JST
teetime! working directory is /var/tmp/log/Install
teetime> portinstall -s ja-uim-mozc
〜
--->  Building '/usr/ports/japanese/uim-mozc'
===>  Cleaning for py38-gyp-20200512
===>   /usr/ports/devel/py-gyp/work-py38 not writable, skipping
===>  Cleaning for ja-uim-mozc-2.23.2815.102.01_4
〜
** Listing the failed packages (-:ignored / *:skipped / !:failed)
	! japanese/uim-mozc	(dependent ports)
teetime! 2021年 5月10日 月曜日 20時02分31秒 JST
ムム、またも筆者の環境要因 (http_proxy の設定ミス) でビルドが止まってしまったのだが、それより、またも「〜 not writable, skipping」が出ている。 前述の「ただしうまくいかないこともあるようだ」が起きているようだ。
/usr/ports/devel/py-gyp/ の所へ行って、手動で make clean する。
% cd /usr/ports/devel/py-gyp

% ls
distinfo   files/     Makefile   pkg-descr  work-py38/

% make clean
===>  Cleaning for py38-gyp-20200512
===>   /usr/ports/devel/py-gyp/work-py38 not writable, skipping

% sudo make clean
〜
===>  Cleaning for py38-gyp-20200512
今度こそ、ja-uim-mozc をビルドする。
% cd /var/tmp/log/Install/

% nice teetime -t ja-uim-mozc_ portinstall -s ja-uim-mozc
conflicting ja-uim-mozc_20210510.log
conflicting ja-uim-mozc_2021051020.log
logging (from the next line till the end) to ja-uim-mozc_202105102011.log
teetime! 2021年 5月10日 月曜日 20時11分33秒 JST
teetime! working directory is /var/tmp/log/Install
teetime> portinstall -s ja-uim-mozc
〜
Installing ja-uim-mozc-2.23.2815.102.01_4...
To activate uim-mozc, please add the following into ~/.xinitrc,
~/.xsession, or ~/.kde4/env (for KDE4):

export GTK_IM_MODULE=uim
export QT_IM_MODULE=uim
export XMODIFIERS=@im=uim
export XIM=uim
/usr/local/bin/mozc start
uim-xim &
〜
teetime! 2021年 5月10日 月曜日 20時21分57秒 JST
無事にビルド・インストールできた。
先ほどのビルドのログにも出ているようなものを、~/.xinitrc
に書く。
筆者は ~/.xinitrc を tcsh 用に書いているので、以下のようにしている。
#!/bin/tcsh
〜
setenv GTK_IM_MODULE uim
setenv QT_IM_MODULE uim
setenv XMODIFIERS @im=uim
setenv XIM uim
/usr/local/bin/mozc start
uim-xim &
〜
一旦、X11 サーバを終了させて、startx し直した。
「mozc_tool config_dialog」で、mozc の設定が出来たりする。 筆者は以前、スペースの入力を「半角」に設定したような記憶がある。
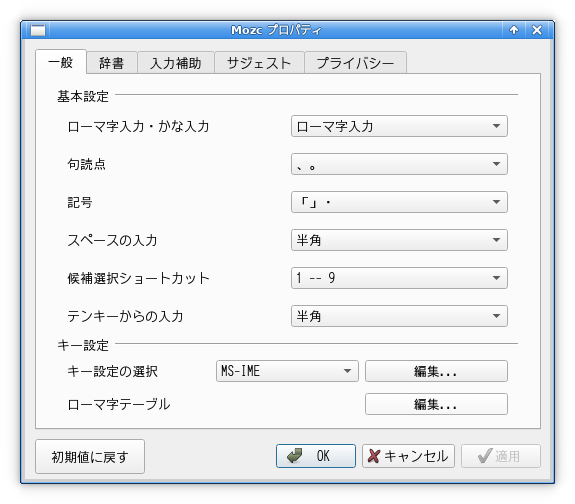
この時点で、Emacs では mozc で漢字変換できるようになっており、Chromium (chrome) や rxvt-unicode (urxvt) でも、Shift-SPC か「半角/全角」を押して、入力・漢字変換できることを確認した。
uim はどうやって設定するのだろうか。
Xfce4
の「アプリケーション」→「設定」→「入力メソッド」を選択すると、以下が現れた。

uim-gtk3 というものをインストールしてみる。 (実は以前だめだったのだがダメ元で)
% pkg search uim | egrep gtk
ja-uim-tomoe-gtk-0.6.0_15      UIM helper program for Tomoe
uim-gtk-1.8.8_2                GTK+ modules of uim input method
uim-gtk3-1.8.8_2               GTK+ 3.x modules of uim input method

% cd /var/tmp/log/Install/

% nice teetime -t uim-gtk3_ portinstall -s uim-gtk3
logging (from the next line till the end) to uim-gtk3_20210511.log
teetime! 2021年 5月11日 火曜日 18時06分12秒 JST
teetime! working directory is /var/tmp/log/Install
teetime> portinstall -s uim-gtk3
〜
teetime! 2021年 5月11日 火曜日 18時07分41秒 JST
すると、uim-pref-gtk3 というのがインストールされたのだが、uim-pref-gtk はインストールされず、よって Xfce4 の「アプリケーション」→「設定」→「入力メソッド」も同様だった。
uim-gtk3 はアンインストールし、uim-gtk の方にしてみる..
% sudo pkg delete uim-gtk3
〜
Checking integrity... done (0 conflicting)
Deinstallation has been requested for the following 1 packages (of 0 packages in the universe):

Installed packages to be REMOVED:
	uim-gtk3: 1.8.9.b.20210104

Number of packages to be removed: 1

Proceed with deinstalling packages? [y/N]: y↵
〜
% nice teetime -t uim-gtk_ portinstall -s uim-gtk
logging (from the next line till the end) to uim-gtk_20210511.log
teetime! 2021年 5月11日 火曜日 18時11分15秒 JST
teetime! working directory is /var/tmp/log/Install
teetime> portinstall -s uim-gtk
〜
teetime! 2021年 5月11日 火曜日 18時12分37秒 JST
今度は uim-pref-gtk がインストールされ、Xfce4 の「アプリケーション」→「設定」→「入力メソッド」も可能だった。
ちなみに Shift-SPC か「半角/全角」を押して、入力オン/オフする設定は、以下にある。
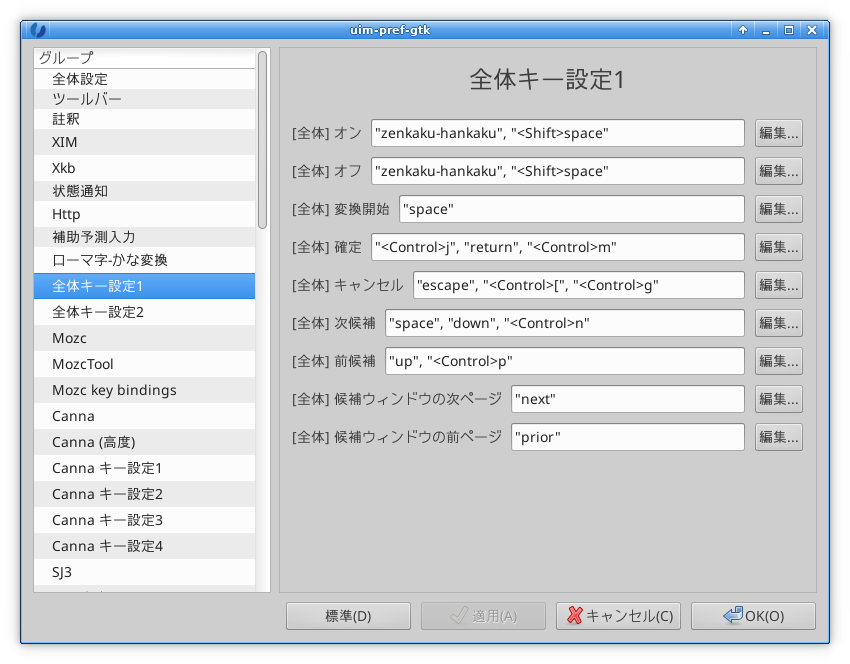
筆者がシェルスクリプト中で用いたりしている。
% cd /var/tmp/log/Install/

% nice teetime -t expect portinstal -s expect
logging (from the next line till the end) to expect20210511.log
teetime! 2021年 5月11日 火曜日 08時54分33秒 JST
teetime! working directory is /var/tmp/log/Install
teetime> portinstall -s expect
〜
teetime! 2021年 5月11日 火曜日 08時54分45秒 JST
X11 の画面やウィンドウのスクリーンショットを取る KDE のツールである。
% cd /var/tmp/log/Install/

% nice teetime -t spectacle portinstall -s spectacle
logging (from the next line till the end) to spectacle20210511.log
teetime! 2021年 5月11日 火曜日 08時59分40秒 JST
teetime! working directory is /var/tmp/log/Install
teetime> portinstall -s spectacle
〜
ここで、phonon の設定で、『PULSEAUDIO』が見えて、チェックが入っていなかったのだが、そのままエンターを押して進めてしまった。
Ctrl-c を押してビルドを止めた。
〜
Checking for AVX2 instructions... ^C*** Signal 2
*** Signal 2
*** Signal 2
*** Signal 2
*** Signal 2
*** Signal 2
*** Signal 2
*** Signal 2
--->  [Executing a command as root: sudo /usr/local/sbin/pkgdb -aFOQ]
〜
** Listing the failed packages (-:ignored / *:skipped / !:failed)
	! graphics/spectacle	(dependent ports)
teetime! 2021年 5月11日 火曜日 09時20分02秒 JST
/var/db/ports/multimedia_phonon/options
ファイルが存在していたのでディレクトリごと消した
(/var/db/ports/multimedia_phonon には options ファイルのみ存在していた)。
そして、portinstall に -w を付けて再開させた。
% nice teetime -t spectacle portinstall -sw spectacle
conflicting spectacle20210511.log
logging (from the next line till the end) to spectacle2021051109.log
teetime! 2021年 5月11日 火曜日 09時20分33秒 JST
teetime! working directory is /var/tmp/log/Install
teetime> portinstall -sw spectacle
〜
再び phonon の設定が出てくるので、『PULSEAUDIO』 (PulseAudio sound server support) にチェックを入れておいてみる。
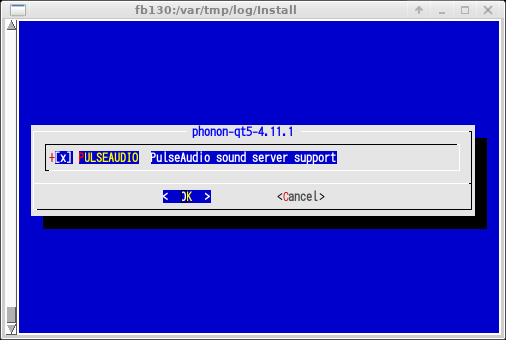
〜
teetime! 2021年 5月11日 火曜日 10時18分14秒 JST
無事にビルド・インストールできた。
余談だが、記載が前後するが、この覚書内の X11 のスクリーンショットは、上の phonon を除き、spectacle で取得している。 上の phonon は ImageMagick の import で取得している。
筆者が仕事で使わせてもらっている。
% cd /var/tmp/log/Install/

% nice teetime -t git portinstall -s git
logging (from the next line till the end) to git20210511.log
teetime! 2021年 5月11日 火曜日 15時44分25秒 JST
teetime! working directory is /var/tmp/log/Install
teetime> portinstall -s git
〜
teetime! 2021年 5月11日 火曜日 15時46分59秒 JST
magit というのは、Emacs から git を使うための Emacs Lisp である。
筆者が仕事で使わせてもらっている。
% cd /var/tmp/log/Install/

% pkg search magit
magit-devel-emacs27-2.90.1.1142_1 Interface to Git for Emacs (Development Version)
magit-devel-emacs27_canna-2.90.1.1142_1 Interface to Git for Emacs (Development Version)
magit-devel-emacs27_nox-2.90.1.1142_1 Interface to Git for Emacs (Development Version)
magit-devel-emacs28-2.90.1.1142_1 Interface to Git for Emacs (Development Version)
magit-devel-emacs28_nox-2.90.1.1142_1 Interface to Git for Emacs (Development Version)
magit-emacs27-2.90.1_5         Interface to Git for Emacs
magit-emacs27_canna-2.90.1_5   Interface to Git for Emacs
magit-emacs27_nox-2.90.1_5     Interface to Git for Emacs
magit-emacs28-2.90.1_5         Interface to Git for Emacs
magit-emacs28_nox-2.90.1_5     Interface to Git for Emacs
magit-popup-emacs27-2.13.3_2   Define prefix-infix-suffix command combos
magit-popup-emacs27_canna-2.13.3_2 Define prefix-infix-suffix command combos
magit-popup-emacs27_nox-2.13.3_2 Define prefix-infix-suffix command combos
magit-popup-emacs28-2.13.3_2   Define prefix-infix-suffix command combos
magit-popup-emacs28_nox-2.13.3_2 Define prefix-infix-suffix command combos

% nice teetime -t magit-emacs27_ portinstall -s magit-emacs27
logging (from the next line till the end) to magit-emacs27_20210511.log
teetime! 2021年 5月11日 火曜日 15時52分43秒 JST
teetime! working directory is /var/tmp/log/Install
teetime> portinstall -s magit-emacs27
〜
Installing magit-emacs27-2.90.1_5...
To use Magit, you should add following line to your .emacs file:

(require 'magit)

〜
teetime! 2021年 5月11日 火曜日 15時53分45秒 JST
% cd /var/tmp/log/Install/

% nice teetime -t xload portinstall -s xload
logging (from the next line till the end) to xload20210511.log
teetime! 2021年 5月11日 火曜日 18時31分36秒 JST
teetime! working directory is /var/tmp/log/Install
teetime> portinstall -s xload
〜
teetime! 2021年 5月11日 火曜日 18時31分45秒 JST
実行例。
% xload -bg tan -hl red2 &
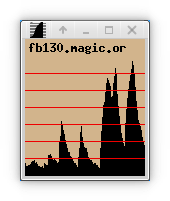
% cd /var/tmp/log/Install

% nice teetime -t oclock portinstal l -s oclock
logging (from the next line till the end) to oclock20210511.log
teetime! 2021年 5月11日 火曜日 18時35分03秒 JST
teetime! working directory is /var/tmp/log/Install
teetime> portinstall -s oclock
〜
teetime! 2021年 5月11日 火曜日 18時35分12秒 JST
ここで筆者の ~/.Xdefaults には、以下の記述があり、oclock に自動的に色が付く。
*customization: -color-transparent を付けて、さらに xload のウィンドウの上に置いてみた例。
% oclock -transparent &
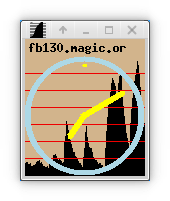
% cd /var/tmp/log/Install

% nice teetime -t xlogo portinstall -s xlogo
logging (from the next line till the end) to xlogo20210511.log
teetime! 2021年 5月11日 火曜日 18時38分02秒 JST
teetime! working directory is /var/tmp/log/Install
teetime> portinstall -s xlogo
〜
teetime! 2021年 5月11日 火曜日 18時38分24秒 JST
実行例。 これも ~/.Xdefaults の記述により自動的に色が付いている。
% xlogo -render &

xdu とは、du の出力を入力すると、それをグラフィカルに表示してくれるツールである。
応用次第で、du の出力に類似のテキストをグラフィカルに表示するといった用途も考えられる (筆者はそれを思い付いて実際にやったことがある)。
% cd /var/tmp/log/Install

% nice teetime -t xdu portinstall -s xdu
logging (from the next line till the end) to xdu20210511.log
teetime! 2021年 5月11日 火曜日 18時41分37秒 JST
teetime! working directory is /var/tmp/log/Install
teetime> portinstall -s xdu
〜
teetime! 2021年 5月11日 火曜日 18時41分54秒 JST
ルートパーティションの使用量を表示させる実行例。 (du に -x オプションを付けることにより、別パーティションである /var や /home/distfiles パーティション等が対象外になっている。)
% sudo du -kx / | xdu
〜
n を押すと大きさ順にソートされたり、h を押すとヘルプが表示されたりする。 n を押した所。
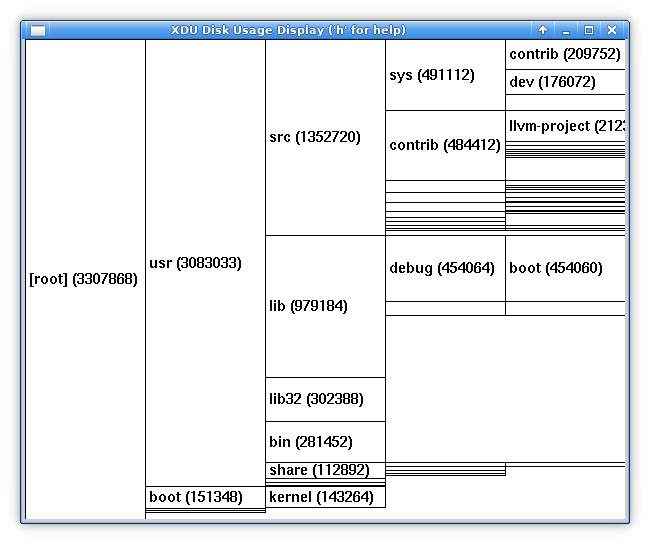
% nice teetime -t xpdf portinstall -s xpdf
logging (from the next line till the end) to xpdf20210511.log
teetime! 2021年 5月11日 火曜日 18時45分41秒 JST
teetime! working directory is /home/nsmrtks
teetime> portinstall -s xpdf
〜
teetime! 2021年 5月11日 火曜日 18時46分31秒 JST
okular も、PDF を表示することが出来る、KDE のツールである。
(筆者の環境要因で一度 Ctrl-c で止めた後にやり直している)
% cd /var/tmp/log/Install

% nice teetime -t okular portinstall -s okular
logging (from the next line till the end) to okular20210511.log
teetime! 2021年 5月11日 火曜日 18時50分00秒 JST
teetime! working directory is /var/tmp/log/Install
teetime> portinstall -s okular
〜
^Cfetch: transfer interrupted
*** Signal 2
*** Signal 2
--->  [Executing a command as root: sudo /usr/local/sbin/pkgdb -aFOQ]
** Listing the failed packages (-:ignored / *:skipped / !:failed)
	! graphics/okular	(dependent ports)
teetime! 2021年 5月11日 火曜日 18時52分02秒 JST
ところが、
% nice teetime -t okular portinstall -s okular
conflicting okular20210511.log
logging (from the next line till the end) to okular2021051118.log
teetime! 2021年 5月11日 火曜日 18時52分08秒 JST
teetime! working directory is /var/tmp/log/Install
teetime> portinstall -s okular
〜
===>  mysql57-server-5.7.33 has known vulnerabilities:
mysql57-server-5.7.33 is vulnerable:
  MySQL -- Multiple vulnerabilities
  CVE: CVE-2021-2232
  CVE: CVE-2021-2308
  CVE: CVE-2021-2301
  CVE: CVE-2021-2162
  CVE: CVE-2021-2171
  CVE: CVE-2021-2174
  CVE: CVE-2021-2293
  CVE: CVE-2021-2217
  CVE: CVE-2021-2215
  CVE: CVE-2021-2208
  CVE: CVE-2021-2201
  CVE: CVE-2021-2146
  CVE: CVE-2021-2230
  CVE: CVE-2021-2299
  CVE: CVE-2021-2278
  CVE: CVE-2021-2213
  CVE: CVE-2021-2212
  CVE: CVE-2021-2203
  CVE: CVE-2021-2193
  CVE: CVE-2021-2170
  CVE: CVE-2021-2169
  CVE: CVE-2021-2164
  CVE: CVE-2021-2160
  CVE: CVE-2021-2226
  CVE: CVE-2021-2179
  CVE: CVE-2021-2305
  CVE: CVE-2021-2300
  CVE: CVE-2021-2196
  CVE: CVE-2021-2166
  CVE: CVE-2021-2154
  CVE: CVE-2021-2194
  CVE: CVE-2021-2180
  CVE: CVE-2021-2304
  CVE: CVE-2021-2307
  CVE: CVE-2021-2202
  CVE: CVE-2021-2178
  CVE: CVE-2021-2298
  CVE: CVE-2021-2172
  CVE: CVE-2021-2144
  CVE: CVE-2021-23841
  CVE: CVE-2020-28196
  CVE: CVE-2021-3449
  CVE: CVE-2020-1971
  CVE: CVE-2020-8277
  WWW: https://vuxml.FreeBSD.org/freebsd/56ba4513-a1be-11eb-9072-d4c9ef517024.html

1 problem(s) in 1 installed package(s) found.
=> Please update your ports tree and try again.
=> Note: Vulnerable ports are marked as such even if there is no update available.
=> If you wish to ignore this vulnerability rebuild with 'make DISABLE_VULNERABILITIES=yes'
*** Error code 1

Stop.
make[6]: stopped in /usr/ports/databases/mysql57-server
*** Error code 1

Stop.
make[5]: stopped in /usr/ports/databases/mysql57-server
*** Error code 1

Stop.
make[4]: stopped in /usr/ports/databases/akonadi
*** Error code 1

Stop.
make[3]: stopped in /usr/ports/databases/akonadi
*** Error code 1

Stop.
make[2]: stopped in /usr/ports/net-im/kaccounts-integration
*** Error code 1

Stop.
make[1]: stopped in /usr/ports/misc/kf5-purpose
*** Error code 1

Stop.
make: stopped in /usr/ports/graphics/okular
--->  [Executing a command as root: sudo /usr/local/sbin/pkgdb -aFOQ]
パスワード:
** Listing the failed packages (-:ignored / *:skipped / !:failed)
	! graphics/okular	(dependent ports)
teetime! 2021年 5月11日 火曜日 19時59分05秒 JST
うーん。
VirtualBox の『デバイス』→『クリップボードの共有』が、何故か「無効」になっていた (仮想マシンごとに設定しないといけない? というか独立?)。 これを「双方向」に変更した。
設定した直後に、VirtualBox でキー入力できなくなって焦ったが、ホストの Windows 側の Cygwin の emacs-w32 では文字入力できるし、それを確かめた後にあらためて VirtualBox に戻ったら、キー入力が復活する。
これで、VirtualBox 内の X11 と、ホストの Windows
間で、コピー & ペーストが出来るようになった。
素晴らしいことに、日本語を含んでいても、正常にコピー & ペースト出来る!
(TigerVNC サーバー + RealVNC Viewer では、これが出来なかった。)
VirtualBox の設定ではないが..
RealVNC Viewer だと、マウスの左右クリックで中ボタンをエミュレートする機能があった気がするのだが (最近は使用していないので分からない)、そのような設定が、VirtualBox 自体や、あるいは Xfce にも、どうにも見つけられない。 筆者が使っている PC に中ボタンが無いので、X11 でこれが出来ないと何かと不便だ。
いろいろ探した所、以下を参考にして、
筆者の MS-Windows (あるいはタッチパッドのドライバ?) 側の設定で、タッチパッドを三本指タップで「マウスの中央ボタン」の動作をさせられることが分かった。
あるいは xorg.conf の設定でも中ボタンエミュレーションが可能らしい。 (Emulate3Buttons)
なお中央ボタン (三本指タップ) によるペーストについては、厳密には効果が違うが、rxvt-unicode (urxvt) の場合は、マウスで範囲選択後 Ctrl-Alt-c でコピー、及び Shift-Insert でペースト出来ることが分かり、これと Emacs でのコピーや Ctrl-y でのペーストなどと併用して、以前ほど使用しないようにはなっている。 また Chromium (chrome) 等のように Ctrl-c でコピー / Ctrl-v でペーストできるものもある。
% cd /var/tmp/log/Install

% nice teetime -t mplayer portinstall -s mplayer
logging (from the next line till the end) to mplayer20210512.log
teetime! 2021年 5月12日 水曜日 18時10分08秒 JST
teetime! working directory is /var/tmp/log/Install
teetime> portinstall -s mplayer
〜
ここで『PULSEAUDIO』 (PulseAudio sound server support) にチェックを入れておいてみる。
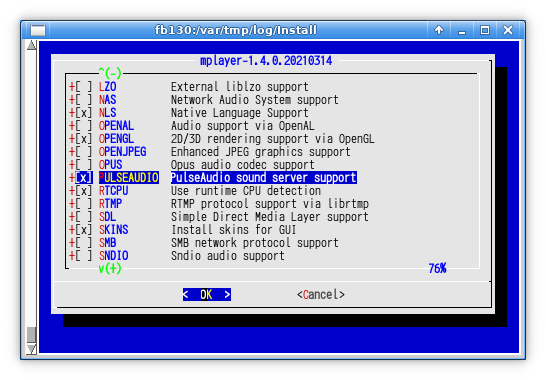
〜
teetime! 2021年 5月12日 水曜日 18時16分05秒 JST
無事にビルド・インストールできた。
音声も正常に鳴るようだ。
実は以前この PC と VirtualBox で、音がどうしても鳴らないという事があり、苦肉の策で pulseaudio で回避していた。 そのためここまで各 ports で PULSEAUDIO のオプションを付けてビルドしていたのだが、それらは余計だったかもしれない。
筆者は NetBSD や Windows ではずっと SeaMonkey を使っているのだが、 FreeBSD では少し前に ports から削除されてしまった。 :-(
% cd /var/tmp/log/Install

% nice teetime -t firefox portinstall -s firefox
logging (from the next line till the end) to firefox20210512.log
teetime! 2021年 5月12日 水曜日 18時33分34秒 JST
teetime! working directory is /var/tmp/log/Install
teetime> portinstall -s firefox
〜
firefox の設定には『PULSEAUDIO』にあらかじめチェックが入っていた。
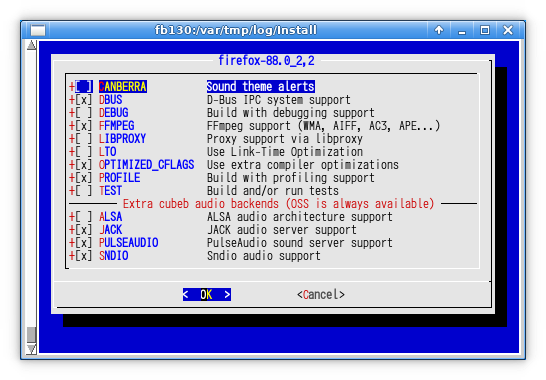
〜
--->  [Executing a command as root: sudo /usr/bin/script -qa /tmp/portinstall20210512-56128-1tg7e86 env make reinstall]
パスワード:
sudo: パスワードの読み込みがタイムしました
sudo: パスワードが必要です
** Command failed [exit code 1]: sudo /usr/bin/script -qa /tmp/portinstall20210512-56128-1tg7e86 env make reinstall
** Fix the installation problem and try again.
--->  [Executing a command as root: sudo /usr/local/sbin/pkgdb -aFOQ]
パスワード:
sudo: パスワードの読み込みがタイムしました
sudo: パスワードが必要です
/usr/local/lib/ruby/site_ruby/2.7/pkgtools/pkgtools.rb:487:in `__system': Command failed [exit code 1]: sudo /usr/local/sbin/pkgdb
 -aFOQ (CommandFailedError)
	from /usr/local/lib/ruby/site_ruby/2.7/pkgtools/pkgtools.rb:510:in `__sudo'
	from /usr/local/lib/ruby/site_ruby/2.7/pkgtools/pkgtools.rb:516:in `xsudo'
	from /usr/local/lib/ruby/site_ruby/2.7/pkgtools/pkgdb.rb:1062:in `autofix!'
	from /usr/local/lib/ruby/site_ruby/2.7/pkgtools/pkgdb.rb:1058:in `autofix'
	from /usr/local/sbin/portinstall:1139:in `do_install'
	from /usr/local/sbin/portinstall:842:in `block (2 levels) in main'
	from /usr/local/sbin/portinstall:838:in `each'
	from /usr/local/sbin/portinstall:838:in `block in main'
	from /usr/local/lib/ruby/2.7/optparse.rb:1093:in `initialize'
	from /usr/local/sbin/portinstall:238:in `new'
	from /usr/local/sbin/portinstall:238:in `main'
	from /usr/local/sbin/portinstall:2380:in `<main>'
teetime! 2021年 5月12日 水曜日 20時33分32秒 JST
放置していたら sudo がタイムアウトしてしまったので、portinstall に -w を付けて再開。
% nice teetime -t firefox portinstall -sw firefox
conflicting firefox20210512.log
logging (from the next line till the end) to firefox2021051222.log
teetime! 2021年 5月12日 水曜日 22時43分30秒 JST
teetime! working directory is /var/tmp/log/Install
teetime> portinstall -sw firefox
〜
teetime! 2021年 5月12日 水曜日 22時44分42秒 JST
無事にビルド・インストールできた。
試しに YouTube で無事に動画が音声付きで再生できた。
% cd /var/tmp/log/Install

% nice teetime -t libreoffice portinstall -s libreoffice
logging (from the next line till the end) to libreoffice20210512.log
teetime! 2021年 5月12日 水曜日 23時04分06秒 JST
teetime! working directory is /var/tmp/log/Install
teetime> portinstall -s libreoffice
〜
===>  Switching to root credentials for 'install' target
Password:
sudo: timed out reading password
sudo: a password is required
*** Error code 1

Stop.
make[2]: stopped in /usr/ports/x11-fonts/crosextrafonts-caladea-ttf
*** Error code 1

Stop.
make[1]: stopped in /usr/ports/editors/libreoffice
*** Error code 1

Stop.
make: stopped in /usr/ports/editors/libreoffice
egrep: empty (sub)expression
** Command failed [exit code 1]: /usr/bin/script -qa /tmp/portinstall20210512-33096-1673eac env make FETCH_BEFORE_ARGS=-q
** Fix the problem and try again.
--->  [Executing a command as root: sudo /usr/local/sbin/pkgdb -aFOQ]
パスワード:
sudo: パスワードの読み込みがタイムしました
sudo: パスワードが必要です
/usr/local/lib/ruby/site_ruby/2.7/pkgtools/pkgtools.rb:487:in `__system': Command failed [exit code 1]: sudo /usr/local/sbin/pkgdb
 -aFOQ (CommandFailedError)
	from /usr/local/lib/ruby/site_ruby/2.7/pkgtools/pkgtools.rb:510:in `__sudo'
	from /usr/local/lib/ruby/site_ruby/2.7/pkgtools/pkgtools.rb:516:in `xsudo'
	from /usr/local/lib/ruby/site_ruby/2.7/pkgtools/pkgdb.rb:1062:in `autofix!'
	from /usr/local/lib/ruby/site_ruby/2.7/pkgtools/pkgdb.rb:1058:in `autofix'
	from /usr/local/sbin/portinstall:1139:in `do_install'
	from /usr/local/sbin/portinstall:842:in `block (2 levels) in main'
	from /usr/local/sbin/portinstall:838:in `each'
	from /usr/local/sbin/portinstall:838:in `block in main'
	from /usr/local/lib/ruby/2.7/optparse.rb:1093:in `initialize'
	from /usr/local/sbin/portinstall:238:in `new'
	from /usr/local/sbin/portinstall:238:in `main'
	from /usr/local/sbin/portinstall:2380:in `<main>'
teetime! 2021年 5月13日 木曜日 00時45分09秒 JST
放置していたら sudo がタイムアウトしてしまったので、portinstall に -w を付けて再開。
% nice teetime -t libreoffice portinstall -sw libreoffice
logging (from the next line till the end) to libreoffice20210513.log
teetime! 2021年 5月13日 木曜日 00時45分27秒 JST
teetime! working directory is /var/tmp/log/Install
teetime> portinstall -sw libreoffice
〜
teetime! 2021年 5月13日 木曜日 00時48分53秒 JST
無事にビルド・インストールできた。
だが、少し経ってから、Shift-SPC や「半角/全角」を押しても UIM で日本語入力できないという問題に気づいた。
ここで、/var/db/ports/editors_libreoffice/options というファイルの内容を見てみると、QT5 が SET されている。
〜
OPTIONS_FILE_SET+=QT5
〜
経験上、これを UNSET にすると、UIM の問題が解消する可能性がある (それが最善なのかという問題があるが)。
LibreOffice はビルドに時間がかかるので、今は忘れないうちに、/var/db/ports/editors_libreoffice/ は中に options ファイルが 1個だけあるので、ディレクトリをとりあえずリネームして無効化しておき、次の更新ビルド時に QT5 のオプションを変更する作戦で行く。
% cd /var/db/ports

% ls -lA editors_libreoffice/
total 4
-rw-r--r--  1 root  wheel  604  5月 12 23:36 options

% ls -ld editors_libreoffice*
drwxr-xr-x  2 root  wheel  512  5月 12 23:36 editors_libreoffice/

% sudo mv -i editors_libreoffice editors_libreoffice.bak
〜

% ls -ld editors_libreoffice*
drwxr-xr-x  2 root  wheel  512  5月 12 23:36 editors_libreoffice.bak/
X11 サーバやその周りの性能によって速さが変わる。
% cd /var/tmp/log/Install/

% nice teetime -t ico portinstall -s ico
logging (from the next line till the end) to ico20210513.log
teetime! 2021年 5月13日 木曜日 17時56分30秒 JST
teetime! working directory is /var/tmp/log/Install
teetime> portinstall -s ico
〜
teetime! 2021年 5月13日 木曜日 17時56分39秒 JST
実行してみた所。 こんなもんか?
% ico &
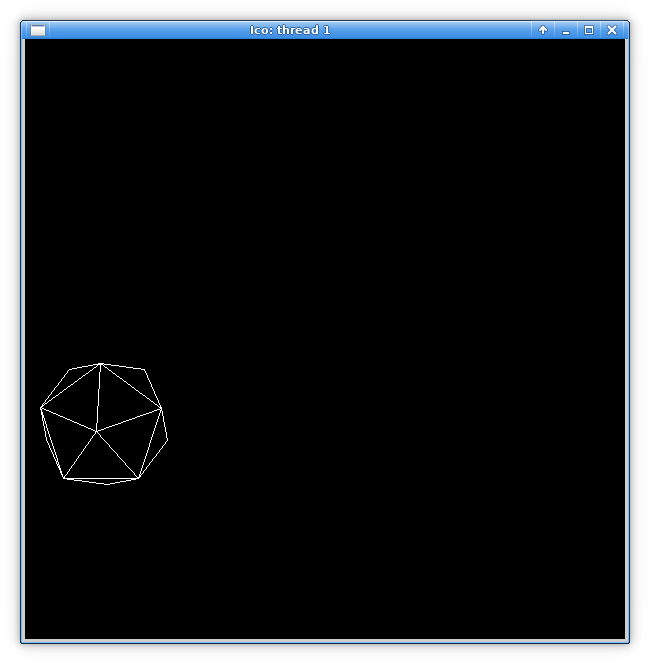
ico(1) (man ico) には見当たらないが、ico -h などとすると (unrecognized argument -h と言われるが)、-threads number という実行オプションがあることが分かる。
% ico -h
ico: unrecognized argument -h

usage:  ico [options]

where options include:
〜
    -threads number         number of windows, each its own thread
    -version                print program version
これをやると、スレッド毎にウィンドウが開かれる。
(昔マルチスレッドが一般的でなかった 1990年代中頃にマルチ CPU の
LUNA-88K2 で、リリースされたばかりの X11R6
をソースからビルドしてやったことがある。)
以下のようにして 8 スレッドを指示してみた所、
% ico -threads 8 &ps で見ると、ico のプロセスは 1個しかないが..
% ps x | egrep ico
13548  0  I    11:49.95 ico -threads 8
13590  0  S+    0:00.00 egrep ico
top コマンドを実行し、さらに「H」を押すと、各論理 CPU (「C」の列) にそれなりにスレッドが分散されていることが分かる。
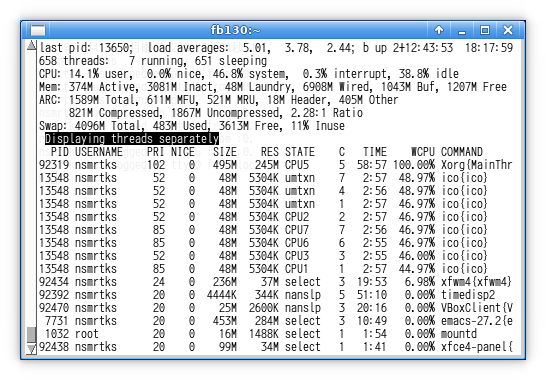
前述のように、Chromium (chrome) のビルド時に、PULSEAUDIO
のオプションを付けてビルドしていた。
おそらくそのせいで、Chromium
で、普通に音が出なくなってしまったことに気づいた。
これも前述だが、以前 VirtualBox で音がどうしても鳴らなかった事があり、苦肉の策で、ホスト の Windows 側の Cygwin で pulseaudio を常駐させ、VirtualBox 内では出力に pulseaudio を使用することで、音を鳴らしていたことがあった。
これはどうやるかというと、Cygwin (Windows 側) では、以下などのようにして pulseaudio を常駐させておく。
$ pulseaudio.exe --start --exit-idle-time=-1
VirtualBox 側の FreeBSD だが、まず環境変数 PULSE_SERVER に、Windows のホスト名 (あるいは IP アドレスでもいけると思われる) を指定しておく。 筆者は /etc/hosts に Windows のホスト名と IPv6 アドレスを記述しておき、そのホスト名で指定していた。
これで、例えば mplayer だと、-ao pulse を指定すると、pulseaudio 経由で、Windows 側から音が鳴る。
Firefox は、環境変数 PULSE_SERVER があるとそれに従って pulseaudio から、そうでないと VirtualBox 側から音が鳴るようだ。
Chromium (chrome) だが、確かに環境変数 PULSE_SERVER
があると音が鳴るのだが、Firefox と違い、環境変数 PULSE_SERVER
を無くしても、VirtualBox 側から音が出てくれないようだ。
Firefox のように、pulseaudio
付きでビルドしていても、それを使わないように実行時に動作を変えられるとよいのだが.. その方法が分からない。
もはや一般的に VirtualBox から音が出ない問題は解消したので、Windows 側に pulseaudio 常駐は無しで行きたい。
しょうがないので、Chromium を PULSEAUDIO 無しでビルドし直すことにする。
/var/db/ports/www_chromium というディレクトリに、options ファイルが 1個だけ存在しているので、www_chromium ディレクトリをとりあえずリネームして無効化する。
% cd /var/db/ports

% ls -lA www_chromium/
total 4
-rw-r--r--  1 root  wheel  578  5月  6 23:46 options

% sudo mv -i www_chromium www_chromium.bak
〜

% ls -ld www_chromium*
drwxr-xr-x  2 root  wheel  512  5月  6 23:41 mwww_chromium.bak
以下のように chromium を一旦アンインストールして、ビルド・インストールすることにした。 (ビルドが完了するまで chromium が使えなくなってしまうが)
% cd /var/tmp/log/Install/

% nice teetime -t chromium portinstall -s chromium
logging (from the next line till the end) to chromium20210513.log
teetime! 2021年 5月13日 木曜日 19時10分32秒 JST
teetime! working directory is /var/tmp/log/Install
teetime> portinstall -s chromium
〜
** Found already installed package(s) of 'www/chromium': chromium-90.0.4430.93
teetime! 2021年 5月13日 木曜日 19時10分34秒 JST

% sudo pkg delete chromium
〜
Deinstallation has been requested for the following 1 packages (of 0 packages in the universe):

Installed packages to be REMOVED:
	chromium: 90.0.4430.93

Number of packages to be removed: 1

The operation will free 299 MiB.

Proceed with deinstalling packages? [y/N]: y
〜
% nice teetime -t chromium portinstall -s chromium
conflicting chromium20210513.log
logging (from the next line till the end) to chromium2021051319.log
teetime! 2021年 5月13日 木曜日 19時11分25秒 JST
teetime! working directory is /var/tmp/log/Install
teetime> portinstall -s chromium
〜
今度はデフォルトのまま、PULSEAUDIO にはチェックを入れず、SNDIO にチェックが入った状態にしておいた。
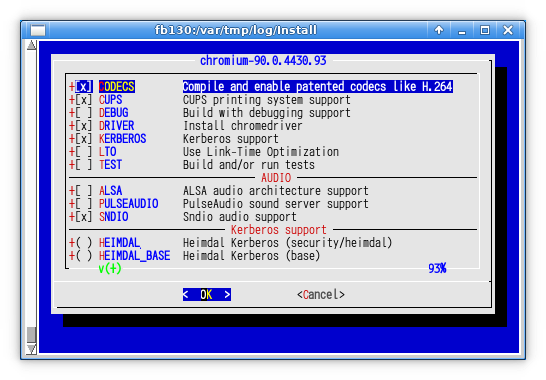
〜
--->  [Executing a command as root: sudo /usr/bin/script -qa /tmp/portinstall20210513-14336-1pq8as9 env make reinstall]
パスワード:
sudo: パスワードの読み込みがタイムしました
sudo: パスワードが必要です
** Command failed [exit code 1]: sudo /usr/bin/script -qa /tmp/portinstall20210513-14336-1pq8as9 env make reinstall
** Fix the installation problem and try again.
--->  [Executing a command as root: sudo /usr/local/sbin/pkgdb -aFOQ]
パスワード:
sudo: パスワードの読み込みがタイムしました
sudo: パスワードが必要です
/usr/local/lib/ruby/site_ruby/2.7/pkgtools/pkgtools.rb:487:in `__system': Command failed [exit code 1]: sudo /usr/local/sbin/pkgdb
 -aFOQ (CommandFailedError)
	from /usr/local/lib/ruby/site_ruby/2.7/pkgtools/pkgtools.rb:510:in `__sudo'
	from /usr/local/lib/ruby/site_ruby/2.7/pkgtools/pkgtools.rb:516:in `xsudo'
	from /usr/local/lib/ruby/site_ruby/2.7/pkgtools/pkgdb.rb:1062:in `autofix!'
	from /usr/local/lib/ruby/site_ruby/2.7/pkgtools/pkgdb.rb:1058:in `autofix'
	from /usr/local/sbin/portinstall:1139:in `do_install'
	from /usr/local/sbin/portinstall:842:in `block (2 levels) in main'
	from /usr/local/sbin/portinstall:838:in `each'
	from /usr/local/sbin/portinstall:838:in `block in main'
	from /usr/local/lib/ruby/2.7/optparse.rb:1093:in `initialize'
	from /usr/local/sbin/portinstall:238:in `new'
	from /usr/local/sbin/portinstall:238:in `main'
	from /usr/local/sbin/portinstall:2380:in `<main>'
teetime! 2021年 5月14日 金曜日 00時06分44秒 JST
放置していたら sudo がタイムアウトしてしまったので、portinstall に -w を付けて再開。
% nice teetime -t chromium portinstall -sw chromium
logging (from the next line till the end) to chromium20210514.log
teetime! 2021年 5月14日 金曜日 00時18分48秒 JST
teetime! working directory is /var/tmp/log/Install
teetime> portinstall -sw chromium
〜
--->  [Executing a command as root: sudo /usr/local/sbin/pkgdb -aFOQ]
無事にビルド・インストールできた..
..だが、音は、鳴らない!
うーん、どうしたものか..
これとは別の、FreeBSD 12.2 のデスクトップ機 (オンボードのサウンドデバイス)
では、何も考えなくても音が鳴ったんだけどな..
と思って、そちらの /var/db/ports/www_chromium/options を見てみたら..
〜
OPTIONS_FILE_SET+=ALSA
OPTIONS_FILE_SET+=PULSEAUDIO
OPTIONS_FILE_UNSET+=SNDIO
SNDIO は UNSET で、ALSA と PULSEAUDIO が SET になっているではないか。
たしかに、PULSEAUDIO は SET した記憶もあるが、ALSA と SNDIO
が違うのは、なんでそうなってるんだろう。
うーん、chromium もビルドに時間がかかるので、次の chromium
の更新の機会に試してみるか..
忘れないうちに、先ほどと同様に、/var/db/ports/www_chromium
をリネームしておく (/var/db/ports/www_chromium.bak は消去)。
デフォルトの FreeBSD の設定では、/etc/crontab にて、夜中〜早朝深夜に daily / weekly / monthly の自動メンテナンスが走るようになっている。
# /etc/crontab - root's crontab for FreeBSD
〜
#minute	hour	mday	month	wday	who	command
〜
# Perform daily/weekly/monthly maintenance.
1	3	*	*	*	root	periodic daily
15	4	*	*	6	root	periodic weekly
30	5	1	*	*	root	periodic monthly
〜
筆者の環境はそのような時間に PC の電源が入っていないので、これを日中に実行するように変更する。
% cd /etc

% sudo cp -ip crontab crontab.ORG
〜
Emacs の C-x C-f からファイル名を /sudo::/etc/crontab というものを指定して編集した。
〜
13	9	*	*	*	root	periodic daily
13	12	*	*	2	root	periodic weekly
13	17	1	*	*	root	periodic monthly
〜
なお、/etc/crontab ファイルの更新さえすれば、cron
デーモンの再起動等は特に不要である。
cron(8) (man cron) より:
Additionally, cron checks each minute to see if its spool directory's modification time (or the modification time on /etc/crontab) has changed, and if it has, cron will then examine the modification time on all crontabs and reload those which have changed. Thus cron need not be restarted whenever a crontab file is modified. 〜
これを設定すると、毎日 root 宛にメールが来るようになる。
自分は sudo -i して mail コマンドで見ている。
筆者は、ホームディレクトリのバックアップと、freebsd-update fetch
と、portupgrade 等を一括して行うスクリプトを、日々走らせている
(手動で起動)。
(なお普通の人はパッケージの更新は portupgrade ではなく
pkg upgrade でバイナリで行えばよいでしょう)
ただしここまで、新環境ではまだ走らせていなかった。 それを設定する。
以下がコマンドラインから実行するスクリプトである。 ファイル名は bup としている。
#!/bin/sh
# 2019-10-18 nsmrtks
# 2014-12-01,29 nsmrtks
# 2014-03-14 for fb092 ..
# 2012-03-16, 09-03, 11-18, 2013-02-21, 06-04 nsmrtks

# (require back2, updatefb and /var/tmp/log/pvc.sh)

# check the dir
cd /var/tmp/log || exit 1

# get the privilege
sudo pwd

# compress the logs
find . -name \*.log -mtime +1 -print0 | xargs -0 xz -v

# backup
back2

# updatefb
[ -d updatefb ] || ( set -x ; mkdir updatefb )
( cd updatefb && teetime updatefb )

# portupgrade
sh pvc.sh

# EoF
このスクリプトからはさらに、back2 と updatefb と pvc.sh
というスクリプトが呼び出されている。
bup 及び、back2 と updatefb は、~/bin
ディレクトリに配置してコマンドパスを通してある。
pvc.sh は (旧環境からコピーしてきて) /var/tmp/log に配置する。
back2 は、ホームディレクトリのバックアップを行うスクリプトである。 短いのでついでに紹介しておく。
#!/bin/sh
# 2021-05-10 nsmrtks
# 2015-02-03,11-25,2016-05-29,2017-10-02,2019-10-18,2020-02-03 nsmrtks
# moved from bup

if [ `hostname`. != fb130.magic.or. ]; then
	echo this is not fb130, backup not supported
	exit 1
fi

[ -d /var/tmp/log/back ] || ( set -x ; mkdir /var/tmp/log/back )
cd /var/tmp/log/back || exit 1

set -x
teetime -t rsync \
 rsync -a --delete-before /home/nsmrtks/ fb121c:/zfs/nsmrtks/

# EoF
updatefb は、freebsd-update fetch や pkg audit -F や ports ツリーの更新を行うスクリプトである。 以下のような内容になっている。
#!/bin/sh
# 2010-11-04,12,2013-03-14-	Time-stamp: <2017-10-23 13:59:14 nsmrtks>

# (sudoers may need to have `Defaults env_keep += "http_proxy"')

date
echo ==========================================================================
( set -x ; sudo freebsd-update fetch )
echo ==========================================================================
if type pkg >/dev/null ; then
	# They hang. Why??
	( set -x ; sudo pkg update )
	echo ------------------------------------------------------------------
	( set -x ; sudo pkg audit -F )
else
	( set -x ; sudo portaudit -Fda )
fi
echo ==========================================================================
( set -x ; sudo portsnap fetch )
echo ==========================================================================
( set -x ; portsnap update )
echo ==========================================================================
( set -x ; sudo portversion -c > portversion-c.out )
echo ==========================================================================
date

# EoF
この最後の方で、/var/tmp/log/updatefb/portversion-c.out というファイルを作成している。 これは中身が sh スクリプトになっており、sh で実行すると、更新があるパッケージについて portupgrade を実行してくれるというものになっている。 (更新があるパッケージ名が内部でずらずら列挙されている)
pvc.sh が、sh portversion-c.out を実行するスクリプトになっている。 (前述の通り /var/tmp/log に配置)
#!/bin/sh
# 2012-03-07,2019-10-18 nsmrtks

# Usage:
#	sh pvc.sh [portupgrade options..]
# Example:
#	sh pvc.sh
#	sh pvc.sh -w

# (require teetime and ../updatefb/portversion-c.out)

[ -d /var/tmp/log/pvc ] || ( set -x ; mkdir /var/tmp/log/pvc )

set -x
cd /var/tmp/log/pvc && \
 nice teetime -t pvc sh ../updatefb/portversion-c.out -s $*

# EoF
準備が出来た。おもむろに bup を実行する..
なお nice +20 〜 としているがこれは csh (tcsh) 系の場合で、もし bash 等 sh 系の場合は nice -n 20 〜 などとする。 (あるいは効果は変わるが nice だけでもよいしそもそも nice 無しでもよい)
% nice +20 bup
〜
/var/tmp/log
〜
+ mkdir /var/tmp/log/back
+ teetime -t rsync rsync -a --delete-before /home/nsmrtks/ fb121c:/zfs/nsmrtks/
logging (from the next line till the end) to rsync20210515.log
teetime! 2021年 5月15日 土曜日 13時33分58秒 JST
teetime! working directory is /var/tmp/log/back
teetime> rsync -a --delete-before /home/nsmrtks/ fb121c:/zfs/nsmrtks/
teetime! 2021年 5月15日 土曜日 13時34分32秒 JST
+ mkdir updatefb
logging (from the next line till the end) to updatefb20210515.log
teetime! 2021年 5月15日 土曜日 13時34分32秒 JST
teetime! working directory is /var/tmp/log/updatefb
teetime> updatefb
2021年 5月15日 土曜日 13時34分32秒 JST
==========================================================================
+ sudo freebsd-update fetch
Looking up update.FreeBSD.org mirrors... 2 mirrors found.
Fetching metadata signature for 13.0-RELEASE from update2.freebsd.org... done.
Fetching metadata index... done.
Inspecting system... done.
Preparing to download files... done.

No updates needed to update system to 13.0-RELEASE-p0.
==========================================================================
+ sudo pkg update
Updating FreeBSD repository catalogue...
Fetching packagesite.txz: .......... done
Processing entries: .......... done
FreeBSD repository update completed. 30361 packages processed.
All repositories are up to date.
------------------------------------------------------------------
+ sudo pkg audit -F
vulnxml file up-to-date
samba412-4.12.14_1 is vulnerable:
  samba -- negative idmap cache entries vulnerability
  CVE: CVE-2021-20254
  WWW: https://vuxml.FreeBSD.org/freebsd/6f33d38b-aa18-11eb-b3f1-005056a311d1.html

python38-3.8.9 is vulnerable:
  Python -- multiple vulnerabilities
  WWW: https://vuxml.FreeBSD.org/freebsd/bffa40db-ad50-11eb-86b8-080027846a02.html

chromium-90.0.4430.93 is vulnerable:
  chromium -- multiple vulnerabilities
  CVE: CVE-2021-30520
  CVE: CVE-2021-30519
  CVE: CVE-2021-30518
  CVE: CVE-2021-30517
  CVE: CVE-2021-30516
  CVE: CVE-2021-30515
  CVE: CVE-2021-30514
  CVE: CVE-2021-30513
  CVE: CVE-2021-30512
  CVE: CVE-2021-30511
  CVE: CVE-2021-30510
  CVE: CVE-2021-30509
  CVE: CVE-2021-30508
  CVE: CVE-2021-30507
  CVE: CVE-2021-30506
  WWW: https://vuxml.FreeBSD.org/freebsd/3cac007f-b27e-11eb-97a0-e09467587c17.html

ImageMagick7-7.0.10.24_3 is vulnerable:
  ImageMagick7 -- multiple vulnerabilities
  CVE: CVE-2021-20313
  CVE: CVE-2021-20312
  CVE: CVE-2021-20311
  CVE: CVE-2021-20310
  CVE: CVE-2021-20309
  CVE: CVE-2021-20246
  CVE: CVE-2021-20245
  CVE: CVE-2021-20244
  CVE: CVE-2021-20243
  CVE: CVE-2021-20241
  CVE: CVE-2021-20176
  CVE: CVE-2020-29599
  CVE: CVE-2020-27829
  WWW: https://vuxml.FreeBSD.org/freebsd/a7c60af1-b3f1-11eb-a5f7-a0f3c100ae18.html

rubygem-rdoc-6.3.0 is vulnerable:
  RDoc -- command injection vulnerability
  CVE: CVE-2021-31799
  WWW: https://vuxml.FreeBSD.org/freebsd/57027417-ab7f-11eb-9596-080027f515ea.html

flac-1.3.3 is vulnerable:
  FLAC -- out-of-bounds read
  CVE: CVE-2020-0499
  WWW: https://vuxml.FreeBSD.org/freebsd/49346de2-b015-11eb-9bdf-f8b156b6dcc8.html

6 problem(s) in 6 installed package(s) found.
==========================================================================
+ sudo portsnap fetch
〜
今回も freebsd-update fetch で更新が出ていなかった。 (もし更新が出ていたら freebsd-update install を実行して、場合によっては再起動も必要だろう。)
bup は、最後に pvc.sh (前述の通り portupgrade を実行するためのスクリプト)
を実行する。
sudo のパスワード入力を求められる場面が何回もあったので入力する。
LibreOffice の更新ビルドが来た。 前述の通り、QT5 のチェックを外してみる。
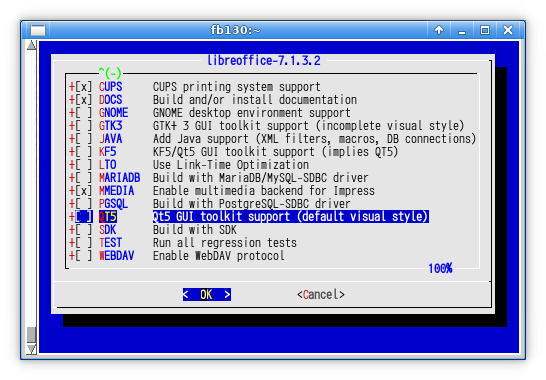
〜
** Listing the failed packages (-:ignored / *:skipped / !:failed)
	! devel/rubygem-rdoc (rubygem-rdoc-6.3.0)	(fetch error)
	* devel/py-six (py27-six-1.15.0)
	* devel/py-babel (py38-Babel-2.9.0)
	* editors/libreoffice (libreoffice-7.1.2.2_7)
	* lang/spidermonkey78 (spidermonkey78-78.7.0_3)
	! www/chromium (chromium-90.0.4430.93)	(unknown build error)
teetime! 2021年 5月15日 土曜日 20時20分05秒 JST
適当に放置していたら、sudo がタイムアウトしてしまったこともあったので、portupgrade に失敗したものも出てきた。
このようなとき、bup をもう一度実行することも考えられるが、色々なものを再実行して時間がかかるため、bup が最後に実行する pvc.sh のみ実行し直すことにする。
それには、/var/tmp/log に行き (そこに pvc.sh を配置している)、手動で
pvc.sh に -w を付けて実行する
(pvc.sh に引数を付けるとそれが portupgrade のオプションとして渡される)。
% cd /var/tmp/log

% nice +20 sh pvc.sh -w
+ cd /var/tmp/log/pvc
+ nice teetime -t pvc sh ../updatefb/portversion-c.out -s -w
conflicting pvc20210515.log
logging (from the next line till the end) to pvc2021051520.log
teetime! 2021年 5月15日 土曜日 20時45分28秒 JST
teetime! working directory is /var/tmp/log/pvc
teetime> sh ../updatefb/portversion-c.out -s -w
〜
今度は chromium の更新ビルドが来た。 前述の通り、ALSA と PULSEAUDIO にチェックを入れ、SNDIO のチェックを外してみる。
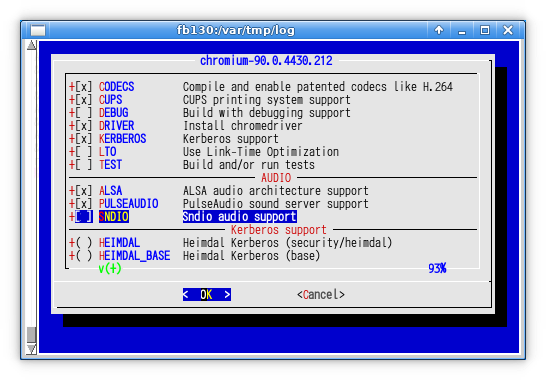
〜
===>  Switching to root credentials to create /var/db/ports/audio_alsa-plugins
Password:
sudo: timed out reading password
sudo: a password is required
===> Cannot create /var/db/ports/audio_alsa-plugins, check permissions
*** Error code 1

Stop.
make[3]: stopped in /usr/ports/audio/alsa-plugins
*** Error code 1

Stop.
make[2]: stopped in /usr/ports/audio/alsa-plugins
*** Error code 1

Stop.
make[1]: stopped in /usr/ports/www/chromium
*** Error code 1

Stop.
make: stopped in /usr/ports/www/chromium

^C
放置していたら sudo がタイムアウトした上、変な状態になってしまったので、Ctrl-c で止めた。 いま一度、再開させる。
% nice +20 sh pvc.sh -w
+ cd /var/tmp/log/pvc
+ nice teetime -t pvc sh ../updatefb/portversion-c.out -s -w
logging (from the next line till the end) to pvc20210516.log
teetime! 2021年 5月16日 日曜日 02時18分59秒 JST
teetime! working directory is /var/tmp/log/pvc
teetime> sh ../updatefb/portversion-c.out -s -w
〜
=> rdoc-6.3.1.gem doesn't seem to exist in /usr/ports/distfiles/rubygem.
=> Attempting to fetch https://rubygems.org/downloads/rdoc-6.3.1.gem
fetch: transfer timed out
fetch: rdoc-6.3.1.gem appears to be truncated: 0/569344 bytes
=> Attempting to fetch http://distcache.FreeBSD.org/ports-distfiles/rubygem/rdoc-6.3.1.gem
fetch: http://distcache.FreeBSD.org/ports-distfiles/rubygem/rdoc-6.3.1.gem: Not Found
=> Couldn't fetch it - please try to retrieve this
=> port manually into /usr/ports/distfiles/rubygem and try again.
*** Error code 1

Stop.
make: stopped in /usr/ports/devel/rubygem-rdoc
** Command failed [exit code 1]: /usr/bin/script -qa /tmp/portupgrade20210516-24310-1p7nb3d env UPGRADE_TOOL=portupgrade UPGRADE_P
ORT=rubygem-rdoc-6.3.0 UPGRADE_PORT_VER=6.3.0 make FETCH_BEFORE_ARGS=-q
** Fix the problem and try again.
--->  Upgrading 'chromium-90.0.4430.93' to 'chromium-90.0.4430.212' (www/chromium)
〜
** Listing the failed packages (-:ignored / *:skipped / !:failed)
	! devel/rubygem-rdoc (rubygem-rdoc-6.3.0)	(fetch error)
teetime! 2021年 5月16日 日曜日 02時29分41秒 JST
うーん、途中 rdoc-6.3.1.gem というのが fetch 出来なくて、その部分が失敗した。 もう一度、再開させる。 (以下は筆者の環境要因でさらにもう一回失敗した後にやり直している)
% nice +20 sh pvc.sh -w
+ cd /var/tmp/log/pvc
+ nice teetime -t pvc sh ../updatefb/portversion-c.out -s -w
conflicting pvc20210516.log
conflicting pvc2021051602.log
logging (from the next line till the end) to pvc202105160234.log
teetime! 2021年 5月16日 日曜日 02時34分57秒 JST
teetime! working directory is /var/tmp/log/pvc
teetime> sh ../updatefb/portversion-c.out -s -w
[Reading data from pkg(8) ... - 846 packages found - done]
--->  Upgrading 'rubygem-rdoc-6.3.0' to 'rubygem-rdoc-6.3.1' (devel/rubygem-rdoc)
--->  Building '/usr/ports/devel/rubygem-rdoc'
===>  License GPLv2 RUBY accepted by the user
===>   rubygem-rdoc-6.3.1 depends on file: /usr/local/sbin/pkg - found
=> rdoc-6.3.1.gem doesn't seem to exist in /usr/ports/distfiles/rubygem.
=> Attempting to fetch https://rubygems.org/downloads/rdoc-6.3.1.gem
fetch: transfer timed out
fetch: rdoc-6.3.1.gem appears to be truncated: 0/569344 bytes
=> Attempting to fetch http://distcache.FreeBSD.org/ports-distfiles/rubygem/rdoc-6.3.1.gem
fetch: http://distcache.FreeBSD.org/ports-distfiles/rubygem/rdoc-6.3.1.gem: Not Found
=> Couldn't fetch it - please try to retrieve this
=> port manually into /usr/ports/distfiles/rubygem and try again.
*** Error code 1

Stop.
make: stopped in /usr/ports/devel/rubygem-rdoc
** Command failed [exit code 1]: /usr/bin/script -qa /tmp/portupgrade20210516-40563-1q2srn3 env UPGRADE_TOOL=portupgrade UPGRADE_P
ORT=rubygem-rdoc-6.3.0 UPGRADE_PORT_VER=6.3.0 make FETCH_BEFORE_ARGS=-q
** Fix the problem and try again.
** Listing the failed packages (-:ignored / *:skipped / !:failed)
	! devel/rubygem-rdoc (rubygem-rdoc-6.3.0)	(fetch error)
teetime! 2021年 5月16日 日曜日 02時40分45秒 JST
うーん..
迷った末、ブラウザで https://rubygems.org/gems/rdoc/versions/6.3.1
というのを Google で探し当て、そこの「ダウンロード」を押すと、rdoc-6.3.1.gem
があっさりとダウンロードできた。
その「ダウンロード」がまさに https://rubygems.org/downloads/rdoc-6.3.1.gem
のようなのだが..
ともかく、その rdoc-6.3.1.gem ファイルを、/usr/ports/distfiles/rubygem/
に mv する。
そしていま一度 sh pvc.sh -w を再開させる。
% nice +20 sh pvc.sh -w
+ cd /var/tmp/log/pvc
+ nice teetime -t pvc sh ../updatefb/portversion-c.out -s -w
conflicting pvc20210516.log
conflicting pvc2021051602.log
logging (from the next line till the end) to pvc202105160255.log
teetime! 2021年 5月16日 日曜日 02時55分26秒 JST
teetime! working directory is /var/tmp/log/pvc
teetime> sh ../updatefb/portversion-c.out -s -w
〜
teetime! 2021年 5月16日 日曜日 02時55分40秒 JST
今度こそ、全ての portupgrade が成功した。
以降は一日一回のペースで bup コマンド
(前述だがホームディレクトリのバックアップと freebsd-update fetch と
portupgrade) を実行することにする。
なお、前述だが freebsd-update fetch で何か出たなら、さらに
freebsd-update install を実行し、必要なら FreeBSD を再起動しないといけない。
Shift-SPC や「半角/全角」を押して無事に UIM で日本語入力できるようになったことを確認した。
YouTube で無事に音が鳴るように鳴ったことを確認した! (pulseaudio を使わずに)
以下を望まないならインストールしなくてよい。
これをインストール・実行すると、
*BSD Usage Statistics: Home
で表示される
(BSDstats で報告された各 BSD の稼働台数やシェア等が表示される)、世界中の
*BSD の統計情報に追加される。
% cd /var/tmp/log/Install/

% nice teetime -t bsdstats portinstall -s bsdstats
logging (from the next line till the end) to bsdstats20210516.log
teetime! 2021年 5月16日 日曜日 22時35分13秒 JST
teetime! working directory is /var/tmp/log/Install
teetime> portinstall -s bsdstats
〜
Installing bsdstats-7.0_2...
You installed BSDstats: script reporting statistics about your machine.

To enable monthly reporting, add this line to /etc/periodic.conf:
	monthly_statistics_enable="YES"

To disable parts of reporting, add these lines to /etc/periodic.conf:
	monthly_statistics_report_devices="NO"
	monthly_statistics_report_ports="NO"

To limit which ports are being submitted:
	create /usr/local/etc/bsdstats.conf and list ports to report in
	the form ${category}/${portname}, one entry per line. It is also
	possible to use the special self explanatory keyword "all-ports".
Example:
	sysutils/bsdstats
	ports-mgmt/pkg

To enable reporting on bootup, add this line to /etc/rc.conf:
	bsdstats_enable="YES"

To run it manually any time:
	bsdstats-send

To view current statistics, go to:
	http://www.bsdstats.org/

You can build bsdstats with TOR port option to submit anonymously

--->  [Executing a command as root: sudo /usr/bin/script -qa /tmp/portinstall20210516-72437-1djh9pk env make clean]
===>  Cleaning for bsdstats-7.0_2
--->  [Executing a command as root: sudo /usr/local/sbin/pkgdb -aFOQ]
teetime! 2021年 5月16日 日曜日 22時35分33秒 JST
以前は、ビルド・インストール時に、BSDstats の初回実行 (おそらく bsdstats-send コマンド) も自動的に行われていたのだが、今回は行われないようだ。
以下の行を /etc/rc.conf に追記する (これも以前はビルド・インストール時に自動的に行われていたのだが今回は行われないようだ)。 これはブート時に自動的に bsdstats-send コマンドを実行するものである。
bsdstats_enable="YES"
また、/etc/periodic.conf ファイルを以下のようにする。 ファイル自体が存在していなかったので新規作成している。
# 2021-05-16

# see /var/tmp/log/Install/bsdstats20210516.log*
monthly_statistics_enable="YES"

# EoF
これは、/usr/local/etc/periodic/monthly/300.statistics
というファイルが今回インストールされており、それを発動させるもののようだ。
ただ、(/etc/crontab で指定した) periodic monthly の時間に FreeBSD
が起動していないと、その月は発動しないように思う。
手動で発動させることも出来る。
その前に、
*BSD Usage Statistics: Home
の、FreeBSD の所の、Systems This Month の数値を確認しておこう。
次に、sudo bsdstats-send を実行する。
% sudo bsdstats-send
〜
BSDstats runs on this system for the first time, generating registration ID
Posting OS statistics to rpt.bsdstats.org ... SUCCESS
Posting device statistics to rpt.bsdstats.org ... SUCCESS
Posting CPU information to rpt.bsdstats.org ... SUCCESS
grep: /usr/local/etc/bsdstats.conf: そのようなファイルまたはディレクトリはありません
Posting port statistics to rpt.bsdstats.org ... SUCCESS
/usr/local/etc/bsdstats.conf が無いと言われているが、ビルド時のメッセージに create /usr/local/etc/bsdstats.conf and 〜 とあったように、デフォルトでは存在しないようだ。
筆者の時は、これで *BSD Usage Statistics: Home の FreeBSD の Systems This Month の数値が 2643 から 2644 に増えた!
筆者は、思い出した時 (月始め等) に sudo bsdstats-send を実行するようにもしている。
VirtualBox 上の FreeBSD を作動させたまま、ホスト側 (MS-Windows 10)
をスリープして、復帰すると、以降 FreeBSD
の時計が、数秒〜数分のオーダーでずれるようになってしまうようだ
(「ようだ」というのは、本当にやってしまうと復旧が面倒なのでこれを記述している時点で追試していない。)。
VBoxService が作動していてもである。
MS-Windows 8.1 のときはそんなことはなかったのだが..
以前、VBoxService --disable-timesync して、代わりに
ntpd による時刻同期も試みたが、改善しなかった。
同じ PC 上の VirtualBox で動かしている FreeBSD 9.3
は、ほとんどずれないのだが..
これを回避する方法として、ホスト (Windows) をスリープさせる前に、VirtualBox
の FreeBSD を必ず「閉じる」→「保存状態」で保存する。
スリープから復帰したときには、また「起動」で保存状態から復帰させる。
保存状態にしておけば、その間は万が一 Windows
が再起動したりしてしまっても安心というのもある。
また、この保存状態で、筆者は日々、仮想ディスクのバックアップコピーを取っている。
(かなり時間がかかるが)